Using Plastics to Extend the Growing Season & Improve the Climate for Your Garden Plants (All Do-It-Yourself)

Grow Bigger and Better Flowers and Vegetables in the Puget Sound Area
Prepared by Ward Briggs, WSU Master Gardener
Introduction
Nearly all of the flowers and vegetables we attempt to grow in the Puget Sound area are natives of much warmer climates. We know that we have to plant them in just the right soil, use a correct fertilizer and assure that each gets the correct watering, then, if the weather cooperates we will probably enjoy our plants. Usually though, we realize our crop would have been much better if we had had a longer and warmer summer. We can take most of the “if” out of the weather and have a longer growing season too by planting under “plastics” 4 to 6 weeks earlier and providing a climate much like the plants native climate. Gardening is 40 years behind time in using modern plastics. During World War II, cockpits of airplanes were protected by plastic “greenhouses” yet today most gardeners don’t realize what a valuable tool plastic can be. Most think only of a large, walk-in, heated greenhouse. Far more valuable to most gardeners is one that is less than a foot high.
Plastics & Cost
Greenhouses or cold frames have always been built with glass and precise frames that were expensive. Since World War II there have been several new plastics developed that are quite inexpensive and far easier to use. With proper use they can pay for themselves in vegetable production alone. The bonus is in satisfaction and “bragging rights” when you out produce a friend or neighbor. Those most often used in home gardens are:
Corrugated Fiberglass: Usually sold for covering patios. It is semi-rigid and in colors or clear (actually opaque). Use clear. It is 26 inches wide and lengths of 8, 10 or 12 feet. (Use 8′ to start with.) It should last 20 years in the garden. The cost varies, look for sales.
6 or 8 mil: Sold for “storm windows” and it is very clear. Rolls of 3 to 5 feet are sold by running foot. It should last 4 to 7 years and more with proper care.
4 mil: Normally sold in 10 x 25 foot sizes of black or clear (opaque) and is folded and rolled. It will usually last one year. Late fall winds may tear it.
3 mil: Not recommended. Same as 4 mil but usually will not last the full summer. NOTE: There are several rigid plastics that may be better than these, but they are quite expensive and tricky to use. Do not start with them.
Physics of Using Plastics or Glass
Wind: “Wind Chill Factor” is now a familiar term. We know that at 50 a damp wind can make you feel like you are freezing and you suffer. Plants also suffer – growth slows, stops or worse. Plastic stops winds. In windy locations control of the wind alone may have a great change in plant growth.
Heat Accumulation: Even on cloudy days sun rays reach the ground. On very cold winter days, full sun can raise greenhouse temperatures 60 to 90 degrees. Even the opaque plastics allow over 90% of the sun rays to pass through. Most of the heat is absorbed by plants, soils and other materials. Rays reflected off these objects are of another wave length that does not escape the plastic readily. It reflects from surface to surface causing further heating. Without wind to carry it away, heat accumulates rapidly.
NOTE: A walk-in greenhouse of all plastic is not efficient. Full plastic allows much of the sun rays to pass through. If the north wall is wood or any non-transparent material it will be much more efficient. A solid north wall will absorb heat and also reflect the remainder back onto inner surfaces.
9 Years of Trials
I have been testing and improving several types of structures and materials for the past 9 years. I have learned much by trial and error. You will gain by following the evolution of some of the structures. If you see why I made changes, you can not only be spared of my mistakes, but better understand how to use each type of structure.
My Gardens
The first two years I lived in Kirkland; the next four years in Edmonds and the last three years in Arlington. The last killing frosts in Arlington were at least 2-3 weeks later than those in Edmonds with those in Kirkland somewhere in between. The total growing degree days (cumulative total of degrees above a specified base) showed a reversed order, with Arlington getting the most and Edmonds the least. In other words, Arlington has the greatest temperature extremes of the three sites but in total during the growing season, it is the warmest spot and Edmonds is the coldest.
My Goal
“Without using artificial heat, to provide ideal heat and humidity for hard to grow plants.”
Test Plant
The tomato is a tropical fruit and if I could succeed with tomatoes I could grow others easily (6 of the past 8 years I have had ripe tomatoes in June).
First Year Tests
Commercial Structures: I looked at small “greenhouses”. I also looked at “mini-greenhouses” for windows and gardens. I eliminated the “mini” for cost and obvious faults. I eliminated the walk-in greenhouses for cost and the inefficiency of not having a solid north wall. I knew I could build a better and cheaper one on the south side of my barn (dark red or black inside the north wall is ideal). I used corrugated fiberglass and wood for an 8′ x 16′ shed, 8′ high (see figure 1).
FIG 1.

I’ve since built another using fiberglass roof and 8 mil walls-easier to build but will need new 8 mil after 4 years.
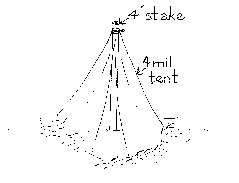
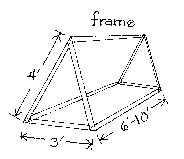
For my first year of tests I also wanted smaller structures to see if they were more heat efficient: I built a frame (figure 1) 6′ long with 4′ sides and 40″ base. I covered it with 4 mil. I also made a tent over a 5′ pole. I wired 4 mil about 3′ above the ground and used soil to hold it sealed into a tent shape.
I purchased tomato plants as soon as they were available. I planted 1 per tent, 6 in the frame, 12 in the house, and several outside. All plants surpassed those outside, but I was surprised that those in the tents grew far faster than the others. Next was the frame and the house was slowest until blossoms appeared and I had to reduce the heat by uncovering the others (tomatoes will only set fruit well between 55 and 95 ). With the tents and frame removed, the housed plants gained and all produced heavily – and early. Why had early growth been best in the tent? Heat confined to lower area? I decided to test that in several ways the next year.
Second Year Plan
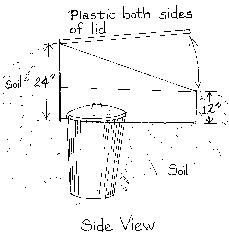
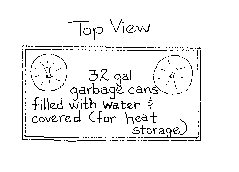
I decided to bring several tents inside the house. I also built another “frame” with 24″ sides and base. Both would confine more heat to the soil and lower areas. I also decided to build a simple “solar cold frame” (by definition: soil insulated with 2 separated layers of plastic lid and with provision for heat storage (see figure 2).
FIG. 2 – Simple Solar Coldframe
That year I started tomatoes, cabbage and marigolds in the coldframe to get an earlier start. I transplanted tomatoes into tents, frames, house and tents inside the house. I left 2 in the cold frame along with sample cabbage and marigolds. I used bush type tomato plants. (Patio or Pixie). I also used shorter tents (2′ high).
Second Year Results
- The shorter (2′) frame plants grew faster than in the taller (4′) frames.
- Inside the house the tented plants grew about twice as fast as the others. (Inside the tents were even more effective than outside.)
- In the cold frame the plants compared well to those tested in the house but I had difficulty controlling the heat.
By May the tomato plants were about a foot high, the cabbage and marigolds about 2 inches less. I had also started 2 cantaloupe plants. On warm days I had to open it at 6 A.M. before I left for work. One late May day, forecast cold day turned warm and by noon reached 72 . When I returned about 4 P.M. my worst fears turned out to be a blessing and fine education.
I could not see into the coldframe because there was a solid mass of large water drops hanging from the inner plastic (8 mil clear). When I lifted the lid it rained hard, inside and the temperature was at least 150 (my thermometer stayed peaked at 135 for about 5 minutes). The tomato plants had grown about 4 inches, the marigold 3 inches, and the cantaloupe had sprouted 8 inch runners all in 24 hours. All plants had excellent color. Only the cabbage had not benefited from the very high humidity and heat!
I was able to monitor the coldframe the next 2 days of similar weather. The thermometer reached 135 around noon. The plants continued very vigorous growth until they touched the lid. (When leaves contact plastic in sunlight, that part of the leaf gets “boiled” – and dies. The plant is not damaged, however.) It was educational to learn that plants would thrive on such high temperatures provided the humidity was also high. I decided to test further measures my third year.
Third Year Plans
I wanted to replace the frames for raising tomatoes with a permanent and more versatile “hut”. I wanted to be able to have early heat close to the ground and also have vent flaps to ventilate once the plants bloomed. Through design evolution the “huts” have proven very efficient. (Figure 3 is the current design.)
Figure 3A Tomato Hut
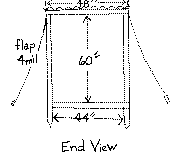
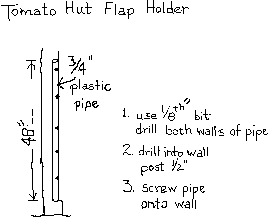
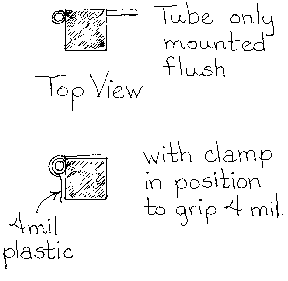
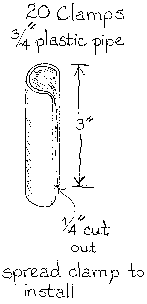
Figure 3B – Flap Holder Detail
I also decided to try a better type of “tent” to use inside the house. I built 3 “tunnel boxes” by bending 8′ lengths of corrugated fiberglass into arches, plugging the ends with boards and providing a center support (Figure 4 – to be added). This made a light weight box that would contain the heat very close to the ground, warm the soil, and assure very high humidity.
Third Year Tests
The Hut worked very well. I could ventilate during the summer and also protect the plants into fall dew and light frost. (A problem of wind blowing and tearing the big flaps was a problem I did not solve until the 8th year. However the plastic tubing and clamps are a must (See Fig. 3B).
The tunnel boxes worked far better than expected and led to the best discovery of all. I used them inside the house (and now use them inside the “hut” also) to cover tomato plants as small as one inch tall. One tunnel covered several plants. They grew even faster than they had in tents and were much easier to care for. I removed the tunnel when the leaves touched it and began to burn. By then the weather was warming and I had planted several vegetables in my garden. I used the tunnels to cover parts of bean and beet rows just planted.
In both cases the results astounded me. The plants under the tunnels reached 8 inches by the time the rest of the row reached 2 inches high. (I have since had the same results with all vegetables – including squash and transplantings.) I made more tunnel boxes and many more tests. I covered the ends of 4 rows of corn. The corn was up in 4 days. Those plants were ripe on July 28th – a full month ahead of the remainder of the rows.
So, in working with tomatoes I had indeed found a way to start vegetables or flowers at least a month earlier. Great! But I also created 3 problems for myself:
- I found that I wanted a tunnel box that was tall and narrow for tomatoes, corn, etc. but when I wanted to plant a wide row of carrots or beets I wanted a wide, lower tunnel box. As a result I had to build many of each for varied uses. I built 10 and wanted more but:
- Winter storage of the tunnel boxes was a big problem. They had to be inside or well tied down from the winter winds. I constructed several using screws vs. nails so I could dismantle them in the fall but this was not fully satisfactory.
- Strong winds often blew the boxes off the plants. I discovered that instead of building boxes I could use stiff wire to hold the panels in the shape I desired. I could then stand a piece of plywood at each end, and have a temporary “tunnel” that was very easy to dismantle. Wires also eliminated a need for weights on the boxes during strong winds. Also I could overlap the sheets and make the tunnel as long as I wanted. (I now use tunnels as long as 140 feet.) Now, I can store 100 sheets of fiberglass, the wires and end boards in about the same space that 2 tunnel boxes take. You may not want the 4 loops I use in each wire but I find them easier to use.
Ranking the Usefulness of Structures
Tunnels: The most important of all. The panels pay for themselves each year and appear to last at least 20 years. I use the same panels as much as 5 times each year as follows:
- Peas January 10 to about March 10
- Beets March 10 to about April 10
- Bush Beans April 10 to about May 30 (Normal last frost date where I line)
- Summer Squash May 30 to about June 20
- Winter Squash June 20 to about July 15
During the same period other panels get limited use starting all other vegetables – including a few corn row ends. You can use them to revive last year’s swiss chard for early greens as early as March, may on strawberries?
2′ Frames: Storage may be a problem. I use each 2 or 3 times each year. I cover last year’s swiss chard in march. In early April I use a tunnel inside them and plant bush type tomatoes. May or June I cover a few squash too large for tunnels. I do the same for some very early ripe corn.
4′ Frames: Limited use. Not recommended at first.
5′ Frames: To love tomatoes is to love the hut – especially if you don’t have a greenhouse. I suggest you raise mostly bush type tomatoes and buy a tomato fertilizer that has “Boron” in it.
I plant 1 inch seedlings, in early April, under a tunnel within the hut and leave the tunnel in until the leaves begin to burn. When I remove the tunnel I stake, fertilize, and close tight until blooming, then ventilate and water as required.
Walk-In Greenhouse: If you have good sun and an available north wall for it, you will find a lot of pleasure at little expense. If its 8 x 16 or 6 x 6 feet you will enjoy it. On the north (solid) wall of mine, I have a small work counter and at the same height several discarded kitchen sinks. I not only form a small tent over the sinks to start plants but I grow tomato and pepper plants in them. (Starting plants I water only with warm water.) I start squash, lettuce, kohlrabi, etc. in pots right on the ground and covered with a tunnel. Full size tomato plants consistently reach the 8 foot roof and continue to ripen through several frosts.
CAUTION: Be sure to provide large panels that can be opened in hot weather. In hot weather, keep the humidity high. Watering even the walkway, if necessary, will help. Using corrugated fiberglass is less costly over a long period, but it is nice to see through the clear 8 mil plastic. If I build another one, I will use the fiberglass except 8 mil on the door and vent panels.
Cold Frame: Without a walk-in greenhouse, a cold frame is excellent. I have not used mine as much as I should have. I know I can have plants ready to transplant in April. I know I can raise cantaloupe and small watermelon and I know I can raise many greens most of our winters.
Black Plastic: I have found I can seed or transplant through one inch holes in black plastic and gain both soil heat and water retention. In most cases I form the soil into a shallow trench so rain will water for me. You can also use a tunnel or frame over it for more early heat. Cucumbers grow especially well in black plastic.
Indoor/Outdoor Carpet: Water penetrates carpeting, lay it as flat as possible. One inch holes suffice for seeds or transplants because heating and moisture circulation are very good. Black or red carpeting is best; green or blue poorest (but you can use any you have).
Other Options: Use your imagination and materials at hand. I hope that the principals & experiences given herein will give you a few ideas. Those who plant in old rubber tires have another tool now. What about a “see-thru” bubble umbrella? Pull off the handle grip and shove the rod into the soil. How about elevating that planter and heating the air below it using black plastic?
Advice
Watering Under Plastic: Larger structures require the most waterings. A greenhouse may require water daily. The tunnels usually do not require water. Let’s look at circulations in the tunnel and see why. Consider that the soil is well cultivated and watered at planting time (approximately 50% soil, 25% air and 25% moisture). Two cycles move both air and water each day. In daylight, (figure 6A – to be added later…) as the air heats, it absorbs moisture from the soil. As this happens, air is drawn into the soil to replace it. At night, (figure 6B – to be added later…) the air is cooled by the glass and very heavy dew and rain actually occurs. The water re-entering the soil forces air back out. There has been little if any loss of water. Unless plants appear wilting, watering is not required. If you do water, do not remove the tunnel. Water along the side. Let the water sink into the soil and be drawn up.
Watering in the frames is quite similar to the tunnels. In any of the structures heavy dew in the morning and around dusk indicates that the air has been saturated all day too.
Slugs: Ever hear slugs singing “Its June In January”? Tunnel your pea row in January and you will! You have created warm moistness and they will find it. Bait them inside the frame and reduce populations later. Pets nor rain will disturb bait and the tunnel (or frame) turns out to be a trap. Bait often.
The Extension office would like to hear from you about any innovative ideas that worked well for you. Help us catch-up on those 40 years we were behind. Your Extension office frequently offers classes on gardening and related topics in your neighborhood. Call 425-338-2400 to find out what’s happening.
Extension programs and employment are available to all without discrimination.
Evidence of noncompliance may be reported through your local Extension office.
Alternate formats of our educational materials are available upon request for persons with disabilities.
Please contact us for more information.