Bokashi
What Is Bokashi Composting?
Bokashi is an anaerobic fermentation system for managing food waste using a sealed container and an inoculated bran made of beneficial bacteria and yeast. Rather than decomposing materials like traditional composting, Bokashi ferments food scraps, preserving nutrients while preventing rot and harmful emissions. The process produces a nutrient-dense pre-compost that must be buried in soil or finished in another compost system to complete breakdown.
Because fermentation occurs in a closed environment, Bokashi produces very little odor and safely processes materials typically excluded from other systems, including meat, dairy, and cooked foods. The high acidity of the process suppresses pathogens and weed seeds. A liquid byproduct (leachate) is generated during fermentation and can be used in diluted form to support soil biology or poured into drains to help reduce organic buildup.
While Bokashi requires an ongoing input of inoculant (commercial or DIY bran), it offers a high nutrient return, diverts all food waste from landfills, and supports carbon-conscious waste management when paired with proper soil integration.
Why Choose Bokashi
- Anaerobic, sealed process – Operates without oxygen, resulting in minimal odor and clean indoor use.
- Accepts a wide range of food waste – Handles meat, dairy, cooked foods, and scraps that traditional compost systems exclude.
- Low-maintenance and clean – Requires minimal management beyond layering, compressing, and sealing.
- Fast, predictable processing – Fermentation occurs quickly (about 10–14 days after filling) and works year-round.
- Small-space friendly – Ideal for apartments or homes without yards or outdoor compost access.
Getting Started With Bokashi
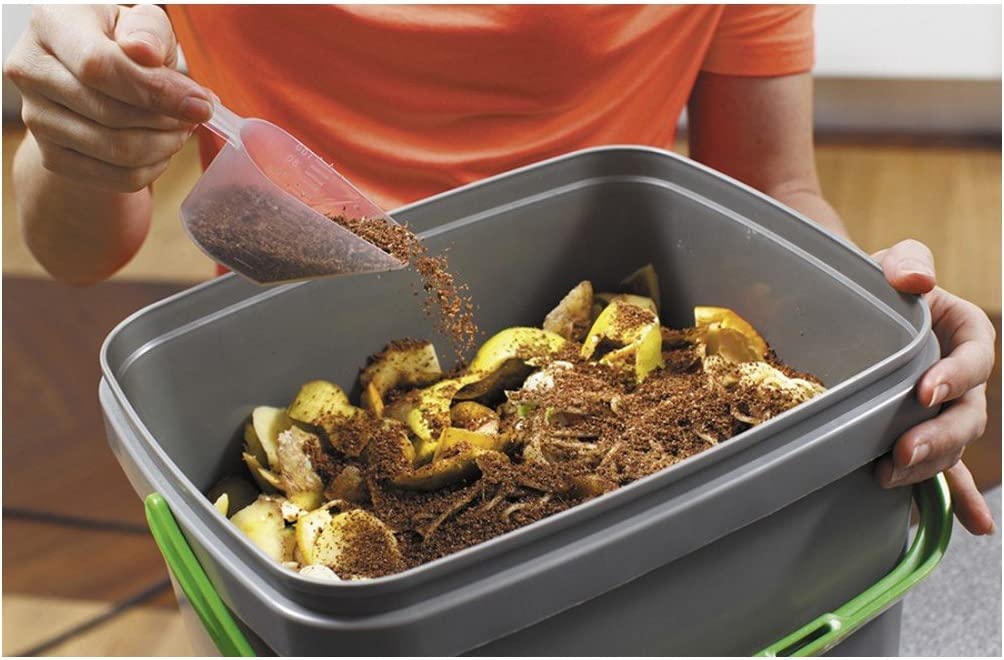
To start bokashi composting, you need a special container, called a bokashi bin, and a microbial inoculant known as bokashi bran. The bran is a mix of wheat bran or rice hulls infused with beneficial microorganisms, including lactic acid bacteria, yeasts, and phototrophic bacteria. These microbes ferment the food waste rather than allowing it to rot.
- Collect Your Food Scraps
Unlike traditional composting, bokashi allows you to compost almost all types of food waste, including fruit and vegetable scraps, cooked food, dairy, meat, and even small bones. - Layer with Bokashi Bran
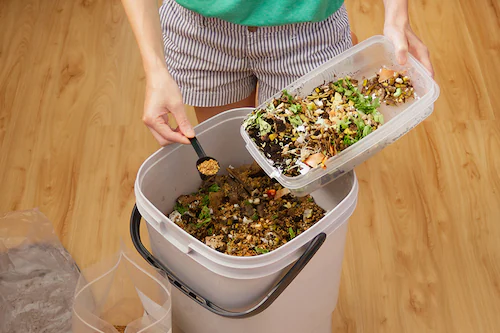
Every time you add food waste to the bin, sprinkle a handful of bokashi bran on top. This introduces the beneficial microbes that will ferment the material. - Press Down and Seal the Lid
Compact the food waste slightly to remove excess air, then tightly seal the bin. Since bokashi is an anaerobic process, keeping air out is essential. - Drain Liquid Regularly
As the food ferments, it releases a nutrient-rich liquid known as bokashi tea. This should be drained every few days to prevent unpleasant odors. Bokashi tea can be diluted and used as a powerful natural fertilizer for plants. - Let It Ferment for Two Weeks
Once the bin is full, allow the contents to ferment for about two weeks. The food waste won’t decompose completely but will develop a pickled smell, indicating successful fermentation. - Bury in Soil or Add to Compost
After fermentation, bury the material in a garden bed or mix it into a traditional compost pile. Within a few weeks, it will fully break down, enriching the soil with nutrients and beneficial microbes.
Bokashi material, as a fermented pre-compost, is not finished compost. It is acidic and biologically active and must be mixed with soil to complete decomposition. Do not leave it exposed or apply it like mulch.
Once the bokashi process is complete, the pre-compost material can be incorporated into your garden in several ways:
- Direct Soil Burial (Most Common)
- Soil microbes neutralize acidity, complete mineralization, and stabilize nutrients.
- Steps
- Dig a trench or hole
- Add 1–2 inches thick of Bokashi material
- Mix thoroughly with at least 2–3 times its volume in soil so it’s not solid Bokashi
- Cover completely so no material is exposed
- Firm soil lightly to remove air pockets
- Wait before planting
- Width: wide enough to mix material with soil
- Minimum: 2 weeks Ideal: 3–4 weeks
- Cooler soils may require longer
- Depth: 8–12 inches
- Garden Bed Rotation (High Efficiency)
- Best for: Annual vegetable beds, Raised beds, Continuous soil improvement. This method avoids disturbing crops and steadily improves soil biology.
- Steps:
- Bury Bokashi in a section of the bed not currently planted
- Rotate planting into that area 3–4 weeks later
- Repeat burial in the next open section
- Incorporation into a Compost Pile or Bin
- Best for: Hot or cold compost systems or Large Bokashi volumes
- Steps:
- Add Bokashi material as a green input
- Bury it in the center of the pile
- Balance with browns (leaves, straw, cardboard)
- Cover completely to avoid odors or pests
- Holding Bin (Urban & Small-Space)
- Best for: Apartment dwellers, Winter storage, Gradual garden use
- Steps:
- Fill a tote or bin with soil or finished compost
- Mix Bokashi material at a ratio of 1 part Bokashi : 3 parts soil
- Keep moist but not wet
- Let sit 3–6 weeks
- Use resulting soil blend in beds or containers
- Method 5: Tree, Shrub, and Perennial Application
- Best for: Established trees and shrubs
- Steps: (Important – Never place Bokashi directly against roots or trunks.)
- Dig holes outside the drip line
- Depth: 10–12 inches
- Mix Bokashi thoroughly with excavated soil
- Backfill and water lightly
What NOT to Do:
- Do not surface-apply or mulch with Bokashi
- Do not plant immediately
- Do not concentrate large volumes in one hole
- Do not leave Bokashi exposed to air
Visual & Sensory Indicators of Success:
- Sour smell disappears within 1–2 weeks
- Soil becomes darker and crumbly
- Earthworm activity increases
- No lingering odor at burial site
Key Timing Guidelines
| Situation | Wait Time Before Planting |
|---|---|
| Warm, active soil | 2 weeks |
| Cool or compacted soil | 3–4 weeks |
| Containers | 4+ weeks |
- Chop large food scraps into smaller pieces to speed up fermentation.
- Keep your bin sealed tightly to maintain an anaerobic environment.
- Drain bokashi tea regularly and use it as a fertilizer to prevent liquid buildup.
- Use enough bokashi bran – If the waste starts to smell foul instead of pickled, add more bokashi bran to balance the process.
Key Principle to Remember
Bokashi is fermentation, not decomposition – It should have a sour, tangy, pickled, vinegar-like smell (not sulfur, rot, or ammonia)
If it smells sour, stays sealed, and is inoculated well, the system is working—it’s not going to look like traditional compost.
- Strong Rotten or Putrid Odor (Not Sour / Pickled)
- What it means: Anaerobic fermentation failed and putrefaction is occurring.
- Fix:
- Add a generous layer of bran immediately
- Compress contents firmly to remove air
- Drain leachate daily
- Ensure lid gasket is clean and sealing fully
- Chop future food scraps smaller
- Visible Mold Growth
- White Mold (GOOD)
- What it means: Healthy fermentation is occurring — this is ideal
- Green, Black, or Blue Mold (BAD)
- What it means: Competing fungi or aerobic contamination
- Common causes: Air exposure, Insufficient inoculant, High moisture
- Fix:
- Remove visibly affected material if extensive
- Add extra bran
- Compress firmly
- Improve drainage
- If mold dominates the bucket, discard and restart
- White Mold (GOOD)
- Excess Liquid or Slimy Contents
- What it means: Overly wet environment stressing microbes
- Common causes:
- High-moisture foods (fruit, soup, leftovers)
- Not draining leachate
- Adding liquids directly
- Fix:
- Drain spigot daily
- Add dry absorbent material (bran, shredded paper, cardboard)
- Avoid adding soups, sauces, or free liquids
- Tilt bucket slightly toward spigot if needed
- No Fermentation Smell / No Visible Change
- What it means: Microbial activity may be too weak or stalled
- Common causes:
- Old or improperly stored bran
- Cold temperatures slowing microbes
- Too little inoculant
- Fix:
- Increase bran per layer
- Store bucket in a warmer location (ideal: 65–85°F)
- Replace bran if it smells musty or neutral instead of yeasty/sour
- Fruit Flies or Insects Inside Bucket
- What it means: Oxygen and access point exists
- Common causes:
- Lid opened too frequently
- Lid not sealing
- Food exposed between layers
- Fix:
- Add bran immediately after each food addition
- Keep food fully covered
- Open bucket briefly and infrequently
- Clean lid and rim to ensure seal
- Food Still Looks “Fresh” After Fermentation
- What it means: Normal for Bokashi — fermentation preserves structure
- Key clarification – Bokashi does not break food down visually
- It chemically and microbially alters it
- Check instead –
- Sour smell
- White mold
- Softened texture
- Action – Proceed to soil burial or secondary composting as normal
- Bucket Swelling or Pressurized
- What it means: Gas buildup from active fermentation
- Common causes: Highly sugary inputs (fruit, bread) or Very active microbes
- Fix:
- Briefly “burp” the bucket if needed
- Ensure spigot is functioning
- This is usually not harmful if odor remains sour
- Soil Smells Bad After Burial
- What it means: Too much Bokashi in one spot or shallow burial
- Common causes:
- Large volume buried at once
- Insufficient soil contact
- Cold or biologically inactive soil
- Fix
- Bury deeper (8–12 inches)
- Mix with more soil
- Reduce volume per burial site
- Allow 2–4 weeks before planting
- Plants Struggling After Application
- What it means: Acidity not fully neutralized
- Common causes:
- Planting too soon
- Bokashi too concentrated
- Fix:
- Wait longer before planting (minimum 2 weeks)
- Blend Bokashi thoroughly into soil
- Avoid direct root contact
Bokashi Overview Resources
- Bokashi Composting: Scraps to Soil in Weeks by Adam Footer
- An Earth Saving Revolution: A means to resolve our world’s problems through Effective Microorganisms (EM) by Teruo Higa
- Teaming with Microbes: The Organic Gardener’s Guide to the Soil Food Web, Revised Edition by Jeff Lowenfels & Wayne Lewis
- Better Bokashi…better earth by Todd Veri
*Note: WSU Extension does not endorse specific products. These are provided as an example of what and where you can purchase some of the necessary items.
Greatly reduce the cost of this system, while also gaining some great additional benefits of the EM solution as a household cleaner and much more.
- Bokashi Composting Ulster County Resource Recovery Agency
- Uses, Recipes & Ingredients by Bokashi Research
- How to Make EM1 Effective Microorganism: 3 Recipes by Zenyr Garden
Funding for this education is provided by Kitsap County Public Works, Solid Waste Division.