
Greenhouse
Construction
and Management
Updated and revised by,
Noelle M. Hart, Curriculum Coordinator, Master Gardener Program, Washington State University Extension
Excerpted and adapted with permission from material published by National Center for Appropriate Technology (NCAT) in collaboration with the United States Botanic Garden (USBG) and City Blossoms. The full publication (Greenhouse Manual: An Introductory Guide for Educators (opens in new window)) is freely available.
Original chapter from the 2011 Washington State University Extension Master Gardener Manual by:
Kurt Schekel, Department of Horticulture and Landscape Architecture, Washington State University
Teresa Cerny-Koenig, Department of Horticulture and Landscape Architecture, Washington State University
Jamie Holden, Department of Horticulture and Landscape Architecture, Washington State University
Introduction
This chapter covers various styles, equipment, and management approaches for greenhouses, with a focus on hobby greenhouses (i.e., small greenhouses for personal use). A greenhouse is basically an enclosed space that is heated and lit by the sun. Shortwave solar radiation passes through a layer of glass or other transparent or semi-transparent material and heats up surfaces like the ground and plants inside the greenhouse. Because of their nature, greenhouses also make it possible to control variables such as temperature, humidity, and light.
Home gardeners use greenhouses to extend the growing season (e.g., start vegetable seedlings), overwinter cold-intolerant plants (e.g., citrus trees), or grow plants that need specialized environments (e.g., tropical orchids). Greenhouses can also protect plants from extreme weather events and from pests and disease (although once introduced, pests and diseases are hard to eradicate).
A greenhouse can be rewarding but also takes hard work, money, time, and diligence. Starting a greenhouse project requires careful advance planning. Your choice of type of greenhouse will depend not only on your primary reason for building the structure—what plants you wish to grow—but also the amount of growing space desired, available building sites and conditions on those sites, access to natural light, surrounding architecture, and costs. Once built, you must manage for the plants’ needs for temperature, light, water, and nutrients, as well as provide protection from pests and disease.
Types of Greenhouses
Freestanding Conventional Greenhouse
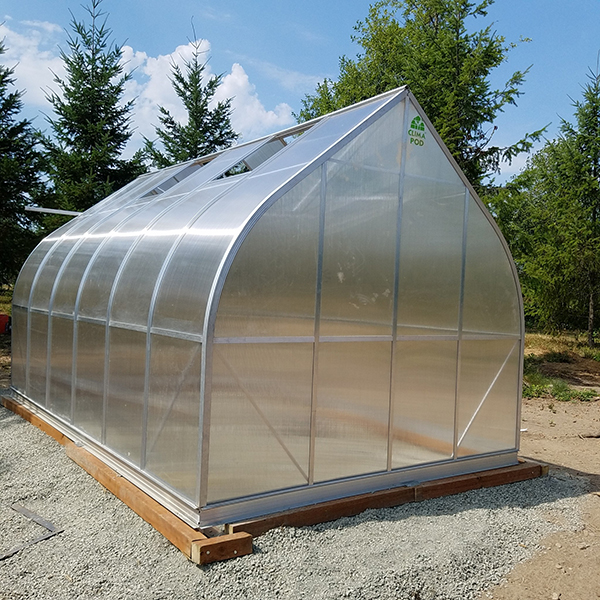
This is the model most people picture when they think of a greenhouse. It is the most common design with the support structure made of wood or metal posts and glass or translucent polycarbonate glazing panels as the covering material (Figure 1). Though these can be built by hand, they tend to be very labor intensive. Models can be purchased as kits of various sizes or professionally installed. Kits are available from small scale hobby use (around 8 ft ×12 ft) to industrial sizes that can be more easily set up with heating and ventilation systems. These are appropriate if you are sure your greenhouse will be a permanent structure and there is a large enough budget to cover the building costs. This is especially true if a foundation needs to be built, and amenities like ventilation systems, lighting, water access, and electricity added. It would be difficult to add these systems after construction, so funding for the whole installation should be secured beforehand. Freestanding structures tend to provide more even light distribution and less shading issues but can be less energy efficient than attached greenhouses due to their large amount of perimeter space from which heat can escape.
Greenhouse Decisions
- Plants—What to grow
- Budget—Construction, maintenance, and utility costs
- Type of structure—Freestanding/attached; permanent/temporary
- Location—Site selection, access to utilities (e.g., electricity)
- Building materials—Covering material, structural support, flooring, insulation
- Planting surface—In-ground/raised bed/benches
- Size—“Decide what size you want, then double it” (advice from a WSU Master Gardener)
- Temperature/humidity control—Heating, cooling, and ventilation systems
- Lighting—Bulb type (if needed)
- Irrigation—Water source, method of water application
- Growing media—In-ground/commercial soil mix/homemade mix
- Fertilizer—Type, concentration, application method
- Pest/disease plan—Techniques for prevention, monitoring, and management
Lean-to or Attached Greenhouse
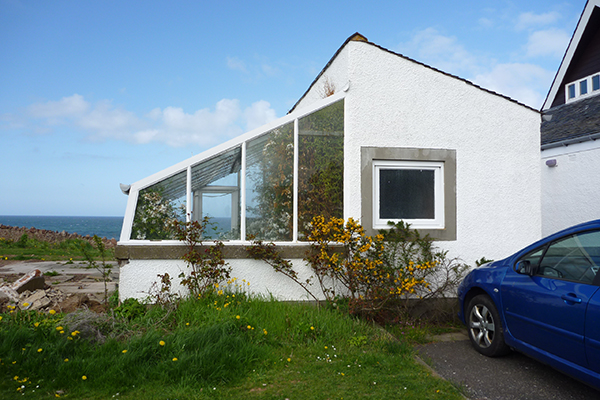
For properties with limited space, an attached greenhouse may be a good option. They are designed to have at least one side connected to an existing building, preferably the south-facing side (Figure 2). However, depending on the greenhouse placement in relation to the structure it is connected to, attached greenhouses may experience shading from the adjacent structure. The size of attached greenhouses is dictated by the length and height of the wall they are attached to, so they tend to be smaller than freestanding greenhouses. A big positive is that utilities like electric and water can be utilized from the existing building.
High Tunnel or Hoop House
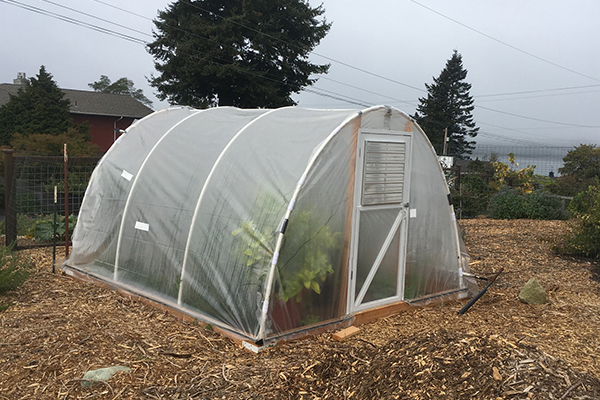
For those looking for a less permanent, more affordable option, hoop houses are worth considering (Figure 3). The main structural difference is that these are made with plastic sheeting. They do not tend to be set up for heating or ventilation and are much more cost-effective. They can also be more easily made to fit specific dimensions. Hoop houses can be purchased as kits. Unlike a greenhouse where the growing environment can be controlled, high tunnels mostly rely on passive heating, cooling, and humidity control. Furthermore, plants are more likely to be grown in the ground in a high tunnel versus containers, which are more common with greenhouse growing. See Chapter 7: Vegetable Gardening for more information on using hoop houses for winter vegetable gardening.
Cold Frames and Cold House
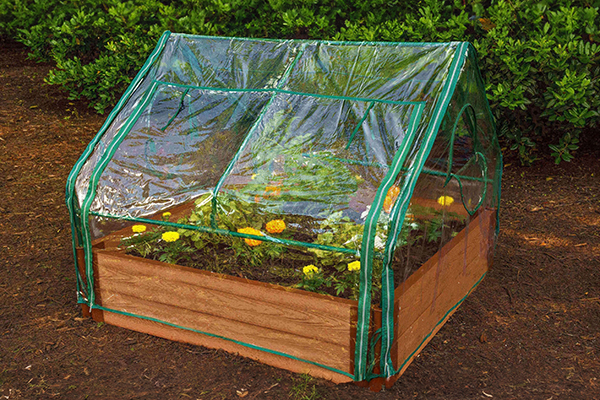
These are not really greenhouses but are a great first project alternative for anyone who would like to begin exploring concepts of greenhouses but does not have the budget or capacity yet to start a larger project. Used to extend the gardening season, the cold frame is the simplest (and by far the cheapest) option. A cold frame is a glass or plastic structural cover over your garden that protects seeds, seedlings, and plants from excessively low temperatures, wind, snow, and rain (Figure 4). Cold frames can be built or purchased. They can be semipermanent and set in one location or transportable to be moved around a garden.
Site Selection
The location of a greenhouse is one of the most important decisions to make. The function and efficiency of the structure in regard to heat gain, ventilation, maintenance, and energy use will be greatly impacted by its placement. The following simple rules can help with proper siting of a greenhouse.

- Be aware of permitting and legal considerations (e.g., county, town, and HOA regulations). Before construction, study all permitting issues. (Also consider any potential impacts to homeowner’s insurance and property value/curb appeal.)
- Place close to utilities. Access to a good water source is critical. If electricity or heating are required, make sure electric, fuel lines, or both can be run to the site.
- Maximize sunlight, especially winter sun. In winter, the sun is lower and shadows are longer than in the summer (Figure 5). The best location for a greenhouse structure is on the south or southeast side of anything that might cast a shadow on it, such as a building or large tree. The least desirable site for a greenhouse is on the north side of anything that casts a shadow on the greenhouse.
- Look for a flat topography. The flatter the area, the easier it is to construct and operate a greenhouse.
- Consider microclimatic effects within the landscape. Small differences in elevation and structure proximity can affect sun exposure and shade patterns and influence temperature variations to moderate soil conditions and air patterns.
- A greenhouse located in a frost pocket (lower area where cool air pools) will have higher heating costs throughout the winter. However, locating the greenhouse on top of a hill could mean greater wind exposure, which can affect heating costs and the selection of construction materials.
- Plan for rainwater. Drainage provisions should be made during construction to ensure that rainwater coming off the structure does not accumulate and that it has a place to run other than into the greenhouse.
Greenhouse Covering Materials
When choosing what material to use for the exterior of the greenhouse (Table 1), consider the following properties:
- Light transmission
- Heat retention (R-value; see section
titled Heating in this chapter) - Longevity
- Structural strength
- Cost (initial and future replacement costs)
- Ease of installation
- Resistance to temperature fluctuations
- Aesthetics
Structural strength of both the framework and the covering material is important to provide the load-carrying capacity of the structure—whether that load is external (snow) or internal (hanging baskets, heaters, supplemental lighting). Local zoning regulations may specify snow load requirements for greenhouse structures.
Table 1. Greenhouse covering materials.| Image | Material | Key Properties | Advantages | Disadvantages |
|---|---|---|---|---|
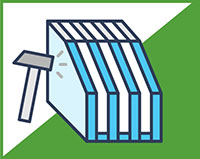
 | Single Layer Glass | Light transmission: 85–90% R-value: 0.9 | • Lifespan indefinite if not broken • Tempered glass is stronger and requires fewer support bars | • Fragile, easily broken • May not withstand weight of snow • Requires numerous supports • Clear glass does not diffuse light |
 | Factory-Sealed Double Glass | Light transmission: 70–75% R-value double layer: 1.5–2.0, low-e 2.5 | • Lifespan indefinite if not broken • Can be used in areas with freezing temperatures | • Heavy • Clear glass does not diffuse light • Difficult to install, requires precise framing |
 | Polyethylene— Single Layer | Light transmission: 80–90% new material R-value single film: 6 mil = 0.87 | • IR (infrared retention) films have treatment to reduce heat loss • No-drop or anti-fog films are treated to resist condensation • Treatment with ethylene-vinyl acetate results in resistance to cracking & tearing in the cold • Easy to install, precise framing not required • Lowest-cost glazing material | • Easily torn • Cannot see through • UV-resistant polyethylene lasts only 1–2 yrs • Light transmission decreases over time • Expands and sags in warm weather, then shrinks in cold weather |
 | Polyethylene— Double Layer | Light transmission: 60–80% R-value double films: 5 mil = 1.5, 6 mil = 1.7 | • Heat loss significantly reduced when a blower is used to provide an air space between the two layers • IR (infrared retention) films have treatment to reduce heat loss • No-drop or anti-fog films are treated to resist condensation • Treatment with ethylene-vinyl acetate results in resistance to cracking in the cold and tearing • Easy to install, precise framing not required • Lowest-cost glazing material | • Easily torn • Cannot see through • UV-resistant polyethylene lasts only 1–2 yrs • Light transmission decreases over time • Expand and sag in warm weather, then shrink in cold weather |
 | Polycarbonate—Double Wall Rigid Plastic | Light transmission: 83% R-value: 6 mm = 1.6, 8 mm = 1.7 | • Most fire-resistant plastic glazing materials • UV-resistant • Very strong • Lightweight • Easy to cut and install • Provides good performance for 7–10 yrs | • Can be expensive • Not clear, only translucent |
 | Polycarbonate Film—Triple or Quad Wall Rigid Plastic | Light transmission: 75% R-value triple walls: 8 mm = 2.0–2.1, 16 mm = 2.5 | • Most fire-resistant of plastic glazing materials • UV-resistant • Very strong • Lightweight • Easy to cut and install • Provides good performance for 7–10 yrs | • Can be expensive • Not clear, only translucent |
Beds and Benches
Many factors determine the type of workbenches or growing surfaces used in the greenhouse. Some crops, such as cut roses, poinsettias, chrysanthemums, and flats of bedding plants, can be grown in or on the ground to reduce costs. Another option is to grow plants in raised beds, which is basically the same idea as in-ground planting except raised beds are built and filled to make access easier.
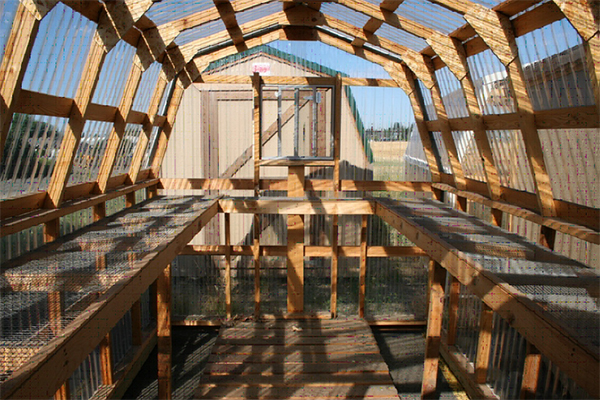
Traditional benches place plants at a convenient height for care and handling, about 30 inches above the floor. A well-designed bench system allows better air circulation around the plants and improves disease control. The air temperature is also warmer at bench level than ground level, and benches are easier to sanitize than the ground is. It is important to maximize growing space when designing a bench arrangement yet be able to conveniently reach all the plants without damaging them. The simplest and least expensive benching structures are wooden or steel frames with mesh wire, snow fence, wood slats, or some other type of rigid supports placed across the frames for supporting the plants (Figure 6).
Wood is one of the most common materials used for frames and surface supports of benches in hobby greenhouses. But remember that the greenhouse environment has high humidity, with irrigation water and condensation commonly present. Wood products such as red cedar and redwood have much longer lives than pine or spruce under these moist conditions. Whether the wood is used for the benches or greenhouse structure, treatments are available that will help extend the life of the wood.
Painting is beneficial for the structure, and paint should be exterior latex—not enamel-based. Enamel tends to peel under wet conditions, leaving the wood unprotected. The paint should be white or a similarly reflective color to improve the light reflection into the plants.
For shelving or workbench tops, galvanized wire mesh or expanded metal are more expensive than wood but are stronger and can have a much longer life.
Starting Seeds
A hobby greenhouse is a great place to start seedlings. Gardeners start seedlings to begin the growing season earlier. Seed starts enable you to have vegetables to harvest for more of the year and to grow varieties that need long stretches of warm weather to mature. It is a fun gardening activity and allows you to choose from a wider diversity of varieties than you find when buying transplants.
Tip: If supplemental heating is needed, heat mats can provide direct warmth to the seed planting containers.
For information on seed starting and supporting seedlings, refer to Chapter 7: Vegetable Gardening and the Greenhouse Manual: An Introductory Guide for Educators, which can be accessed in the Further Reading section of this chapter.
Controlling Temperature, Airflow, and Humidity
A major advantage of growing plants in a greenhouse is the ability to maintain optimum growing temperatures. Depending on what plants you grow, what time of year, and in what climate, your greenhouse may need to be actively heated or cooled. For example, if you are overwintering a frost-intolerant plant in a region that frequently experiences freezing temperatures and overcast days, you may need heating. If you are growing vegetables during a hot summer, you will need to cool the greenhouse. Ventilation and airflow are important for uniform temperature, managing humidity, preventing disease, air movement (encourages plants to build strength; discourages some pests), and providing plants with fresh air and carbon dioxide.
Heating
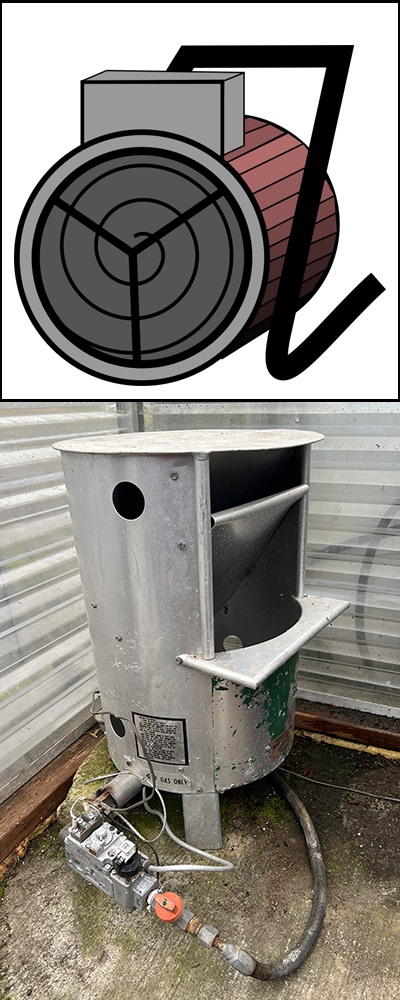
While greenhouse covering materials are an efficient means of converting sunlight into heat, they also allow a lot of heat to escape since they are not particularly good insulators. Depending on your location, this can lead to problems maintaining acceptable inside temperatures. Adding heat to the greenhouse can provide the warmth plants need during periods of cold outdoor temperatures. Heat can be provided in greenhouses through electric hot-air heaters with fans (most common) (Figure 7), hydronic (circulating water-based) systems placed in the floor or on the growing benches, or by adding compost to hoop houses and other structures without electricity. Propane or natural gas heaters are another option (Figure 7), but most of these heaters available for sale today are designed to heat commercial-size greenhouses and would overheat a hobby greenhouse.
Heat is mainly lost by conduction (opens in new window) through the covering. Conduction is the transfer of heat (energy) through a material from an area with warmer temperatures (greater energy) to an area with cooler temperatures (lower energy). For example, on a winter day, the warmth inside a building is conducted to the cold outdoors through the walls, windows, and all other exposed surfaces. Compare insulation capabilities (R-value) when selecting the greenhouse covering material. The cost savings of buying a cheaper cover could be offset by additional heating costs.
Heat is also lost through convection (opens in new window). Convection is the movement of air (or any gas or liquid) that is driven by the natural phenomenon of hotter air expanding and rising, causing cooler air to be drawn in below it. Warm air escapes through the leaks in a structure, drawing cold air in from outside to replace the warm air that was lost. The more leaks, or the colder the outside air, the more energy is needed to heat the drawn-in cold air. Be sure to minimize the potential for air leaks during construction by using well-fitted pieces.
Cooling and Ventilation
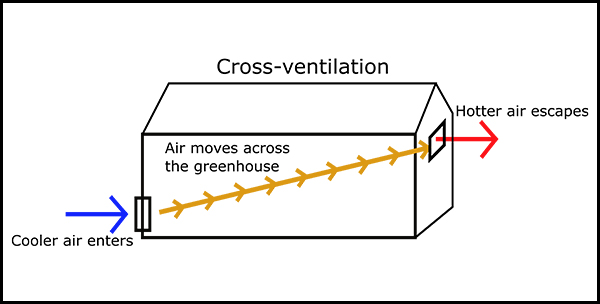
Since greenhouses are designed to capture as much solar heat as possible, they can overheat in hotter weather. Overheating can stunt or kill plants. Sometimes just being able to open doors and vents is enough to get natural ventilation to cool a greenhouse and control humidity. Ventilation is the process of moving, or venting, warm air inside a building to the outside, with cooler outside air entering the building to replace the warm air (Figure 9). The temperature inside the building is lowered if the outside air is cooler. (While heat loss through convection is a bad thing when you need to maintain heat in cold months, the same phenomenon is useful for ventilation in the warm months!) To encourage cross-ventilation, vents can be installed close to the ground on one end of the greenhouse and near the roof on the opposite end.
Electric fans are useful to increase airflow. Horizontal airflow fans (HAF) are used to circulate air inside the greenhouse, distribute heat evenly, and reduce condensation on plant foliage that can lead to disease (see section titled Humidity in this chapter). End-wall fans are big enough to exchange the entire volume of air in the greenhouse with the outside air.
Cooling is the process whereby the temperature of air (or any material) is lowered. Common methods for cooling air temperatures within a greenhouse structure are fan-and-pad systems and shading.
A fan-and-pad system involves mechanical ventilation: fans are located on one wall of a greenhouse with vents and cooling pads on the opposite wall. The fans push air out of the greenhouse, thus drawing air in through the vents and pads. Depending on the temperature of the outside air, the pads may be dry or have water circulating through them for evaporative cooling. With evaporative cooling, the humidity level of the air increases.
Passive Solar Greenhouses
Passive solar greenhouses are designed to capture and store heat from the sun and use it to keep the inside temperatures from dipping too low at night or during cloudy periods. They use what are called thermal mass materials, like water, cement, and soil, to absorb extra heat from the greenhouse during sunny periods and release the stored heat during shaded or dark periods.
The effectiveness of a passive solar greenhouse is dependent on having an airtight structure that is well-insulated on the north-, east-, and west-facing walls. The structure should be oriented as close to true south as possible with the glazing set at an angle equal to the location’s latitude plus 15 degrees (Figure 8). This angle allows low winter sun (Figure 5) to hit the glazing at the optimal angle for heat gain inside the structure.
Solar greenhouses are also usually built to a ratio of one wide to two long to one high to optimize the area of space that needs to be heated. For example, a 12-foot-wide structure would be built 24-feet long and 12-feet high to meet the ratio. All these design features add up to a greenhouse that can maintain minimum temperatures above freezing, even in the northern parts of the country. For more information, see Performance of an Energy-Efficient, Solar-Heated Greenhouse in Southwest Missouri, which can be accessed in the Further Reading section.

A nonelectric cooling option is shade cloth, a woven material that can be draped over sections of the greenhouse to provide cooling shade. Shade cloth is available in varying densities.
Humidity
One of the more important environmental factors affecting plant growth and health is the humidity level, or amount of water vapor, in the air. Problems can occur either when the humidity is too low or when the humidity is too high.
Low humidity can increase plant water stress, because under conditions of low relative humidity, more water is transpired (lost) from plant leaves. If too much water is transpired, water absorption and translocation within the plant cannot keep up. Providing and maintaining humidity levels between 50% and 70% satisfies most plants’ needs for moisture.
By contrast, high humidity with resulting condensation can lead to increased disease problems. At night or under cloudy conditions during the day, a plant’s temperature can be a few degrees cooler than the surrounding air. This temperature difference will result in condensation on the plant if the humidity is high enough.
To reduce the humidity in a greenhouse, a fan from the ventilation system can be used to exhaust the warm, humid air from the greenhouse and bring in cooler outside air. When that drawn-in air warms up inside of the greenhouse, the relative humidity goes down and the air feels drier. Providing good air circulation while holding off on watering for a few days can assist plants in overcoming fungal and disease problems.
High humidity is important for seed germination and for rooting of cuttings. See Chapter 7: Vegetable Gardening for instructions on how to use a plastic bag to maintain moisture when starting seedlings.
Humidity vs. Relative Humidity
Humidity is the amount of water vapor in air.
Relative humidity is a measure of how saturated the air is with water vapor. Relative humidity changes with air temperature, without changing the amount of water vapor present. Warmer air can “hold” more water than cold air can. This is why muggy summer weather makes us feel sticky, and why our skin dries out in the winter.
Lighting
Plants need light to make food, and greenhouses are designed to provide as much natural light as possible. The more exposure a plant has to light, the more it will grow. However, plants can suffer if the light is too intense, too low, or if it does not last long enough. Supplemental lighting can help plants grow when not enough natural light is available during the day and can control the quality and intensity of the light. This is especially helpful during shorter winter days, or in cloudy weather. Additionally, lighting requirements for plants will change frequently as the daylight hours change throughout the year.
Utilizing automatic timers for lights can help ensure that the right amount of light is supplied to plants. Such timers can be beneficial in turning on lights early in the morning and turning them off in the evening. Furthermore, automatic timers save energy and preserve the life of the bulb.
Types of Greenhouse Lighting
The types of lights used in a greenhouse for supplemental plant growth are incandescent, fluorescent, High-intensity discharge (HID), and LED. Each of these types offer varying levels of performance and efficiency, which are reflected in their price.
Incandescent Lights
Incandescent lights are often used as a spotlight on a specific plant or with a small grouping of plants where the light is placed at a minimum of 24 inches from the plant or plants. These lights get hot, and their placement should be carefully considered. Incandescent lights are inexpensive to purchase and have a life span of less than 1,000 hours.
Fluorescent Grow Lights
Fluorescent grow lights are ideal for starting plants because they are traditionally on the blue end of the light spectrum, which favors plant growth. And because they are cooler in temperature, they can be situated within a few inches of plant seedlings. But as the plants grow, the light will need to be raised. These fluorescent lights are quite efficient and can offer up to 20,000 hours of use.
T-8 and T-12 bulbs are fluorescent lights where the T represents the diameter of the bulb. Newer types of fluorescent bulbs are available in the red spectrum to encourage blooming and can be combined in a fixture with a blue bulb. Together, they provide the full spectrum of light required by plants. Additionally, full-spectrum fluorescent lights have come on the market in recent years, as well as T-5 lights, which triple the amount of light output of T-8 or T-12 lights without increasing energy use.
High Intensity Discharge (HID) Lights
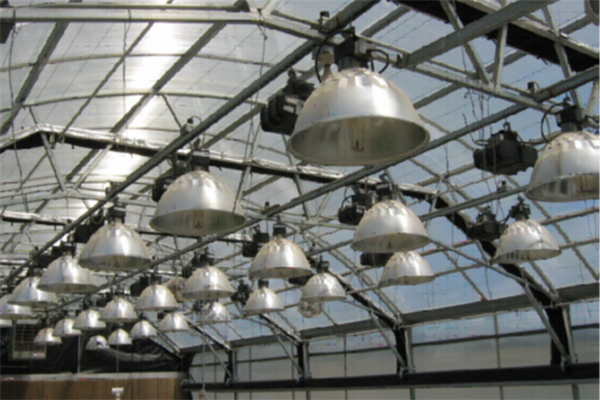
HID lights are used to cover a large growing area (Figure 10). HID lights provide a high output of light from a ballast, allowing them to be hung high above plants. They also produce heat, which can burn plant leaves if situated too close. The height of a HID light is determined by its wattage, and a reflective hood is most often used with HID lights in order to direct light down to the plants.
There are two types of HID lights: metal halide and high-pressure sodium. Metal halide lighting produces a blue light spectrum that closely resembles natural light, thus serving well as primary lighting. High-pressure sodium lights utilize the red light spectrum and can be used as supplemental light for plant growth, as they help prevent leggy plant growth. High pressure sodium bulbs last longer than metal halides but should be changed according to manufacturers’ recommendations. Even though the bulb might still be functioning, using it for too long can result in reduced light output and increased energy cost.
LED Grow Lights
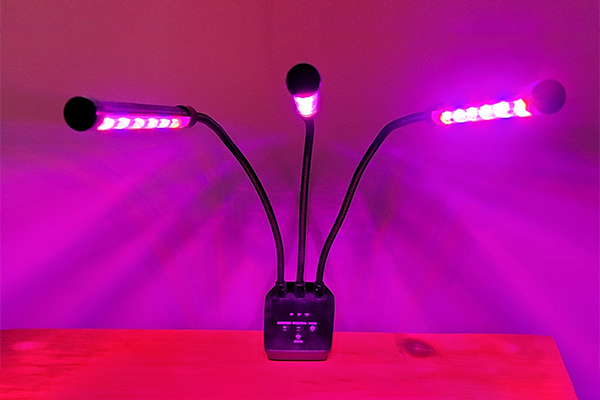
LED grow lights offer a balance between blue and red lights for plants (Figure 11). They are small in size and weigh much less than other types of grow lights. LEDs have a high light intensity and produce almost no heat. While their initial cost is higher, especially in comparison to T-5 fluorescent lights, their life span can average between 50,000 and 100,000 hours and their energy use will be lower.
Energy Efficiency
Greenhouses can be expensive to heat and ventilate, especially if they are operating during winter months in colder regions. Supplemental lighting also requires energy. To be more energy efficient and economical, consider including some of the following techniques in your greenhouse plan:
- Keep the greenhouse structure tight by limiting cracks where air infiltration can occur. Seal door frames with caulk or weatherstripping, and repair any holes in the foundation, doors, glazing material, and around vents.
- Insulate. On new foundations, adding 1 to 2 inches of polyurethane or polystyrene insulation 1.5 to 2 feet deep around the entire foundation can reduce heat loss. On existing foundations that are not insulated, make sure that all cracks and holes are repaired. Walls, including foundation knee walls, can be insulated up to the plant or bench height. Reflective insulation boards work well; however, the reflective surface should not be positioned toward any perimeter heating pipes and a small airspace should be included between the insulation and sidewall to prevent freezing of the wall.
- Add a windbreak to the outside of the north wall of the greenhouse. Planting conifers or utilizing a temporary fence as a windbreak, if possible, can help divert wind up and over the greenhouse.
- Add a thermal blanket or night curtain to prevent heat loss at night.
- Perform annual maintenance on heating systems.
- Utilize HAF fans to circulate air. Keep in mind that making the greenhouse “tighter” will also increase the relative humidity. HAF fans improve the greenhouse temperature and humidity levels.
- Install vents to have the option for natural ventilation, when conditions allow.
- Group plants together based on temperature requirements.
- Use infrared (IR) and anti-condensation treated films to reduce infrared and thermal radiation losses in polyethylene covered greenhouses.
- Use computerized control systems to increase energy efficiency.
- Use low-energy lighting, like LED grow lights.
- Consider alternative energy sources, like solar panels.
- Timers can turn off lights or other equipment automatically, preventing accidental waste of electricity.
Water
Greenhouse plants require the right quantity and quality of water for optimum plant health. Lack of water can inhibit plant growth. Wilting leaves is one sign that a plant is not receiving enough water. Other signs include graying leaves, red or purple leaves, loss of leaf sheen, pest and disease damage, and root damage. Overwatering can also be harmful to plants, particularly young seedlings. Too much water limits the amount of oxygen in the soil, which can be damaging to root tissues. Overwatering can lead to wilting, spindly, leggy stems, and an increase in plant diseases. Overwatering also wastes water.
Factors in determining how often plants need water include:
- Water-holding capacity of potting soil
- Type and size of container
- Greenhouse environmental conditions (temperature, light, humidity)
- Depth of planted seed
- Age of plants
- Type of plants
The importance of using good-quality water to irrigate cannot be overemphasized. Optimum water pH is 5.5 to 7.0. Optimum soluble salt concentrations are 0.2 to 0.5 mS/cm. Young seedlings and certain plants are sensitive to even lower concentrations.
Water softeners should never be used to remove soluble salts from irrigation water because they result in levels of sodium in the water that are toxic to plants. More expensive methods of salt removal include deionization or reverse osmosis. Some waters, especially well waters, may be high in ions such as sodium, chloride, or boron. Bicarbonate (HCO3) and carbonate (CO3) can be present in relatively high concentrations in water having a pH above 7. Over time these ions will raise the pH of the growing media, causing problems with nutrient uptake and availability. They can also cause unsightly white spots on plant foliage.
Water containing high levels of chlorine can be harmful to plants and soil organisms, usually indicated by yellowing leaves along the leaf veins followed by curling of the leaves. Chlorine in water can be dissipated by exposing the water to air and by allowing the water to settle overnight.
Water temperature may affect some plants. While the water temperature may have less of an impact on plants that prefer cooler environments, such as plants in the Brassicaceae family (e.g., broccoli, cabbage, and kale), cold water can cause heat-loving plants to go into shock. Room temperature water, around 70°F, is ideal for tomatoes, peppers, eggplants, melons, cucumbers, and other members of the Solanaceae and Cucurbitaceae plant families.
Irrigation Methods
Watering greenhouse plants can be as simple as using a watering can or as complex as using computerized, automatic systems. Operation of the irrigation system can be manual (a person turns on or off the water) or automated. When choosing your watering method, consider how much time you can spend watering, how much money you are willing to spend, how sensitive your plants are to consistent watering, and your water source.
Hand-Application
In hobby greenhouses, growers typically use a hose to hand-apply water. This method of watering is straightforward and requires minimal equipment. Since someone must be present during watering, it ensures that plant health and greenhouse conditions are regularly inspected. However, watering by hand takes time and can be less water-efficient and less consistent than other methods.
Spray Systems
Spray systems apply water from overhead nozzles. Each nozzle creates a circular water pattern over plants. This system is commonly used for germinating seeds and for bedding plant production.
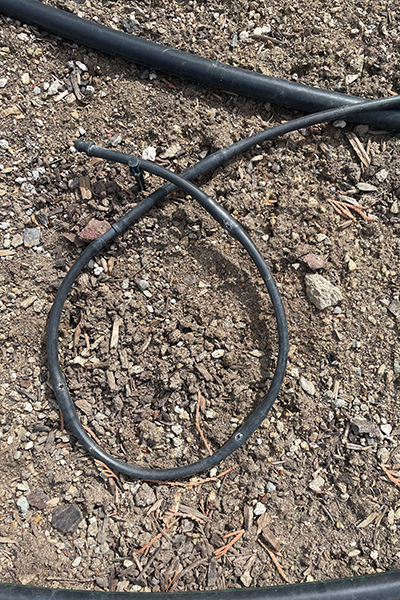
Drip Irrigation Systems
Water is slowly applied to individual pots or localized areas of a bench through drip (“spaghetti”) tubes (Figure 12). The drip tubes are small plastic tubes that are connected to a larger supply tube. The tubes and emitters (tube-end nozzles) come in various types and sizes depending on the size of the plants being watered. Due to the slow trickle of water applied directly to the soil, water is conserved with this system.
Capillary Mats
This is a subsurface irrigation system. A special fibrous cloth mat is placed on a plastic liner or tray on top of the workbench. Pots sit directly on the capillary mat so that as water is applied to the mat, the water is taken up by capillary action through holes in the bottom of the pots. It is important that the benches are level so the water does not all drain to one side, which can cause some pots to be overwatered and others to dry out.
Automated Systems
Using automated timers can reduce the risk of plants drying out and provide a consistent source of moisture that is essential in a greenhouse environment. The simplest automated irrigation system consists of plumbing, a timer, and a solenoid valve (used to turn the water on and off) controlled by the timer. Even though the control may be automated, the requirements of the plant and influences of the environment and growing media must be understood to operate the system correctly.
Growing Media
Unless you are directly planting into the ground (such as inside a hoop house), you will need to acquire growing media for your greenhouse plants. Growing media differs from garden soil in that it should contain higher amounts of organic matter as well as drainage and aeration materials so that plants flourish despite being restricted in a container. It is important for all mixes to:
- Contain readily available nutrients to support healthy plant growth
- Have adequate water and moisture retention
- Provide proper drainage of excess water
- Maintain pockets of air (pore space)
- Be free of pathogens and weed seeds
Premixed commercial media for plant production consist mainly of peat moss or bark plus inorganic components added to increase aeration, bulk density, or water-holding capacity. Wetting agents, limestone, and a nutrient “starter charge” are also added to commercial mixes. Wetting agents allow for more rapid water absorption by the medium. Limestone is added to adjust the pH to 5.5 to 6.5, the optimum pH level for production of most greenhouse crops. A nutrient starter charge provides a small amount of initial nutrients for the plants, but additional fertilizer must be applied throughout a plant’s life to satisfy its requirements.
You can also mix your own growing media using various organic and inorganic components. The only organic constituents that should be considered are materials that have been fully composted or those that are resistant to decomposition. Manures, sawdust, and other fresh organic materials will decompose as they sit in the mix and can tie up nitrogen, causing nitrogen deficiencies in plants. They can also introduce disease and other pests. Be cautious when using fresh organic matter, such as manure, because it can carry weed seeds and herbicides and have high soluble salt levels.
Compost
Compost can provide adequate amounts of nutrients to a soil mix over an extended time. It can also support water retention while still allowing excess water to drain. Compost can add beneficial bacteria and fungi to the mix, which promote plant health. It is important to use high-quality compost that has been managed correctly to ensure that it is fertile and free of pathogens and weed seeds. Compost is ready, or finished, when it feels crumbly, looks dark brown or black, and smells rich and earthy. The initial inputs going in to make compost should not be recognizable when it is finished.
Soil
Soil from a garden or field can provide nutrients and beneficial organisms. Soil can increase the physical structure of the mix when used in proper amounts so as not to negatively affect the aeration or drainage. Add soil carefully since it too can introduce pathogens and weed seeds to the mix.
Peat Moss
Peat moss is an excellent ingredient for retaining water while providing good drainage and aeration. However, there are environmental concerns about using peat moss. Peat moss comes from partially decomposed sphagnum moss, which accumulates very slowly in bog wetlands. The sustainability of peat moss is debatable, given the long time frame for recovery and the ecological importance of wetlands.
Coco Peat
Often used as an alternative to peat moss, coco peat (also called coir) is a byproduct of the coconut industry and a renewable resource. It has the ability to retain water and provide good drainage and aeration. Coco peat also contains small amounts of nutrients. It is important to purchase only coco peat that has been leached of salts, as salt can prohibit plant growth.
Bark
Bark, especially Douglas-fir bark, is used by growers in the Northwest. This bark is fairly resistant to decomposition and is chemically inactive. Hardwood barks should be thoroughly composted before using.
Sand
Sand provides aeration and drainage qualities. Use medium to larger (coarser) particle size, as small particle size sand can reduce porosity rather than improve it, causing drainage and aeration problems. Sand is chemically inert and has limited nutrient-holding capacity. Sand should not be used in polystyrene seedling containers because it can scratch, and the resulting grooves can host pathogens.
Perlite
Perlite is a lightweight, sterile mineral used in soil mixes and soilless mixes to provide drainage and aeration. It has only limited water- and nutrient-holding capacity. It is made from amorphous volcanic glass that is mined and heated at high temperatures, removing the trapped water molecules and causing the perlite to expand.
Vermiculite
Vermiculite is mined mica that has been heated at extreme temperatures in order to allow water molecules to evaporate. It too is sterile and lightweight and provides good drainage and aeration. Vermiculite particles hold water and are effective at holding onto certain nutrients, particularly potassium (K), magnesium (Mg), calcium (Ca), and phosphorus (P).
Pumice
Pumice is a volcanic rock and is mined in eastern Oregon, among other places. This is a common constituent of commercial mixes in the Northwest. Pumice is heavier than perlite but not as heavy as sand and adds water and nutrient-holding characteristics to the mix.
Lime
Lime is used to raise the pH of a soil mix. A pH test can be used to determine how much lime should be added to raise the pH.
Nutrients
Nutrients increase fertility and include macro- and micronutrients and trace minerals. Nutrients can be added individually or together in premade fertilizers.
Fertilizer

Organic fertilizers are available in liquid or dry form. The dry forms are most commonly used in greenhouses as an ingredient in potting mixes and are also applied when seedlings are transplanted into the garden. This is generally because the nutrients are slow to release (there are some dry-soluble fertilizers designed to be dissolved in water). Be certain to moisten potting soil before blending in a dry fertilizer so as not to damage plant roots.
A liquid fertilizer rapidly makes plant nutrients available. The correct amount and frequency of fertilizer applications should follow the directions listed on a product’s label. A fertilizer proportioner system can be used to apply a liquid feed to plants. A siphon injector, or similar hose-on type applicator (Figure 13), attaches directly to a hose and mixes fertilizer into the water. See Fertilizer Injectors: Selection, Maintenance, and Calibration, which can be found in the Further Reading section of this chapter, for information and diagrams for setting up a proportioner system.
Note that backflow (opens in new window) can occur in a fertilizer injection system when there is a pressure drop in the supply line, creating suction and drawing the liquid from the concentrated fertilizer tank or other source backward into the water supply line and contaminating the water line. Various types of backflow prevention devices are available.
The fertilizer type and concentration or rate depends on the plant species being grown. See Chapter 4: Plant Mineral Nutrition and Fertilizers for more information on essential plant nutrients, nutrient deficiency and toxicity symptoms, fertilizers, soil pH, and soil salinity.
Pest and Disease Management
Protecting your plants from pests and disease is a critical part of managing a greenhouse. A greenhouse limits exposure to pests and disease, as compared to plants grown outside. However, when you do encounter a problem, management is often difficult and time-consuming. Integrated pest management (IPM) strategies should be used whenever possible (see Chapter 21: Plant Health Care and Integrated Pest Management).
Sanitation is the first line of defense against pests and diseases in a greenhouse. Sanitation relates to the cleanliness of the growing facility and ensures that only clean plant material, tools, supplies, and irrigation water enter the greenhouse. In addition to following good sanitation practices at all times (see sidebar Good Greenhouse Sanitation Practices), deep clean your greenhouse annually.

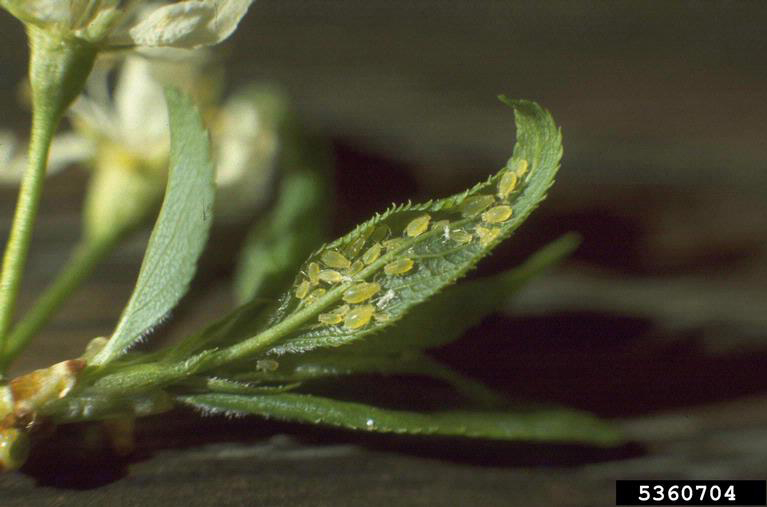
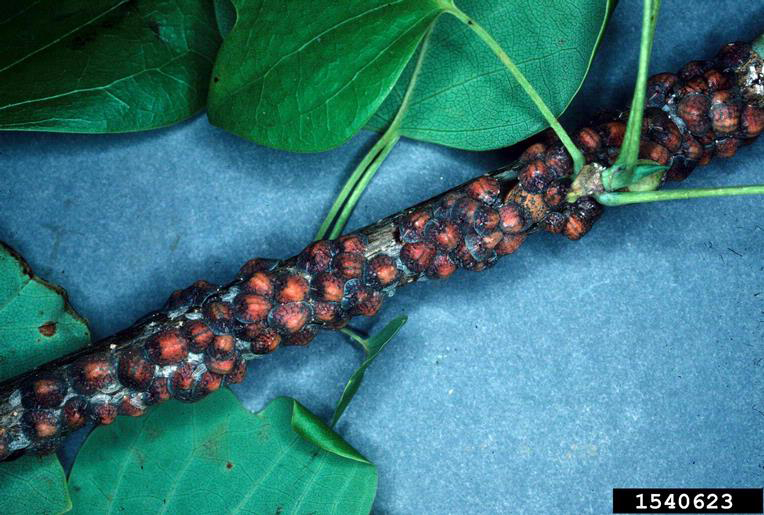
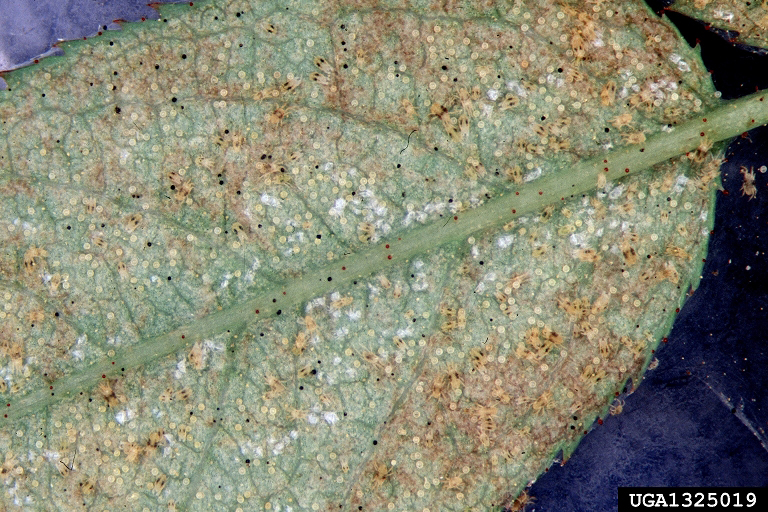
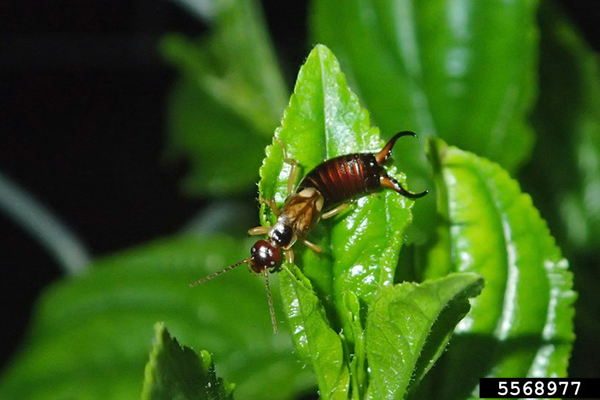
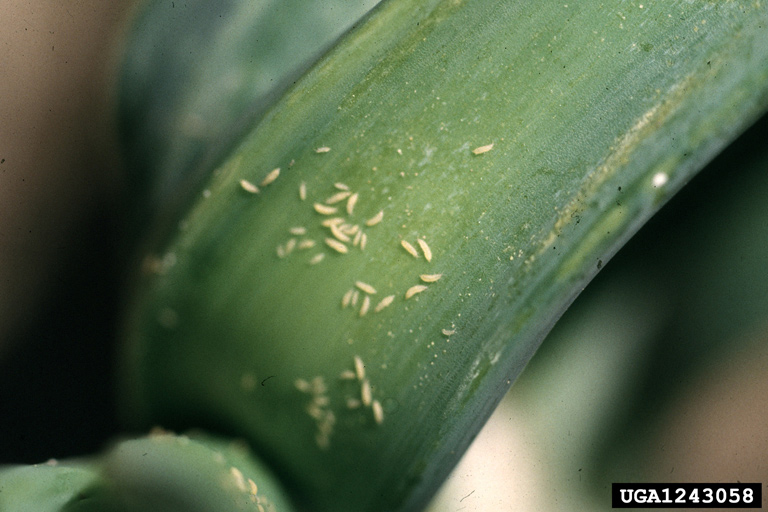
Table 2. Common types of insect pests encountered in greenhouses.

Damping off is a term used to describe a fungal infection commonly found on the stems of young seedlings. The damping off pathogens favor wet, cool environments. Infected plants show grayish, “water-soaked” tissues near the base of the stem at the soil level, causing the stem to wither away. The name of the disorder supplies a clue to control: reduce the dampness. Use only well-drained and sterile potting mixes, avoid overwatering, and provide good air circulation. Additionally, practice good sanitation protocols.
Acknowledgements
Portions of this chapter were excerpted and adapted with permission from Greenhouse Manual: An Introductory Guide for Educators by the National Center for Appropriate Technology (NCAT) in collaboration with the United States Botanic Garden (USBG) and City Blossoms (opens in new window).
Further Reading
Albrecht, M.L. 1998. Hobby Greenhouses in Tennessee (opens in new window). University of Tennessee Extension Publication PB1068. University of Tennessee.
Bartok, J.W. 2000. Greenhouses for Homeowners and Gardeners (opens in new window). Natural Resource, Agriculture, and Engineering Service NRAES 137.
Beytes, C., ed. 2021. Ball RedBook: Greenhouse Structures, Equipment, and Technology, volume 1, 19th edition. Ball Publishing.
Cotnoir, C., and H. Davies. 2020. Ask the Master Gardener—A Greenhouse in Your Garden (opens in new window). Skagit Valley Herald.
Dole, J.M., and H.F. Wilkins. 2005. Floriculture: Principles and Species, 2nd edition. Pearson Education, Inc.
Greer, L., and S. Diver. 1999. Integrated Pest Management for Greenhouse Crops (link to PDF document). Appropriate Technology Transfer for Rural Areas Publication IP144. National Center for Appropriate Technology.
Kessler , J.R., Jr. 2003. Greenhouse Sanitation and Pest Exclusion. Auburn University Extension Publication.
Lamp’l, J. 2019. Hobby Greenhouse Considerations: What to Know Before You Buy (and After You Do) (opens in new window). Joe Gardener podcast and article.
Miles, C., and P. Labine. 2009. Portable Field Hoophouse (opens in new window). Washington State University Extension Publication EM015. Washington State University.
Nau, J., B. Calkins, and A. Westbrook, eds. 2021. Ball RedBook: Crop Culture and Production, volume 2, 19th edition. Ball Publishing.
Pennisi, B., and R. Kessler. 2017. Fertilizer Injectors: Selection, Maintenance, and Calibration (opens in new window). University of Georgia Cooperative Extension Publication 1237. University of Georgia.
Pressman, A., T. Rittenhouse, R. Lemos-Otero, A. Smith, and W. Pohlman. 2019. Greenhouse Manual: An Introductory Guide for Educators (opens in new window). National Center for Appropriate Technology and United States Botanic Garden Publication.
Reed, D.W. 1996. Water, Media, and Nutrition for Greenhouse Crops. Ball Publishing.
Scherr, M., and L. Nackley. 2022. Greenhouse Ornamental Pests. Pacific Northwest (PNW) Pest Management Handbooks (opens in new window). Oregon State University.
Schnelle, M.A., S.H. Dobbs, D.C. Needham, and J.M. Dole. 2017. The Hobby Greenhouse (link to PDF document). Oklahoma State University Extension Publication HLA-6705. Oklahoma State University.
The Hobby Greenhouse Association (opens in new window). n.d.
Thomas, A.L., and R.J. Crawford Jr. 2001. Performance of an Energy-Efficient, Solar-Heated Greenhouse in Southwest Missouri. Southwest Missouri Agricultural Research and Education Center 2001 Research Report. University of Missouri-Columbia.
University of Florida IFAS Extension (opens in new window). Greenhouse Publications.
Washington State University Clark County Extension (opens in new window). n.d. Greenhouse Structures