Vegetable Gardening
Carol Miles, Vegetable Extension Specialist, Washington State University
Connie Mehmel, Chelan County Extension Master Gardener, Washington State University
Introduction
Sustainable gardening means growing plants in an environmentally friendly way. In the vegetable garden, this may include using cover crops to improve soil tilth and nutrition, rotating crops to prevent disease, and choosing an irrigation system that conserves water and reduces disease pressure. Also, making the right choices regarding types of crops and varieties to grow will enable you to produce a healthy crop while reducing the need for pesticides. Many of the practices that we will discuss in this chapter are the same practices that are used in organic gardening. Our goal is to grow a healthy, productive vegetable garden while minimizing outside inputs such as purchased fertilizer and pesticides. In addition, by recycling plant debris through composting you will be able to reduce the amount of waste that your garden produces.
In this chapter we will discuss common cultural practices and techniques to use in your vegetable garden. Some topics such as soils, fertility, and composting are covered in detail in separate chapters in this handbook.
Getting Started
Establishing a successful vegetable garden requires some advance assessment and planning, similar to implementing any landscape design. There are decisions to be made about exactly where the garden will be for best sun access and wind protection, what that site needs in terms of soil enhancement, what sort of beds will be set up, what methods of irrigation will be used, what types and quantities of vegetables will be grown, and so on. Some of these issues are ongoing and can be addressed or modified throughout the growing season or between seasons. Others, such as where the garden sits, are not so flexible. Also keep in mind your own needs as a gardener: if the garden is not where and what you want it to be, you will be less inclined to give it the attention it needs to be sustainable and successful.
Choosing a Vegetable Garden Site
The first step to growing a healthy and productive vegetable garden is selecting a site that has these four important elements:
- Full sunlight.
- Easy access to water.
- Protection from heavy winds.
- Soil with good tilth.
Sunlight
Most summer vegetable crops need at least eight hours of direct sunlight a day. If trees or shrubs are shading your garden, prune branches to allow in more light. If a solid fence is the source of the shade, consider replacing it with a post and rail fence that will let in more light. If you live in a region with low light intensity, paint nearby walls or fences white so they are more reflective. Areas receiving less sunlight may make a good composting site or work area. If the only garden site you have is shady, start by growing crops with low light requirements, such as leafy green crops (e.g., lettuce, spinach, bok choy, mustards), asparagus, garlic, and leeks. If these do well, expand into crops with medium light requirements, such as beans, radishes, and peas.
Water
Regardless of where you live in Washington, if you are going to grow summer vegetables you will need a steady supply of clean water for irrigation all summer long. The easiest way to irrigate is from a water spigot located in or near your vegetable garden. If the spigot is in an inconvenient place, you may want to extend the line and put a spigot closer to the garden. In climates that freeze, bury the pipe deep enough (below the soil frost line (opens in new window)) to prevent it from bursting. Check with your local water company and county building department to learn how deep the soil frost line is in your area and to determine if there are any required permits or procedures for extending a water line. See the Watering section to learn more about how and when to irrigate your vegetable garden to conserve water and optimize crop production. If your garden is very wet during the winter, it will require drainage if you plan to grow winter vegetable crops. Use raised beds and deep pathways to create a drier growing area for winter crops (see the section Raised Beds for more information). If your garden is very dry during the summer, consider making sunken beds (where the soil level of bed is lower than the pathway) to retain water.
Wind Protection
Vegetables tend to be very easily damaged by winds. Not only can plants be blown over but if there are particles of soil in the wind, these will abrade leaves and stems, thereby sandblasting them. If your site is exposed to wind, construct a trellis (it can be as simple as wire fencing secured to posts) and plant a vining vegetable or fruit crop that will take the brunt of the wind and act as a windbreak. Alternatively, plant or build a windbreak so that it protects the garden but does not shade plants. See Trees Against the Wind listed in the Further Reading section for details on planting a windbreak.
Soil Tilth
A deep, loose garden soil that is high in organic matter is ideal, but few gardens start out this way. If you are lucky enough to have such good soil, maintain it by adding compost each year. If your soil is poor quality to begin with, or if you cannot dig more than a few inches deep, or if it is full of rocks, you can slowly improve the soil by adding organic matter several times a year. See the section Soil Management for suggestions on building soil tilth.
Access and Convenience
It is best to plant your garden in an area where you have easy access for maintenance. Vegetables usually require care several times a week so choose a location that is convenient. You will also need to move things in and out of the garden, such as wheelbarrows of compost. If you will be adding compost by the pickup load, make sure the garden gate area is large enough for this.
Site Protection
Another primary consideration for your vegetable garden is fencing. Deer can be a nuisance throughout the state, and they may feed in your garden year-round. If you know there are deer in your area, be prepared to construct an 8-foot deer fence. Neighborhood dogs can also be destructive pests, so fencing them out as well is often necessary. See Chapter 20: Vertebrate Pest Management for methods of dealing with other large pests.
Design
Once you have decided where your vegetable garden will be located, your next step is to design the garden layout. Committing your design to paper helps you plan quantities of seed, mulch, and other materials. It also serves as a record of what was done, to help with future design changes or rotational plantings.
Many gardens often look like smaller versions of farms: long, single rows of vegetables with wide alleys between the rows. If you have lots of land and a rototiller, you may choose this system. If you have limited space or would like to maximize space usage, beds may be a better choice. See the Raised Beds and the Sunken Beds sections for information on how to make each of these bed types.
Pathways
Whether you choose to plant in rows or beds, make the main pathways in your garden at least 3-feet wide so that you can easily use a wheelbarrow. If you use a garden tractor, make sure you have room to drive in and out of the garden and to turn around if needed. If you plant vegetables in long, single rows, allow enough space to walk between the rows for weeding and harvesting. If your garden is arranged in raised beds, pathways between the beds should be wide enough for you to work. Plan to plant, weed, water, and harvest by reaching into the bed while standing or kneeling on the pathway to avoid compacting the soil within the bed. For example, if you work on your knees, measure the distance between the front of your knee and the toe of your shoe, then allow at least this much space for the width of your pathway. Do not make the beds or rows too wide.
Cover all pathways with mulch or an easily mowed cover crop to control weeds and to keep your feet clean and dry year-round. For mulch, use wood chips, straw, pine needles, or any other inexpensive product that is readily available in your area. To make the mulch more effective, first lay down heavy cardboard and then cover with mulch. If you use degradable mulch such as woodchips or straw, scrape the decomposed mulch off the pathways and into the rows or beds every two to three years and add new, fresh mulch to pathways.
If you plant a cover crop in the pathways, mow it several times a year to keep it from getting too tall and setting seed. If you use this technique, make sure your paths are wide enough for your lawn mower. See the Cover Crops section for information about different cover crops that can be used. The major disadvantage with this technique is that the cover crop will grow into the beds and will require edging or weeding several times a year. If you use framed beds, this may not be an issue.
Raised Beds
Raised beds have some important advantages that make them very popular for vegetable gardeners in areas with cooler summer temperatures and moderate or high rainfall. Raised beds are also suitable for gardeners with mobility issues. Raised beds have improved water drainage that results in increased soil temperatures, especially in the spring months: it is possible to work a drier soil earlier and to plant in warmer soil earlier, so raised beds lead to an earlier garden. An additional benefit of warmer, drier soil is decreased incidence of root rot, a common disease problem of many vegetable crops. If your soil is poor quality, raised beds can be filled with good soil and compost, eliminating the need for years of adding soil amendments. Raised beds are most commonly framed with wood (Figure 1). Corrugated aluminum is gaining popularity to frame raised beds in areas with cool summer temperature as there is a potential to slightly heat the soil, and they are also lighter weight and easier to move. Raised beds are usually semipermanent or permanent, and although they may require more labor to start with, they are generally easier to maintain.
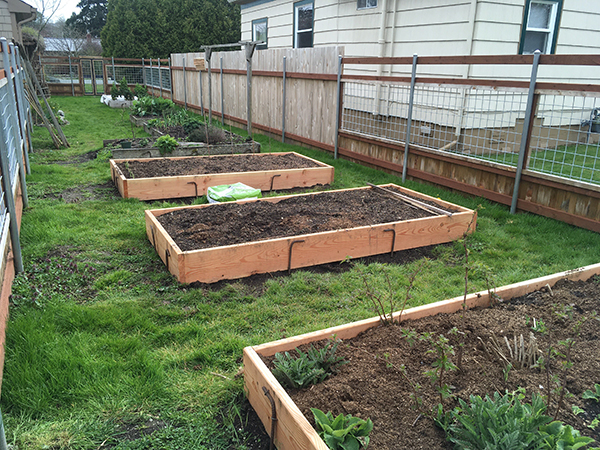
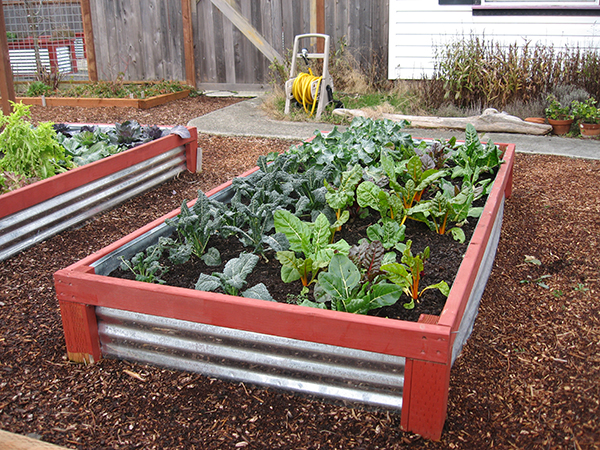
While a raised bed can be of any dimension, they are usually 6 inches to 1 foot high, 3 to 4 feet wide, and 10 feet long or longer. It is best to custom-fit the width and length of your beds to suit your needs. First, make sure you can easily reach the middle of the bed while squatting, kneeling, or sitting on either side of the bed. If a bed is against a wall or a fence and you only have access from one side, make sure you can reach all the way across the bed without stepping into the bed. Make the beds short enough so that you can easily get from one place to another in the garden without going too far out of your way. If children assist you in the garden, make shorter beds or place stepping stones across the beds every 10 feet or so for easy crossing over. Do not walk on beds—avoiding foot traffic in the bed will minimize soil compaction and will result in better soil tilth.
For more information about the design and use of raised beds for people with limited mobility, refer to the publication Gardens for All listed in Further Reading at the end of this chapter. Typically, when used for this purpose, raised beds are built 2 to 3 feet high and are spaced far enough apart to allow wheelchair access.
Sunken Beds
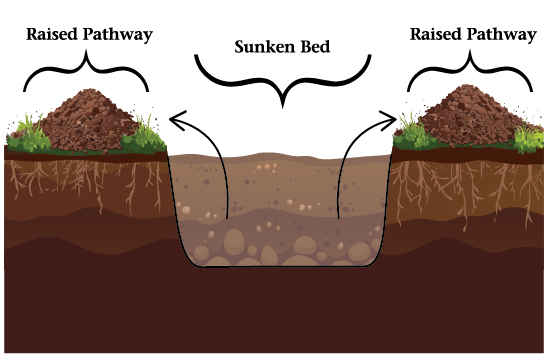
The goal of a sunken garden bed (Figure 2) is to retain as much water as possible for crop growth, and they are suited for areas that receive little precipitation. A sunken bed can be made by digging out soil so that the surface of the bed is 4–8 inches below the level of the pathways. First remove the topsoil and save on one side of the bed. Next remove 4–6 inches of subsoil and place around the bed to form a berm around the bed’s edges. Finally, place the topsoil back into the bed. If the soil is too difficult to dig, make berms around the bed using soil from another area of your garden. Smaller sunken beds tend to be more water efficient in areas that do not receive much precipitation.
Soil Management
Establishing and maintaining a healthy, fertile soil is the foundation of a healthy, productive vegetable garden. It is important to consider soil holistically, as a healthy soil provides nutrients, water-holding capacity, and physical support for plants as well as air for plant root respiration.
Air
Plants are living, breathing organisms and require air in their root zones to thrive. Because roots are buried in soil, it is easy to think that air is not an essential part of a healthy soil system. On the contrary, air in the root zone is as necessary to plant growth as water and nutrients. Soil organisms such as worms, bacteria, and fungi also need air to survive and do their jobs of breaking down organic matter and making nutrients available to plants. Air is added to the soil when you cultivate for planting, when you incorporate compost, or when you till in plant residue after harvest. A rototiller will generally turn the top 5–6 inches of soil, while hand digging can reach a foot or more deep. Worm tunnels and decomposing deep plant roots will also create channels several feet deep in the soil for aeration and water drainage. Soil that has high organic matter content will have large pore spaces that can be filled with air.
A well-aerated, deep soil allows plants to establish a deep rooting system. Plants with deep root systems are more drought tolerant and more effective at capturing soil nutrients. It is especially important to have deep, well-aerated soils in intensive beds where plants are spaced close together and there is greater potential for competition for water and nutrients.
Organic Matter
Plant residues, such as fallen leaves, grass clippings, vegetable crop debris, and compost, are all sources of organic matter for your vegetable garden. Soil organic matter improves soil tilth (soil health and structure), water-holding capacity, nutrient retention, nutrient availability, and aeration. Soil organic matter helps to improve soil structure by binding mineral soil particles together into larger soil aggregates. Large soil aggregates result in larger pore spaces that are available for air and water retention, and for root growth.
Naturally occurring bacteria and fungi in the soil decompose organic matter, turning it into humus, which is generally seen as the dark brown or black layer at the top of the soil. Soil organic matter generally accounts for only 1–5% of the total soil weight, whereas the majority of soil is made up of mineral particles in the form of sand, silt, and clay.
Whether your soil is too heavy due to high clay content or too light due to high sand content, adding organic matter regularly is the best thing you can do to improve the quality of your soil. Soil that is high in organic matter is easier to work and generally is more productive than soil that lacks organic matter. To increase soil organic matter, add 2–3 inches of compost to the beds or rows each year. In addition, you can grow cover crops or use properly composted animal manures from local farms to build a healthy, productive soil.
Building the Soil
If your garden soil is very rocky or compacted, it is easiest to build the soil up over the course of several years rather than trying to dig deep the first year. To build your soil up, apply a 4–6 inch layer of compost uniformly over beds the first year. Next, remove the top few inches of good soil from the paths and place it on top of the compost in the beds. This increases the depth of good soil in the beds and discourages weed growth in the poorer soil left in the paths. Apply a 2–3 inch layer of compost to the beds each year thereafter.
You can leave compost on the surface of the bed or you can turn it into the soil. Compost left on the surface will act as mulch and will help retain soil moisture, reduce the germination of weed seeds, and smother small weeds. By incorporating the compost, you are placing nutrients where they are needed most—in the rooting zone. Your decision may be based on how easy it is to turn the soil in your garden and you should do what is easiest for you. Whether you choose to leave the compost on top of the bed or turn it in, rake the beds to level them and to break up any large clods.
Compost
Compost is decomposed plant material and is easily made from plant residues from your garden and kitchen; however, kitchen scraps may be best to add to a worm box (see next section). Homemade compost is the easiest and least expensive way to provide your garden soil with fresh organic matter each year. In general, you should think of your compost pile as a place to recycle garden debris and kitchen vegetable scraps. Do not compost food wastes such as meat that might attract rodents or other animals. Be cautious when composting problem weeds such as quack grass, bindweed (morning glory), and comfrey because rhizomes and roots of these weeds can be very resistant to decomposition and may begin to grow again when incorporated back into garden soil.
Also, some plant seeds may not be killed unless you are very diligent about turning the compost pile to ensure that high enough temperatures have been reached for the necessary time period. Diseased plants with infections such as club root or late blight should not be put in your compost pile because the disease organisms can survive the composting process.
Composting involves a mixture of “brown” carbon-rich material, such as dead leaves, twigs, or straw, and “green” nitrogen-rich material, such as lawn clippings, food scraps, or coffee grounds. The best ratio of brown to green materials is 2:1. Add water when adding large amounts of brown organic material or during dry periods. Moisture is needed for the decomposition process, and the compost pile should be saturated but not seeping. If the pile is too dry or wet, materials will decompose slowly, or become moldy or slimy. If the pile is too wet, turn the pile and mix the materials, or add more dry brown material. Covering the compost pile during heavy rains will prevent too much moisture from entering the pile, which stops the composting process.
Oxygen is needed in the compost pile to support the decomposition of plant material by bacteria. As the bacteria decompose the materials, the center of the pile will become hot (135–160°F). Turn the compost pile when the center becomes hot or about every two to three weeks to incorporate oxygen into the center of the pile and to speed the composting process. Turning the pile will also move materials from the edge of the pile into the center and will help to control any bad odors. When the pile cools in the center, decomposition of the materials has taken place.
Bacteria and other microorganisms are the real workers in the compost process. By supplying organic materials, water, and oxygen, the already present bacteria will get to work breaking down the plant material. You may also add layers of soil or finished compost to supply more bacteria and speed the composting process. There are several techniques and “recipes” for making compost effectively. To learn more, refer to Chapter 6: Composting.
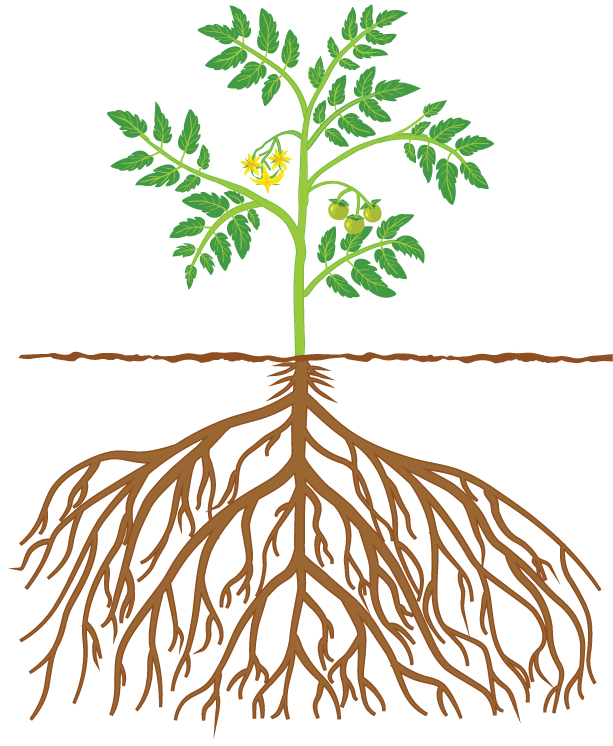
If your soil is compact and difficult to dig, plant deep-rooted vegetables such as tomatoes, winter squash, and melons for the first two to three years (Figure 3). Decomposing deep roots will create channels for water drainage and aeration, which will, in turn, enable medium- and shallow-rooted crops to grow and be more productive in following years.
Worm Box
Worm boxes are a tidy way to compost kitchen scraps and prevent rodents from eating them in your compost pile. A worm box can be built with wood scraps and then you can cover the top with plastic to protect it from rain and snow (Figure 4).
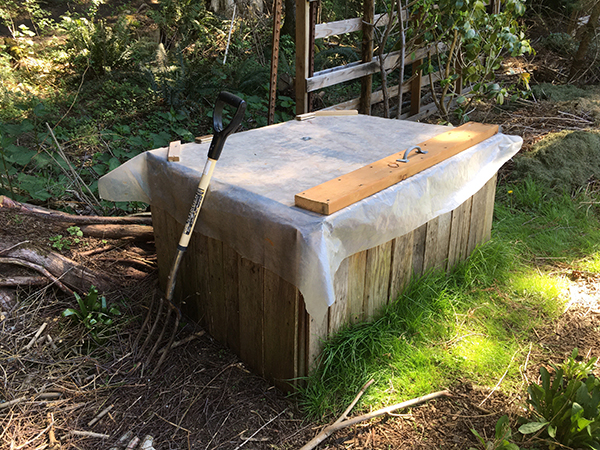
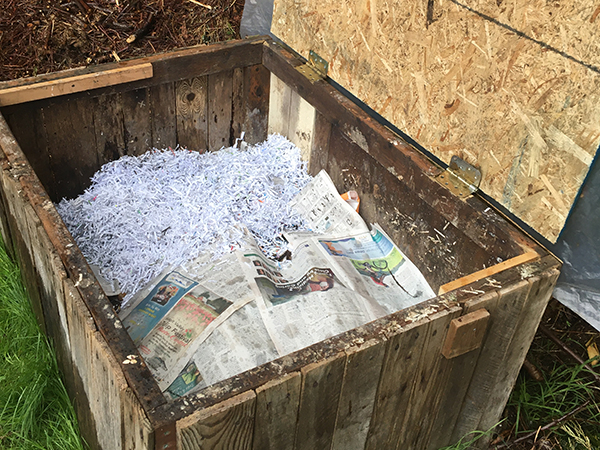
A tight-fitting lid and welded wire mesh covering any openings that are essential for air circulation will keep rodents out of the box. If the worm box is very large (2 ft × 2 ft × 2 ft or larger), place 2–4 inches of garden soil in the bottom of the box to provide a foundation for the bedding. Next, place a 6- to 8-inch layer of bedding into the box. Examples of bedding materials include shredded newspaper or office paper (this is a good use of shredded office paper), corrugated cardboard, or shredded dry leaves. If the worm box is smaller, add the bedding to the bottom of the box and sprinkle 2–3 cups of garden soil over the bedding. Lightly moisten the contents of the box and then incorporate red wiggler worms. Add kitchen scraps to the box and periodically cover them with bedding material to maintain a balance of worm bedding and food. After initial establishment, the proper moisture level will be sufficiently maintained through the addition of a gallon or two per week of kitchen scraps or green plant residues from the garden.
The species and number of worms added to the worm box is important. Red wigglers, Eisenia foetida, a European species of worm, is preferred for worm bins because they have evolved to live in and consume decaying organic matter. They can be purchased from commercial suppliers or obtained from a friend’s established worm box. The number of worms needed to start a worm box depends on the weight of food scraps placed in the box each week. For example, 1 pound of worms can eat 3.5 pounds of food waste per week, or 0.5 pounds per day. Well-fed and comfortable worms will multiply quickly, and extra worms may be removed and shared with friends.
There are several methods for harvesting worm castings. After the worms have become well established in the box, new bedding and kitchen scraps can be added to just one side of the box. After one to three weeks, the worms will have mostly migrated to the side with fresh scraps and bedding. Worm castings can be scooped out from the side the worms have vacated and then scraps and bedding can be added to this side, and the process repeated. Alternatively, for a small worm box, dump the whole contents into a pile on a tarp. The worms will migrate to the center of the pile and the outside layer of the pile can be gently removed repeatedly until the majority of the worms remain in the small remaining pile of organic material. Add fresh bedding to the box, cover it with the worms and the remaining organic material, and top with a layer of bedding and kitchen scraps.
If the worm box is large (2 ft × 2 ft × 2 ft or larger) and about three-quarters full, it will not freeze in the center when temperatures fall below freezing for a few weeks, and the worms can be overwintered in the box outside. If your area has freezing temperatures for more than a few weeks, the worm box will freeze through and the worms will not survive. To protect the worms from winter temperatures, place them in a plastic bin and place the bin in your garage. Be sure to feed the worms throughout the winter. See Composting with Worms (Oregon State University EM 9034) for more detailed information.
Cover Crops
Cover crops are planted to protect the soil from erosion, control weeds, trap or add nutrients, add organic matter, break up a pest cycle in the soil, improve soil moisture retention, break up compacted soil, and increase soil drainage. Cover crops can also attract beneficial insects and pollinators. If you have unplanted areas in your garden in the summer, or are not growing a winter vegetable crop, consider planting a cover crop. Choose cover crops based on which benefits are most important to you and how the crop fits into your garden plan.
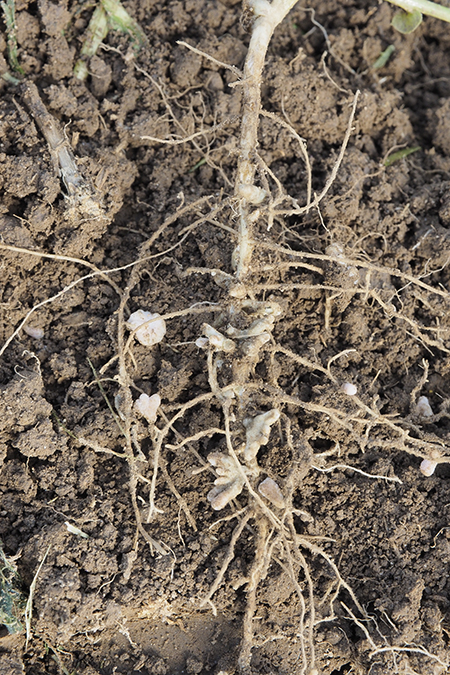
Cover crops improve soil nutrition by taking up nutrients from the soil that would otherwise be lost due to leaching or erosion. Grass or grain cover crops (e.g., wheat, oats, barley, rye) are able to capture potassium and phosphorus while legumes can add nitrogen into the soil. Legume plants add nitrogen to the soil through the action of Rhizobium bacteria that form nodules on the plant roots (Figure 5). Each legume crop has a specific Rhizobium bacteria that is compatible. A mixed Rhizobium inoculum is sold by some seed companies and can be used for all legume vegetable crops. However, the Rhizobium bacteria will not form nodules if the plants receive sufficient nitrogen fertilizer. To take advantage of nitrogen fixation by a legume crop, only use a small amount of starter nitrogen fertilizer for legume plants.
Grain and legume cover crops are often planted together: the grain germinates more quickly, and the legume tends to spread out more. When the primary purpose of planting a cover crop is to add nutrients, then the crop is often referred to as a “green manure crop.”
Cold-tolerant crops can be planted as summer or winter cover crops, while tender crops should only be planted in the summer (Table 1). Depending on the minimum winter temperatures in your area, somewhat cold-tolerant crops may also be suitable for both winter and summer planting. Plant your summer cover crop before spring rains end, as soil moisture is needed for good germination. Although some cover crops can survive all summer long without irrigation, they generally will not be very productive. If you want a vigorously growing cover crop it may require irrigation during the summer. Plant a winter cover crop by mid-September so that it becomes established before temperatures become too cold. If you would like to plant a cover crop earlier than mid-September but have not finished harvesting the summer vegetable crop, simply broadcast the cover crop seed around and under the vegetable plants and rake in the seed. The cover crop will germinate under the vegetable crop and will be ready to take off when the vegetable crop harvest is complete. Cut the vegetable plants at the soil surface and place the tops in your compost pile. Leave the roots in place in the garden and they will decompose, adding organic matter where it is needed most—deeper in the soil.
Table 1. Cold hardiness of cover crops commonly grown in Washington.| Cold Tolerant | Somewhat Cold Tolerant | Not Cold Tolerant |
|---|---|---|
| Hairy vetch (annual) | Alfalfa (-10 to -5°F) | Buckwheat (annual) |
| Red clover (-30 to -20°F) | Annual ryegrass (annual) | Mustard (annual) (canola, rapeseed) |
| Subterranean clover (-30 to -20°F) | Barley (annual) | Oats (annual) |
| White clover (-30 to -20°F) | Crimson clover (annual) | Sudangrass & sorghum (annuals) |
| Winter wheat (annual) | Fava beans (annual) | Not applicable |
| Not applicable | Field peas (annual) | Not applicable |
Nutrients are held in the green, living tissue of the cover crop and are not available for the vegetable crop until the cover crop is killed and it has decomposed in the soil. Mowing is generally a good method to kill annual grain cover crops and will knock down a legume crop but will not kill it. Mow or kill the cover crop before it sets seed to prevent the cover crop from becoming a weed in the next season. Mow the grain or legume cover crop first and then leave the cuttings on the soil surface for two to three weeks before tilling them into the bed. Tillage will kill the remaining roots. Alternatively, you can place the chopped up cover crops in your compost pile or leave the cuttings on the soil surface to act as mulch.
Wait at least two weeks after killing or tilling the cover crop before planting a new crop. As the cover crop breaks down during these two weeks, nutrients are not available for new plant growth, and any new seedlings will suffer from nutrient deficiencies during this period.
Cover crops require planning and management including seed selection, irrigation, and planting and termination at the right time. Consider how much effort you want to spend managing your cover crop when you make your selection. For more information on planting, managing, and terminating cover crops, refer to the WSU Extension publication Methods for Successful Cover Crop Management in Your Home Garden.
Livestock Manure
Manure from cows, sheep, chickens, rabbits, and other livestock is a good source of organic matter and crop nutrients but must be handled safely to avoid problems due to potential human pathogen contamination. The two major pathogens of concern are Escherichia coli O157 and Salmonella. To avoid potential contamination of your vegetable crops with these pathogens, do not use fresh livestock manure in your vegetable garden. Composting methods that achieve temperatures above 145°F can kill most harmful pathogens and weed seeds; however, it can be difficult to maintain these high temperatures for sufficient time in a backyard compost pile. Be aware that composted manure has the potential to introduce weed seeds or herbicide residues, and horse manure is particularly likely to contain viable weed seeds because horses do not digest what they eat as completely as other grazing animals do. Never use pet manure as it may contain pathogens and also parasites.
To avoid contamination of your vegetable crops by Escherichia coli and Salmonella, do not use fresh livestock or pet manure in your garden.
When sourcing manure, ask if broadleaf-specific herbicides such as aminopyralid, clopyralid, or picloram have been used on pastures or hay fields that were used to feed the livestock. These herbicides will carry over into the manure and will negatively impact vegetable crops.
Use composted manure in the same way as other composted materials. Manure is typically high in phosphorus and potassium and should not be used if a soil test shows high levels of these nutrients in the garden soil. See Chapter 6: Composting and the composting section in Food Safety Begins on the Farm: A Grower’s Guide, listed in the Further Reading section, for more details on composting. See also Fertilizing with Manure and Other Organic Amendments for more information on using livestock manure for crop production (also included in Further Reading at the end of this chapter).
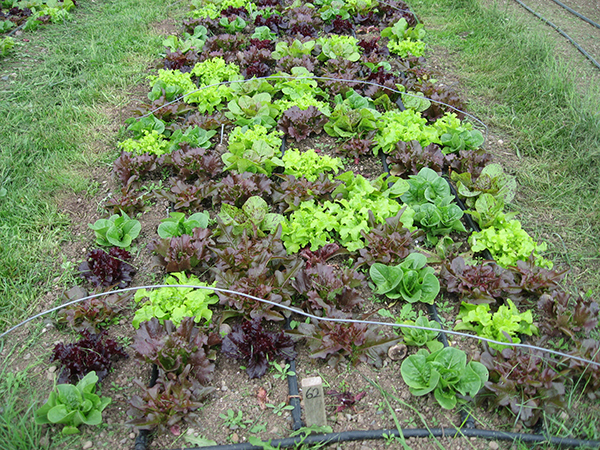
Variety Selection
When planning your home garden, select crops that you and your family want to eat (Figure 6). Then be sure these are crops and varieties that are likely to do well in your local climate. Washington is known for its cool nights that result in relatively mild average daily summer temperatures (Table 2). In central and eastern Washington, the average temperature on a summer day can be quite warm (80–90°F), whereas in western Washington summer temperatures are quite a bit cooler (65–75°F). Throughout the state, nighttime temperatures are quite low all summer long (50–60°F). The maximum and minimum daily temperatures impact plant growth, and vegetable crops are classified based on how cold hardy or tender they are (see List 3 below).
Eastern Washington
Table 2. Average maximum and minimum temperatures (°F), average precipitation (inches),and growing degree days (GDD) for some locations in Washington State.
| Ellensburg | Jan | Feb | Mar | Apr | May | Jun | Jul | Aug | Sep | Oct | Nov | Dec | Annual | GDD1 Jan-Aug | GDD1 May-Sept |
|---|---|---|---|---|---|---|---|---|---|---|---|---|---|---|---|
| Ave. Max. Temp | 34.3 | 41.5 | 53.1 | 61.7 | 69.4 | 76.1 | 84.2 | 83.4 | 74.7 | 62.3 | 45.7 | 35.6 | 60.2 | Not applicable | Not applicable |
| Ave. Min. Temp | 18.6 | 22.8 | 28.6 | 34.0 | 41.6 | 48.2 | 52.8 | 51.4 | 43.0 | 33.9 | 26.9 | 21.0 | 35.2 | Not applicable | Not applicable |
| Ave. Total Precip | 1.27 | 0.92 | 0.68 | 0.51 | 0.55 | 0.65 | 0.28 | 0.27 | 0.45 | 0.59 | 1.24 | 1.45 | 8.87 | Not applicable | Not applicable |
| GDD2 | Not applicable | Not applicable | Not applicable | Not applicable | 170.5 | 364.5 | 573.5 | 539.4 | 265.5 | Not applicable | Not applicable | Not applicable | Not applicable | 1477 | 1695 |
| Ephrata | Jan | Feb | Mar | Apr | May | Jun | Jul | Aug | Sep | Oct | Nov | Dec | Annual | GDD1 Jan-Aug | GDD1 May-Sept |
|---|---|---|---|---|---|---|---|---|---|---|---|---|---|---|---|
| Ave. Max. Temp | 34.3 | 42.2 | 54.1 | 65 | 74.7 | 81.9 | 90.2 | 88 | 79.3 | 64.8 | 46.7 | 37.3 | 63.2 | Not applicable | Not applicable |
| Ave. Min. Temp | 21.2 | 26.5 | 33.2 | 40.5 | 48.4 | 55.6 | 61.6 | 59.9 | 52.6 | 42.1 | 31.3 | 25 | 41.5 | Not applicable | Not applicable |
| Ave. Total Precip | 0.98 | 0.71 | 0.6 | 0.62 | 0.68 | 0.77 | 0.22 | 0.27 | 0.42 | 0.64 | 1 | 1.16 | 8.04 | Not applicable | Not applicable |
| GDD2 | Not applicable | Not applicable | Not applicable | Not applicable | 358.1 | 562.5 | 802.9 | 742.5 | 478.5 | Not applicable | Not applicable | Not applicable | Not applicable | 2108 | 2526 |
| Prosser | Jan | Feb | Mar | Apr | May | Jun | Jul | Aug | Sep | Oct | Nov | Dec | Annual | GDD1 Jan-Aug | GDD1 May-Sept |
|---|---|---|---|---|---|---|---|---|---|---|---|---|---|---|---|
| Ave. Max. Temp | 38.2 | 46.1 | 56.3 | 64.9 | 73.3 | 80.3 | 88.1 | 86.8 | 78 | 65.1 | 48.7 | 40 | 63.8 | Not applicable | Not applicable |
| Ave. Min. Temp | 23.9 | 27.7 | 32.5 | 37.6 | 44.3 | 50.2 | 54 | 53 | 46.7 | 38.6 | 30.9 | 26.2 | 38.8 | Not applicable | Not applicable |
| Ave. Total Precip | 0.97 | 0.73 | 0.61 | 0.58 | 0.62 | 0.66 | 0.2 | 0.28 | 0.39 | 0.72 | 0.98 | 1.12 | 7.86 | Not applicable | Not applicable |
| GDD2 | Not applicable | Not applicable | Not applicable | Not applicable | 272.8 | 457.5 | 652.6 | 616.9 | 370.5 | Not applicable | Not applicable | Not applicable | Not applicable | 1727 | 2049 |
| Pullman | Jan | Feb | Mar | Apr | May | Jun | Jul | Aug | Sep | Oct | Nov | Dec | Annual | GDD1 Jan-Aug | GDD1 May-Sept |
|---|---|---|---|---|---|---|---|---|---|---|---|---|---|---|---|
| Ave. Max. Temp | 34.7 | 40.6 | 47.3 | 56 | 64.4 | 71.4 | 81.7 | 82 | 72.9 | 59.9 | 43.7 | 36.1 | 57.5 | Not applicable | Not applicable |
| Ave. Min. Temp | 22.7 | 27 | 30.7 | 35.5 | 41.3 | 46.3 | 49.7 | 49.7 | 44.3 | 37.2 | 30.3 | 25 | 36.7 | Not applicable | Not applicable |
| Ave. Total Precip | 2.76 | 2.06 | 2 | 1.61 | 1.66 | 1.43 | 0.59 | 0.79 | 0.99 | 1.69 | 2.84 | 2.85 | 21.26 | Not applicable | Not applicable |
| GDD2 | Not applicable | Not applicable | Not applicable | Not applicable | 88.35 | 265.5 | 486.7 | 491.4 | 258 | Not applicable | Not applicable | Not applicable | Not applicable | 1244 | 1417 |
| Richland | Jan | Feb | Mar | Apr | May | Jun | Jul | Aug | Sep | Oct | Nov | Dec | Annual | GDD1 Jan-Aug | GDD1 May-Sept |
|---|---|---|---|---|---|---|---|---|---|---|---|---|---|---|---|
| Ave. Max. Temp | 40.4 | 48.5 | 58 | 66.6 | 75.2 | 82.6 | 90.3 | 89.2 | 80.6 | 66.9 | 50.9 | 41.9 | 65.9 | Not applicable | Not applicable |
| Ave. Min. Temp | 26.2 | 30.3 | 35.1 | 40.9 | 48.2 | 54.8 | 59.5 | 58.8 | 50.7 | 41 | 33.8 | 28.6 | 42.3 | Not applicable | Not applicable |
| Ave. Total Precip | 1.01 | 0.71 | 0.6 | 0.49 | 0.56 | 0.5 | 0.21 | 0.25 | 0.27 | 0.51 | 0.94 | 1.04 | 7.09 | Not applicable | Not applicable |
| GDD2 | Not applicable | Not applicable | Not applicable | Not applicable | 362.7 | 561 | 771.9 | 744 | 469.5 | Not applicable | Not applicable | Not applicable | Not applicable | 2077 | 2493 |
| Spokane | Jan | Feb | Mar | Apr | May | Jun | Jul | Aug | Sep | Oct | Nov | Dec | Annual | GDD1 Jan-Aug | GDD1 May-Sept |
|---|---|---|---|---|---|---|---|---|---|---|---|---|---|---|---|
| Ave. Max. Temp | 34.5 | 42.5 | 49.6 | 59.2 | 68.8 | 76.8 | 85.8 | 84.5 | 74.4 | 60.3 | 44 | 37.1 | 59.8 | Not applicable | Not applicable |
| Ave. Min. Temp | 23.9 | 28.8 | 31.2 | 36.8 | 44.3 | 51.2 | 56 | 54.7 | 47.2 | 38.4 | 31.5 | 27.2 | 39.3 | Not applicable | Not applicable |
| Ave. Total Precip | 2.24 | 1.65 | 1.56 | 1.25 | 1.52 | 1.33 | 0.56 | 0.79 | 0.86 | 1.13 | 2.16 | 2.58 | 17.62 | Not applicable | Not applicable |
| GDD2 | Not applicable | Not applicable | Not applicable | Not applicable | 203.1 | 420 | 647.9 | 607.6 | 324 | Not applicable | Not applicable | Not applicable | Not applicable | 1676 | 1939 |
| Walla Walla | Jan | Feb | Mar | Apr | May | Jun | Jul | Aug | Sep | Oct | Nov | Dec | Annual | GDD1 Jan-Aug | GDD1 May-Sept |
|---|---|---|---|---|---|---|---|---|---|---|---|---|---|---|---|
| Ave. Max. Temp | 39.6 | 46.4 | 56.6 | 66.8 | 74.8 | 81.3 | 91.3 | 88.8 | 79.8 | 66.1 | 49.8 | 43.3 | 65.4 | Not applicable | Not applicable |
| Ave. Min. Temp | 25.8 | 30.1 | 34.9 | 40.3 | 46.3 | 51.8 | 57.4 | 55.7 | 48.3 | 40.9 | 32.7 | 30.3 | 41.2 | Not applicable | Not applicable |
| Ave. Total Precip | 1.73 | 1.46 | 1.53 | 1.29 | 1.47 | 1.2 | 0.25 | 0.33 | 0.82 | 1.48 | 1.72 | 1.73 | 15 | Not applicable | Not applicable |
| GDD2 | Not applicable | Not applicable | Not applicable | Not applicable | 327.1 | 496.5 | 754.9 | 689.8 | 421.5 | Not applicable | Not applicable | Not applicable | Not applicable | 1941 | 2315 |
| Wenatchee | Jan | Feb | Mar | Apr | May | Jun | Jul | Aug | Sep | Oct | Nov | Dec | Annual | GDD1 Jan-Aug | GDD1 May-Sept |
|---|---|---|---|---|---|---|---|---|---|---|---|---|---|---|---|
| Ave. Max. Temp | 34.6 | 42.4 | 54.4 | 64.7 | 73.1 | 79.9 | 87.9 | 86.8 | 78.1 | 63.6 | 46.6 | 36.7 | 62.4 | Not applicable | Not applicable |
| Ave. Min. Temp | 22.1 | 25.8 | 32.7 | 40 | 47.9 | 54.8 | 60 | 58.6 | 50.2 | 39.8 | 31.3 | 25.6 | 40.7 | Not applicable | Not applicable |
| Ave. Total Precip | 1.26 | 0.91 | 0.62 | 0.54 | 0.55 | 0.72 | 0.21 | 0.39 | 0.37 | 0.60 | 1.21 | 1.47 | 8.85 | Not applicable | Not applicable |
| GDD2 | Not applicable | Not applicable | Not applicable | Not applicable | 325.5 | 520.5 | 742.5 | 703.7 | 424.5 | Not applicable | Not applicable | Not applicable | Not applicable | 1967 | 2342 |
| Yakima | Jan | Feb | Mar | Apr | May | Jun | Jul | Aug | Sep | Oct | Nov | Dec | Annual | GDD1 Jan-Aug | GDD1 May-Sept |
|---|---|---|---|---|---|---|---|---|---|---|---|---|---|---|---|
| Ave. Max. Temp | 37.3 | 45.9 | 55.5 | 63.9 | 72.6 | 79.8 | 87.5 | 86.1 | 77.8 | 64.2 | 48.2 | 38.2 | 63.1 | Not applicable | Not applicable |
| Ave. Min. Temp | 20.8 | 25.7 | 29.9 | 34.8 | 42.3 | 49 | 53.2 | 51.8 | 44.2 | 34.8 | 27.7 | 22.8 | 36.4 | Not applicable | Not applicable |
| Ave. Total Precip | 1.27 | 0.77 | 0.65 | 0.52 | 0.52 | 0.68 | 0.19 | 0.33 | 0.34 | 0.55 | 1.01 | 1.32 | 8.15 | Not applicable | Not applicable |
| GDD2 | Not applicable | Not applicable | Not applicable | Not applicable | 231 | 432 | 630.9 | 587.5 | 330 | Not applicable | Not applicable | Not applicable | Not applicable | 1650 | 1931 |
Source: Western Regional Climate Center.
1GDD are calculated for June through August and for May 15 through September 15.
2GDD are calculated for a base temperature of 50°F.
Western Washington
Table 2. Average maximum and minimum temperatures (°F), average precipitation (inches),and growing degree days (GDD) for some locations in Washington State.
| Bellingham | Jan | Feb | Mar | Apr | May | Jun | Jul | Aug | Sep | Oct | Nov | Dec | Annual | GDD1 Jan-Aug | GDD1 May-Sept |
|---|---|---|---|---|---|---|---|---|---|---|---|---|---|---|---|
| Ave. Max. Temp | 43.2 | 47.7 | 51.1 | 56.4 | 62.3 | 66.7 | 71.2 | 71.3 | 67.1 | 58.4 | 49.6 | 44.5 | 57.4 | Not applicable | Not applicable |
| Ave. Min. Temp | 31.4 | 33.9 | 35.9 | 39.9 | 45.2 | 50.4 | 53.2 | 53.1 | 48.1 | 42 | 36.7 | 33.1 | 41.9 | Not applicable | Not applicable |
| Ave. Total Precip | 4.56 | 3.45 | 3.02 | 2.65 | 2.16 | 1.8 | 1.24 | 1.37 | 1.83 | 3.43 | 5.02 | 4.82 | 35.36 | Not applicable | Not applicable |
| GDD2 | Not applicable | Not applicable | Not applicable | Not applicable | 116.3 | 256.5 | 378.2 | 378.2 | 228 | Not applicable | Not applicable | Not applicable | Not applicable | 1013 | 1185 |
| Centralia | Jan | Feb | Mar | Apr | May | Jun | Jul | Aug | Sep | Oct | Nov | Dec | Annual | GDD1 Jan-Aug | GDD1 May-Sept |
|---|---|---|---|---|---|---|---|---|---|---|---|---|---|---|---|
| Ave. Max. Temp | 46 | 50.4 | 55.2 | 61.6 | 68.1 | 72.9 | 78.5 | 78.4 | 73.2 | 62.4 | 51.9 | 46.6 | 62.1 | Not applicable | Not applicable |
| Ave. Min. Temp | 33.9 | 35 | 36.6 | 39.6 | 44.4 | 49 | 52.2 | 52.2 | 48.6 | 43.2 | 38.3 | 35.3 | 42.4 | Not applicable | Not applicable |
| Ave. Total Precip | 6.7 | 5.27 | 4.79 | 3.13 | 2.16 | 1.85 | 0.76 | 1.17 | 1.93 | 4.28 | 6.91 | 7.51 | 46.45 | Not applicable | Not applicable |
| GDD2 | Not applicable | Not applicable | Not applicable | Not applicable | 193.8 | 328.5 | 475.9 | 474.3 | 327 | Not applicable | Not applicable | Not applicable | Not applicable | 1279 | 1539 |
| Goldendale | Jan | Feb | Mar | Apr | May | Jun | Jul | Aug | Sep | Oct | Nov | Dec | Annual | GDD1 Jan-Aug | GDD1 May-Sept |
|---|---|---|---|---|---|---|---|---|---|---|---|---|---|---|---|
| Ave. Max. Temp | 37.7 | 44.8 | 52.6 | 61.3 | 69.8 | 76.3 | 85.7 | 84.2 | 76.9 | 63.6 | 48 | 39.6 | 61.7 | Not applicable | Not applicable |
| Ave. Min. Temp | 23.7 | 26.9 | 30.3 | 33.8 | 39.6 | 45.3 | 49.6 | 48.3 | 42.6 | 35.4 | 30 | 26.8 | 36 | Not applicable | Not applicable |
| Ave. Total Precip | 3.06 | 1.94 | 1.64 | 0.9 | 0.82 | 0.74 | 0.19 | 0.27 | 0.57 | 1.47 | 2.62 | 3.22 | 17.44 | Not applicable | Not applicable |
| GDD2 | Not applicable | Not applicable | Not applicable | Not applicable | 145.7 | 324 | 547.2 | 503.8 | 292.5 | Not applicable | Not applicable | Not applicable | Not applicable | 1375 | 1594 |
| Long Beach | Jan | Feb | Mar | Apr | May | Jun | Jul | Aug | Sep | Oct | Nov | Dec | Annual | GDD1 Jan-Aug | GDD1 May-Sept |
|---|---|---|---|---|---|---|---|---|---|---|---|---|---|---|---|
| Ave. Max. Temp | 48.3 | 51.1 | 52.2 | 55.6 | 59.7 | 63.3 | 65.9 | 66.5 | 66.9 | 61.8 | 54.3 | 50 | 58 | Not applicable | Not applicable |
| Ave. Min. Temp | 35.8 | 37 | 36.2 | 39.8 | 43.6 | 48.3 | 50.4 | 50.3 | 47.1 | 43.7 | 39.2 | 37.2 | 42.4 | Not applicable | Not applicable |
| Ave. Total Precip | 12.91 | 9.46 | 8.38 | 6.01 | 3.09 | 2.87 | 1.33 | 2.2 | 3.05 | 7.86 | 12.07 | 11.91 | 81.15 | Not applicable | Not applicable |
| GDD2 | Not applicable | Not applicable | Not applicable | Not applicable | 51.15 | 174 | 252.7 | 260.4 | 210 | Not applicable | Not applicable | Not applicable | Not applicable | 687 | 818 |
| Mt Vernon | Jan | Feb | Mar | Apr | May | Jun | Jul | Aug | Sep | Oct | Nov | Dec | Annual | GDD1 Jan-Aug | GDD1 May-Sept |
|---|---|---|---|---|---|---|---|---|---|---|---|---|---|---|---|
| Ave. Max. Temp | 45.5 | 49.2 | 52.8 | 57.7 | 63.9 | 68.9 | 73.2 | 73.8 | 68.6 | 59.4 | 50.7 | 45.9 | 59.1 | Not applicable | Not applicable |
| Ave. Min. Temp | 33.6 | 35.1 | 37.1 | 39.9 | 44.7 | 48.8 | 50.6 | 50.9 | 47 | 41.9 | 37.8 | 34.6 | 41.8 | Not applicable | Not applicable |
| Ave. Total Precip | 4.02 | 2.84 | 2.73 | 2.43 | 2.21 | 1.83 | 1.16 | 1.49 | 1.84 | 3.23 | 4.43 | 4.08 | 32.30 | Not applicable | Not applicable |
| GDD2 | Not applicable | Not applicable | Not applicable | Not applicable | 133.3 | 261 | 368.9 | 382.9 | 234 | Not applicable | Not applicable | Not applicable | Not applicable | 1013 | 1196 |
| Olympia | Jan | Feb | Mar | Apr | May | Jun | Jul | Aug | Sep | Oct | Nov | Dec | Annual | GDD1 Jan-Aug | GDD1 May-Sept |
|---|---|---|---|---|---|---|---|---|---|---|---|---|---|---|---|
| Ave. Max. Temp | 44.5 | 49.2 | 53.4 | 59 | 65.7 | 71 | 77.1 | 77.1 | 71.6 | 60.6 | 50.5 | 44.8 | 60.4 | Not applicable | Not applicable |
| Ave. Min. Temp | 31.6 | 32.4 | 33.8 | 36.5 | 41.5 | 46.6 | 49.4 | 49.5 | 45.2 | 39.6 | 35.5 | 32.8 | 39.5 | Not applicable | Not applicable |
| Ave. Total Precip | 7.95 | 5.82 | 5.12 | 3.35 | 1.98 | 1.57 | 0.72 | 1.2 | 2.04 | 4.74 | 8.1 | 8.18 | 50.76 | Not applicable | Not applicable |
| GDD2 | Not applicable | Not applicable | Not applicable | Not applicable | 111.6 | 264 | 410.8 | 412.3 | 252 | Not applicable | Not applicable | Not applicable | Not applicable | 1087 | 1269 |
| Port Angeles | Jan | Feb | Mar | Apr | May | Jun | Jul | Aug | Sep | Oct | Nov | Dec | Annual | GDD1 Jan-Aug | GDD1 May-Sept |
|---|---|---|---|---|---|---|---|---|---|---|---|---|---|---|---|
| Ave. Max. Temp | 45.1 | 47.7 | 50.5 | 55.3 | 60.6 | 64.7 | 68.4 | 68.4 | 65.7 | 57.4 | 50 | 45.9 | 56.6 | Not applicable | Not applicable |
| Ave. Min. Temp | 34 | 35.5 | 36.9 | 40.1 | 44.7 | 49 | 51.6 | 51.6 | 48.8 | 43.3 | 38.1 | 35.2 | 42.4 | Not applicable | Not applicable |
| Ave. Total Precip | 4.02 | 2.75 | 2.19 | 1.34 | 0.96 | 0.86 | 0.55 | 0.80 | 1.11 | 2.64 | 4.19 | 4.25 | 25.66 | Not applicable | Not applicable |
| GDD2 | Not applicable | Not applicable | Not applicable | Not applicable | 82.15 | 205.5 | 310 | 310 | 217.5 | Not applicable | Not applicable | Not applicable | Not applicable | 825.5 | 975.3 |
| Puyallup | Jan | Feb | Mar | Apr | May | Jun | Jul | Aug | Sep | Oct | Nov | Dec | Annual | GDD1 Jan-Aug | GDD1 May-Sept |
|---|---|---|---|---|---|---|---|---|---|---|---|---|---|---|---|
| Ave. Max. Temp | 46.3 | 50.5 | 54.8 | 60.9 | 68.1 | 72.6 | 78.2 | 78 | 72.2 | 62.3 | 51.9 | 47 | 61.9 | Not applicable | Not applicable |
| Ave. Min. Temp | 32 | 33.6 | 35.3 | 38.5 | 43.1 | 47.9 | 50.3 | 50.1 | 46.5 | 41.6 | 36.1 | 33.4 | 40.7 | Not applicable | Not applicable |
| Ave. Total Precip | 5.59 | 4.5 | 4.01 | 2.84 | 1.94 | 1.78 | 0.82 | 1.1 | 1.87 | 3.55 | 5.67 | 6.16 | 39.84 | Not applicable | Not applicable |
| GDD2 | Not applicable | Not applicable | Not applicable | Not applicable | 173.6 | 307.5 | 441.8 | 435.6 | 280.5 | Not applicable | Not applicable | Not applicable | Not applicable | 1185 | 1412 |
| Seattle | Jan | Feb | Mar | Apr | May | Jun | Jul | Aug | Sep | Oct | Nov | Dec | Annual | GDD1 Jan-Aug | GDD1 May-Sept |
|---|---|---|---|---|---|---|---|---|---|---|---|---|---|---|---|
| Ave. Max. Temp | 44.7 | 50.1 | 53.4 | 59.4 | 66.7 | 71.2 | 76.9 | 76.3 | 71 | 61.3 | 52 | 47.1 | 60.8 | Not applicable | Not applicable |
| Ave. Min. Temp | 34.2 | 37.1 | 38.2 | 41.6 | 47.1 | 52.2 | 55.1 | 55.6 | 52.1 | 46.1 | 40.5 | 37.1 | 44.7 | Not applicable | Not applicable |
| Ave. Total Precip | 4.94 | 4.23 | 3.52 | 2.3 | 1.5 | 1.5 | 0.96 | 1.08 | 1.92 | 3.24 | 4.89 | 5.79 | 35.86 | Not applicable | Not applicable |
| GDD2 | Not applicable | Not applicable | Not applicable | Not applicable | 213.9 | 351 | 496 | 494.5 | 346.5 | Not applicable | Not applicable | Not applicable | Not applicable | 1341 | 1622 |
| Vancouver | Jan | Feb | Mar | Apr | May | Jun | Jul | Aug | Sep | Oct | Nov | Dec | Annual | GDD1 Jan-Aug | GDD1 May-Sept |
|---|---|---|---|---|---|---|---|---|---|---|---|---|---|---|---|
| Ave. Max. Temp | 44.7 | 49.8 | 55.4 | 61.4 | 67.4 | 72.7 | 78.9 | 79.1 | 73.9 | 63.6 | 52.4 | 45.9 | 62.1 | Not applicable | Not applicable |
| Ave. Min. Temp | 32.4 | 34.4 | 37.4 | 40.7 | 45.6 | 50.5 | 53.7 | 53.4 | 49.2 | 43.4 | 38.1 | 34.3 | 42.7 | Not applicable | Not applicable |
| Ave. Total Precip | 5.71 | 4.48 | 3.79 | 2.67 | 2.2 | 1.65 | 0.6 | 0.87 | 1.82 | 3.17 | 5.94 | 6.31 | 39.23 | Not applicable | Not applicable |
| GDD2 | Not applicable | Not applicable | Not applicable | Not applicable | 201.5 | 348 | 505.3 | 503.8 | 346.5 | Not applicable | Not applicable | Not applicable | Not applicable | 1357 | 1631 |
Source: Western Regional Climate Center.
1GDD are calculated for June through August and for May 15 through September 15.
2GDD are calculated for a base temperature of 50°F.
Wait to plant tender crops until all danger of frost has passed in your area, and do not set very tender crops, such as tomato, in the garden until nighttime temperatures remain above 55°F. Hardy crops can be grown during the winter months with some protection (see the Winter Gardening section), while half-hardy crops are suitable for fall and spring production.
List 3. Crops well-suited to warm and cool temperatures.
Warm Temperature Crops
- Bean
- Cucumber
- Edamame
- Eggplant*
- Melon
- New Zealand spinach
- Okra*
- Pepper
- Pumpkin
- Squash, summer
- Squash, winter
- Sweet corn
- Sweet potato
Cool Temperature Crops
- Artichoke†
- Asparagus†
- Beet
- Broad bean
- Broccoli
- Brussels sprouts
- Cabbage
- Carrot
- Cauliflower
- Celery
- Chard
- Chicory
- Chive
- Collards
- Endive
- Garlic
- Globe artichoke†
- Horseradish†
- Kale
- Kohlrabi
- Leek
- Lettuce
- Mustard
- Onion
- Parsley
- Parsnip
- Pea
- Potato
- Radish
- Rhubarb†
- Salsify
- Spinach
- Turnip
Source: Adapted from Knott’s Handbook for Vegetable Growers listed in the Further Reading section.
*These crops require the most warmth to be productive; in cooler areas they may need to be grown under tunnels or in greenhouses.
†These crops are perennial.
Growing Degree Days
Plants grow in response to the amount of heat they accumulate each day above a base temperature. Warm season crops have a higher base temperature than cold season crops. Table 4 provides a summary of the base temperatures for many common vegetable crops. When the temperature is below a plant’s base temperature, that plant does not actively grow. The equation that measures heat accumulation is referred to as growing degree days (GDD) (opens in new window) and is calculated for each day:
(Average daily temperature) [minus] (the base temperature) where the average daily temperature equals:
(Maximum daily temperature + Minimum daily temperature)/2
Table 4. Growing degree days (GDD) base temperatures for some common vegetable crops.| Crop | Base Temperature (°F) |
|---|---|
| Asparagus | 40 |
| Bean, snap | 50 |
| Beet | 40 |
| Broccoli | 40 |
| Carrot | 38 |
| Collards | 40 |
| Cucumber | 55 |
| Eggplant | 60 |
| Lettuce | 40 |
| Muskmelon | 50 |
| Onion | 35 |
| Okra | 60 |
| Pea | 40 |
| Pepper | 50 |
| Potato | 40 |
| Squash | 45 |
| Strawberry | 39 |
| Sweet corn | 48 |
| Sweet potato | 60 |
| Tomato | 51 |
| Watermelon | 55 |
Source: Knott’s Handbook for Vegetable Growers, listed in the Further Reading section.
In Washington, the average number of GDD for the summer growing season (June through August) at a base temperature of 50°F (the base temperature for most summer crops) varies considerably depending on your location. Table 2 provides monthly average maximum and minimum temperatures and GDD for some locations in Washington. To find a summary of temperatures year-round for your area, see the Western Regional Climate Center (opens in new window) or AgWeatherNet (opens in new window). In western Washington, for example, GDD range from 700 (Long Beach) to 1350 (Vancouver), whereas in eastern and central Washington GDD range from 1200 (Pullman) to 2000 (Richland). In comparison, in the midwestern US there are, on average, 1800–2300 GDD for the summer growing season (50°F base temperature). You can see that in some areas of Washington there is less than one-half the heat for crop growth in the summer than in the midwestern US.
Our summers do not provide enough heat for rapid crop growth, and as a result, it can take varieties longer to mature in Washington than in warmer regions of the country. Seed catalogs and seed packets provide an estimated number of “days to maturity” for each variety; however, these values are based on production in warmer parts of the country. In Washington, add 10 days for short-maturing varieties (40–50 days to maturity), 20 days for moderate-maturing varieties (50–100 days to maturity), and 30 days for long-maturing varieties (100 or more days to maturity). Seed companies that are located in mountain states or in the Pacific Northwest tend to provide days-to-maturity values that better match what we can expect in Washington.
Selecting varieties that will mature in your area is one of the fundamental steps for successful gardening. Experiment with varieties and note how many days they take to mature in your garden. It takes three or more years to determine an average number of days to maturity.Variety Selection
Disease Resistance
When selecting varieties to grow, it is also important to select those varieties that are resistant to the most common diseases that affect your area. Table 5 is a summary of the primary diseases affecting vegetable crops in Washington. If you know a particular disease is a problem in your area, select a variety with resistance whenever possible. Seed catalogs can be a good source of information regarding the disease resistance of particular varieties; look for the disease abbreviations key that most catalogs include in their information section.
Table 5. Vegetable crop rotation recommendations to avoid soilborne diseases.| Disease | Rotation Recommendation |
|---|---|
| Asparagus | Not applicable |
| Fusarium wilt, root & crown rot | Indefinite; use transplants grown from treated seed and plant on clean ground in raised beds; rotate with grasses and cereals |
| Basil | Not applicable |
| Fusarium wilt | Indefinite; plant disease-free seed in disease-free soil or potting mix |
| Bean, dry | Not applicable |
| White mold (Sclerotinia rot) | 8–9 years; avoid tomato, potato, lettuce, cabbage, celery, carrot, peas |
| Bean, green | Not applicable |
| Fusarium root rot | 5–6 years; rotate with grass or small grain crops |
| Gray mold | 2 years; rotate with cereals and corn |
| White mold (Sclerotinia disease) | 2–3 years; avoid tomato, potato, lettuce, cabbage, celery, carrot, peas |
| Bacterial blight | 2 years; eliminate overhead irrigation |
| Beet, red | Not applicable |
| Cercospora leaf spot | 3 years |
| Root rots | 3 years; rotate with grain crops and sweet corn |
| Broccoli | Not applicable |
| Bacterial blight | 2+ years; no crucifer crops |
| Bacterial soft rot (Erwinia) | 2+ years; no crucifer crops |
| Blackleg | 5 years; no crucifer crops |
| Clubroot | 10 years; no crucifer crops, adjust pH ≥6.8 |
| Damping off | 2+ years; no crucifer crops |
| Downy mildew | 2 years; no crucifers |
| Ringspot | 2+ years; no crucifer crops |
| Brussels sprouts | Not applicable |
| Bacterial leaf spot | 2 years; no crucifer crops |
| Blackleg | 5 years; no crucifer crops |
| Clubroot | 10 years; no crucifer crops, adjust pH ≥6.8 |
| Ringspot | 2+ years; no crucifer crops |
| Sclerotinia stem rot & watery soft rot | 3+ years; rotate with grain crops |
| Sprout rot | 4 years; pH ≥6.5 |
| Chard, Swiss | Not applicable |
| Blackleg | 5 years; no crucifer crops |
| Damping off | 2+ years; no crucifer crops |
| Leaf spot | 3 years; no crucifer crops |
| Cabbage | Not applicable |
| Nematode (sugar beet cyst) | 2 years for slight infestations; 5–6 years for severe infestations; avoid crucifers. Rotate with beans, clover, corn, grains, peas, potatoes, and tomatoes annually. Alfalfa is suitable for a long rotation period |
| Cabbage and cauliflower | Not applicable |
| Blackleg | 5 years; no adjacent crucifer crops for this time period |
| Black rot | 2–3 years; no crucifer crops |
| Club root | 6+ years; no crucifer crops; adjust pH to 6.8 or above |
| Damping off and wirestem | 3 years; rotate with cereals |
| Leaf spot | 3 years; no crucifer crops |
| Phytophthora root rot | 3 years; rotate with nonsusceptible crops such as grass or grains |
| Water soft rot (white blight) | 3 years; rotate with nonsusceptible crops such as grass or grains |
| White mold, Sclerotinia | 3 years; rotate with grains and sweet corn |
| Cantaloupe | Not applicable |
| Fusarium wilt | 4+ years; no cucurbit crops; avoid soil with a history of this disease |
| Leaf blight | 2+ years; do not plant other cucurbits |
| Leaf spot, gummy stem blight & scab | 2+ years; do not plant other cucurbits |
| Carrot | Not applicable |
| Alternaria leaf spot & leaf blight | 1–2 years |
| Bacterial leaf blight | 2–3 years |
| Black rot | 1–2 years |
| Cavity spot | 6–7 years; avoid fields with a recent history of cavity spot |
| Cercospora leaf spot, leaf blight | 1–2 years |
| Cottony soft rot (white mold) | 2 years; rotate onions, grasses, cereals; do not rotate with beans, lettuce, parsnips, crucifers; do not grow early or late crops in fields with a history of this disease as heavy rains can cause severe losses |
| Nematode (root-knot) | 4–5 years; rotate with a nonhost crop such as corn or cereals |
| Violet root rot | 4–5 years; rotate with cereals and grasses |
| Celery | Not applicable |
| Fusarium yellows | 2–3 years; rotate with corn, crucifers, cucurbits, or onions |
| Late blight | 2 years |
| Leaf blights | 2 years |
| Sclerotinia pink rot | 2–3 years; rotate with corn, cereals, beets, onions, and spinach |
| Corn | Not applicable |
| Leaf spots & blights | 2–3 years |
| Seed rot & seedling blight | 2–3 years |
| Smut (head) | 3–4 years |
| Stalk rots | 2–3 years |
| Cucumber | Not applicable |
| Alternaria leaf spot | 2 years |
| Powdery mildew | 2 years; plant no cucurbits during this time |
| Scab (gummosis) | 2–3 years; plant no cucurbit crops during this time |
| Sclerotinia stem rot (white mold) | 2–3 years; do not follow potato or tomato crops |
| Eggplant | Not applicable |
| Anthracnose | Rotate crops |
| Cercospora leaf spot | Rotate crops |
| Root rot | Practice light irrigation and crop rotation |
| Verticillium wilt | 4–5 years; rotate with grasses and grains, no solanaceous crops, strawberry or brambles |
| Garlic | Not applicable |
| Leaf blight | 2–3 years |
| Nematode (stem & bulb) | 2 years |
| White rot | 6–7 years; plant only disease-free cloves in disease-free soil |
| Ginseng | Not applicable |
| Verticillium wilt | 3–4 years; rotate with alfalfa or cereal crops |
| Lettuce | Not applicable |
| Anthracnose | 4–5 years |
| Bottom rot | 3 years; rotate with sweet corn or onions |
| Drop (watery soft rot) | 3 years; rotate with corn, cereals, grasses, onions, table beets, spinach; avoid tomato, potato, beans, cabbage, celery, carrots |
| Varnish spot | 2–3 years |
| Onion | Not applicable |
| Basal plate rot | 4 years |
| Botrytis leaf blight | 2–3 years; no allium crops |
| Downy mildew | 3–4 years |
| Nematode (stubby-root) | 5–6 years; do not plant after a mint crop |
| Pink root | 3–6 years |
| Purple blotch | 5–6 years; no allium crops |
| White rot | 6–7 years; plant only disease-free material in disease-free soil |
| Parsley | Not applicable |
| Leaf spot and root canker | 2 years |
| Parsnip | Not applicable |
| Leaf spot and root canker | 2 years |
| Pea | Not applicable |
| Aphanomyces root rot | 4–5 years |
| Ascochyta blight (basal stem rot or black stem) | 4 years; do not include vetch or alfalfa in the rotation |
| Downy mildew | 2–3 years; do not rotate with legumes |
| Nematode (pea cyst) | 4 years for slight infestation; eliminate peas if high infestation |
| Powdery mildew | 1 year |
| Root rots | 5 years |
| Seed rot and damping off | 3 years |
| Wilt and near-wilt | 5 years |
| Pepper | Not applicable |
| Anthracnose | 3 years |
| Cercospora leaf spot | 3–4 years |
| Phytophthora blight | 3 years; avoid tomato, eggplant, cucurbits |
| Root rot | 3–4 years |
| Verticillium wilt | 3 years; rotate with grass and grain crops |
| Potato | Not applicable |
| Black dot | 2–3 years |
| Early blight | 2 years; do not plant tomatoes |
| Fusarium wilt | 4–5 years |
| Nematode (potato rot) | 2–3 years; rotate with cereals and corn |
| Nematode (root-knot) | 2–3 years; rotate with cereals or sweet corn |
| Nematode (root-lesion) | 2–3 years; rotate with cereals or sweet corn |
| Powder scab | 3–4 years; avoid planting on previously contaminated ground |
| Pythium leak, pink rot | 4 years |
| Rhizoctonia canker (black scurf) | 3 years; best with cereals or grass |
| Scab | 2–3 years; no root crops; adjust pH to 5.2 or below |
| Sclerotinia stalk rot | 4 years; avoid tomato, lettuce, beans, cabbage, celery, carrot |
| Silver scurf | 3 years |
| Verticillium wilt | 3–4 years; do not plant solanaceous, cucurbits, mint or nursery maple crops; rotate with alfalfa or cereals |
| Radish | Not applicable |
| Black root | 3–4 years |
| Clubroot | 7 years; do not plant crucifers; adjust pH to 6.8 |
| Spinach | Not applicable |
| Downy mildew & white rust | 2–3 years |
| Tomato | Not applicable |
| Anthracnose | 1–2 years; alternate every other year with nonsolanaceous crop |
| Bacterial canker | 3–4 years |
| Bacterial spot | 2 years; do not plant peppers |
| Early blight | 3–4 years |
| Wilt | 4–6 years |
| Turnip and rutabaga | Not applicable |
| Black root rot | 3 years; do not plant any crucifers during this period |
| Club root | 6–7 years; do not plant crucifers; adjust pH to 6.8 |
| Powdery mildew | 1 year |
| Watermelon | Not applicable |
| Alternaria leaf spot | 1 year |
| Bacterial fruit blotch/seedling blight | 3 years; rotate with cucurbits, avoid overhead irrigation, use bacteria-free seed (seed tested) |
| Damping off | 2+ years; avoid planting in cool soil (<65°F) |
| Fusarium wilt | 10 years with nonsusceptible grain crops |
| Verticillium wilt | 14 years; use corn and grains in rotation, avoid former potato, tomato or mint |
| Winter squash & pumpkins | Not applicable |
| Alternaria leaf blight | 2–3 years; do not plant any cucurbits during this period |
| Angular leaf spot | 2 years |
| Crown and foot rot (Fusarium root rot) | 3–5 years; plant no cucurbits |
| Gummy stem blight (black rot) | 2–3 years; plant no cucurbits |
| Phytophthora blight | 3 years; do not plant tomato, pepper, eggplant, or cucurbits |
| Pythium root rot | 2 years |
| Scab (gummosis) | 2–3 years; plant no cucurbits |
| Sclerotinia stem rot | 2–3 years; do not plant potatoes |
Source: Adapted from A.A. McNab and T.A. Zitter’s Do Rotations Matter Within Disease Management Programs, Cornell Cooperative Extension of Oswego County. Table 5 courtesy of Carol Miles, Vegetable Horticulture Program, and Debra A. Inglis and Babette Gundersen, Vegetable Pathology Program, WSU-Mount Vernon NWREC. Based on crop rotation recommendations listed in the 2000 PNW Plant Disease Management Handbook.
Rotating Vegetable Crops
The primary reasons to rotate vegetables in the garden are: to limit the development of disease, reduce damage from insect pests, and manage soil fertility. As a general rule, rotate crops based on family, as many crops in the same family are often hosts to the same diseases and insects. For example, potato and tomato, both in the Solanaceae family, are affected by, Phytophthora infestans, which causes the disease commonly called Late Blight. This pathogen can overwinter on crop debris in the soil; therefore, do not plant potatoes in the bed or area where the previous year you had tomatoes. The families of common vegetable crops are presented in Table 6.
Table 6. Families of common vegetable crops.| Family name | Common name | Scientific Name |
|---|---|---|
| Aizoaceae | New Zealand spinach | Tetragonia expansa |
| Apiaceae | Carrot | Daucus carota var. sativa |
| Not applicable | Celeriac | Apium graveolens var. rapaceum |
| Not applicable | Celery | Apium graveolens var. dulce |
| Not applicable | Cilantro | Coriandrum sativum |
| Not applicable | Dill | Anethum graveolens |
| Not applicable | Fennel | Foeniculum vulgare |
| Not applicable | Parsley | Petroselinum crispum |
| Not applicable | Parsnip | Pastinaca sativa |
| Asteraceae | Artichoke | Cynara scolymus |
| Not applicable | Cardoon | Cynara cardunculus |
| Not applicable | Chicory | Chichorium intybus |
| Not applicable | Dandelion | Taraxacum officinale |
| Not applicable | Endive | Cichorium endivia |
| Not applicable | Jerusalem artichoke | Helianthus tuberosus |
| Not applicable | Lettuce | Lactuca sativa |
| Not applicable | Salsify | Tragopogon porrifolius |
| Brassicaceae/Cruciferae | Arugula | Eruca sativa |
| Not applicable | Broccoli | Brassica oleracea var. italica |
| Not applicable | Brussels sprouts | Brassica oleracea, var. gemmifera |
| Not applicable | Cabbage | Brassica oleracea var. capitata |
| Not applicable | Cauliflower | Brassica oleracea var. botrytis |
| Not applicable | Chinese cabbage | Brassica chinensis or pekinensis |
| Not applicable | Collard | Brassica oleracea var. viridis |
| Not applicable | Cress | Lepidium sativum |
| Not applicable | Horseradish | Armoracia rusticana |
| Not applicable | Kale | Brassica oleracea var. viridis |
| Not applicable | Kohlrabi | Brassica oleracea var. gongylodes |
| Not applicable | Mustard | Brassica juncea |
| Not applicable | Radish | Raphanus sativus |
| Not applicable | Rutabaga | Brassica campestris var. napobrassica |
| Not applicable | Turnip | Brassica rapa |
| Chenopodiaceae | Beet | Beta vulgaris |
| Not applicable | Chard | Beta vulgaris var. cicla |
| Not applicable | Spinach | Spinacia oleracea |
| Convalvulaceae | Sweet potato | Ipomoea batatas |
| Cucurbitaceae | Cucumber | Cucumis sativus |
| Not applicable | Gherkin | Cucumis anguria |
| Not applicable | Muskmelon/cantaloupe | Cucumis melo |
| Not applicable | Pumpkin | Cucurbita pepo |
| Not applicable | Summer squash | Cucurbita pepo var. melopepo |
| Not applicable | Watermelon | Citrullus lunatus |
| Not applicable | Winter squash | Cucurbita maxima or moschata |
| Fabaceae | Broad bean | Vicia faba |
| Not applicable | Bush bean | Phaseolus vulgaris |
| Not applicable | Kidney bean | Phaseolus vulgaris |
| Not applicable | Lima bean | Phaseolus limensis |
| Not applicable | Pea | Pisum sativum |
| Not applicable | Scarlet runner | Phaseolus coccineus |
| Not applicable | Soybean, | Glycine max |
| Liliaceae/Alliaceae | Asparagus | Asparagus officinalis var. altilis |
| Not applicable | Chive | Allium schoenoprasum |
| Not applicable | Garlic | Allium sativum |
| Not applicable | Leek | Allium porrum |
| Not applicable | Onion | Allium cepa |
| Not applicable | Shallot | Allium ascalonicum |
| Not applicable | Welsh onion | Allium fistulosum |
| Poaceae | Sweet corn | Zea mays var. rugosa |
| Solanaceae | Eggplant | Solanum melogena |
| Not applicable | Husk tomato | Physalis pubescens |
| Not applicable | Pepper | Capsicum frutescens |
| Not applicable | Potato | Solanum tuberosum |
| Not applicable | Tomato | Solanum lycopersicum |
| Valerianaceae | Corn salad | Valerianella oliteris |
Planting
Seeds can be sown outside directly in the garden or started earlier inside to be set out as transplants. Table 7 provides recommended plant spacing information for many vegetable crops. In row cropping, the between-row spacing is generally quite a bit wider than the in-row spacing. In raised beds, plants are grown with the same spacing between the rows as within the rows. This results in more plants per square foot in a raised bed compared with row cropping, and this is the reason why raised beds are commonly used for intensive gardens.
Table 7. Seeding recommendations for common vegetables crops.| Vegetable | Seeding | Not applicable | Not applicable | Germination | Not applicable | Growth | Not applicable | Not applicable |
|---|---|---|---|---|---|---|---|---|
| Not applicable | Depth to plant (in) | Distance between plants (in) | Distance between rows (in) | Number of days to germinate | Optimum soil temperature range (°F) | Base air temperature (°F) | Weeks to grow to transplant size | Days to maturity |
| Artichoke: cardoon | ¼–½ | 18 | 36 | 8–14 | 65–82 | 50 | 6–8 | 85–120 |
| Artichoke: Jerusalem (Sunchoke tuber) | 4 | 12–18 | 36–48 | 10–20 | 65–90 | 50 | DS | 110–150 |
| Arugula | ¼ | 6 | 10–12 | 7–14 | 45–75 | 40–55 | DS1 | 30–40 |
| Asparagus, seed | 1½ | 12 | 18–36 | 24–30 | 50–85 | 40 | 12–14 | 2–3 years |
| Asparagus, crown | 6–9 | 12 | 18–36 | 12–20 | 60–85 | 40 | DS | 1–2 years |
| Celtuce | ¼ | 8 | 10–20 | 7–10 | 50–80 | 50–60 | 4–5 | 80 |
| Bean: bush | 1½–2 | 2 | 18–30 | 6–14 | 60–90 | 50 | DS | 50–70 |
| Bean: pole | 1½–2 | 3 | 24–36 | 6-14 | 60-85 | 50 | DS | 55-65 |
| Bean: Lima bush | 1½–2 | 3 | 18-30 | 7-12 | 70-85 | 55 | DS | 75-80 |
| Bean: Lima pole | 1½–2 | 3–4 | 24–36 | 7–12 | 75–85 | 55 | DS | 85–90 |
| Bean: Garbanzo, chickpea | 1½–2½ | 3–4 | 24–30 | 6–12 | 45 | 65 | DS | 85–125 |
| Bean: Scarlet runner | 1½–2 | 4–6 | 36–48 | 8–16 | 65–85 | 50 | DS | 60–70 |
| Bean: Edamame | 1½–2 | 2–3 | 24–30 | 6–14 | 55 | 50 | DS | 85–100 |
| Bean, Yardlong | 1 | 3 | 24–36 | 6–13 | 60 | 50 | DS | 75–85 |
| Beet | ½–1 | 3 | 12–18 | 7–10 | 50–85 | 40 | DS | 45–55 |
| Black-Eyed Pea (Cowpea, Southern Pea) | 1–1½ | 2–4 | 24–30 | 7–14 | 70–85 | 65 | DS | 105–125 |
| Bok Choy | ¼–½ | 4–12 | 10–18 | 5–14 | 50–80 | 45 | 4–5 | 30–50 |
| Broccoli | ¼–½ | 12–18 | 18–24 | 3–10 | 50–60 | 40 | 5–6 | 50–80 |
| Brussels Sprouts | ¼–½ | 18–24 | 24–36 | 3–10 | 45–85 | 40 | 5–6 | 80–105 |
| Cabbage | ¼–½ | 12–24 | 24–36 | 4–10 | 50–90 | 50 | 5–6 | 65–95 |
| Cabbage, Chinese | ¼–½ | 10–18 | 18–30 | 4–10 | 60–85 | 50 | 4–6 | 70–90 |
| Carrot | ¼–½ | 1–2 | 12–24 | 7–21 | 50–75 | 45 | DS | 60–80 |
| Cauliflower | ¼–½ | 18 | 24–36 | 4–10 | 45–85 | 50 | 5–6 | 65–80 |
| Celeriac | ⅛ | 8 | 24–36 | 9–21 | 70–75 | 60 | 10 | 90–120 |
| Celery | ⅛ | 8 | 24–36 | 9–21 | 60–70 | 45 | 10–12 | 120–140 |
| Chicory, endive, escarole | ½ | 8–10 | 12–24 | 5–9 | 50–80 | 40 | 4–6 | 50–60 |
| Witloof chicory, Belgian endive | ¼–½ | 4–8 | 18–24 | 7–21 | 50–75 | 45 | 4–6 | 100–120 |
| Chicory, Italian Dandelion | ¼–½ | 8–10 | 12–16 | 7–14 | 50–75 | 40 | DS | 45–55 |
| Chive | ¼–½ | 2–4 | 12–18 | 7–21 | 50–70 | 45 | 4–6 | 80–90 |
| Collards | ½–¾ | 8–18 | 18–30 | 4–10 | 40–85 | 40 | 5–6 | 65–85 |
| Corn, Sweet | 2 | 6–12 | 24–36 | 6–10 | 60–90 | 48 | DS | 65–90 |
| Corn Salad, mâche | ¼–½ | 4–6 | 6–18 | 10–14 | 50–65 | 40 | DS | 45–55 |
| Cress, garden | ¼–½ | 4–6 | 3–4 | 4–10 | 55–75 | 45 | DS | 25–45 |
| Cucumber | 1 | 12–18 | 36–48 | 6–10 | 70–95 | 55 | 4–5 | 45–65 |
| Eggplant | ¼–½ | 18 | 24–36 | 7–14 | 70–90 | 60 | 6–9 | 75–95 |
| Fennel, florence, finocchio: bulb | ¼–½ | 10–12 | 24–36 | 12–18 | 50–75 | 30 | 6–8 | 100–120 |
| Garlic: bulb | 2 | 4–6 | 12–24 | 6–10 | 35–50 | 30 | DS | 90–150 |
| Horseradish, root | 4 | 12–24 | 24–48 | 10–20 | 45–75 | 40 | DS | 140–160 |
| Kale | ¼–½ | 8–12 | 18–24 | 3–10 | 60–90 | 40 | 5–6 | 55–80 |
| Kohlrabi | ½ | 8 | 18–24 | 3–10 | 50–80 | 40 | 6–8 | 60–70 |
| Leek | ¼–½ | 4–6 | 18–24 | 7–12 | 45–90 | 35 | 10–12 | 80–90 |
| Lettuce: head | ⅛–¼ | 12–14 | 18–24 | 4–10 | 40–80 | 40 | 4–6 | 55–80 |
| Lettuce: leaf | ⅛–¼ | 2–4 | 4–6 | 7–10 | 50–80 | 40 | 4–6 | 45–60 |
| Muskmelon | 1 | 24–36 | 36–48 | 4–8 | 75–95 | 50 | 3–4 | 75–95 |
| Mustard Greens | ¼–½ | 8–18 | 12–24 | 3–10 | 45–85 | 35 | 5–6 | 35–65 |
| Onion: set | 1–2 | 2–3 | 12–24 | n/a | 50–90 | 40 | DS | 90–110 |
| Onion: seed | ¼–½ | 1–2 | 12–18 | 10–20 | 50–90 | 40 | 5–6 | 80–120 |
| Parsley | ¼–½ | 2–4 | 12–18 | 20–30 | 50–85 | 35 | 6–8 | 75–90 |
| Parsnip | ¼–½ | 2–3 | 18–24 | 20–25 | 50–85 | 45 | DS | 100–120 |
| Pea | 1–2 | 2–3 | 18–36 | 6–15 | 45–85 | 40 | DS | 65–85 |
| Pepper | ¼–½ | 18–24 | 12–24 | 10–20 | 65–95 | 50 | 6–8 | 60–80 |
| Potato: tuber | 2–3 | 12 | 30–36 | 14–21 | 40 | 40 | DS | 90–105 |
| Pumpkin | 1–1½ | 36 | 72 | 6–10 | 70–90 | 45 | 4–6 | 70–110 |
| Radicchio | ¼–½ | 8–10 | 8–18 | 7–10 | 45–85 | 40 | 4–6 | 65–90 |
| Radish | ½ | 1–2 | 6–12 | 3–10 | 50–65 | 40 | DS | 20–30 |
| Rutabaga | ½ | 6–8 | 18–24 | 3–10 | 45–85 | 40 | DS | 80–90 |
| Salsify | ½ | 3–4 | 18–24 | 14–20 | 55–75 | 40 | DS | 110–150 |
| Shallot: bulb | 1 | 4–6 | 12–18 | 18 | 45–95 | 32 | DS | 60–75 |
| Spinach | ½ | 2–4 | 12–18 | 6–14 | 45–75 | 15–20 | DS | 30–40 |
| Spinach: New Zealand | ¼–½ | 6 | 24 | 5-10 | 60-75 | 50 | 4-6 | 70-80 |
| Squash (summer) | 1–1½ | 18–24 | 36–48 | 3–12 | 70–95 | 45 | 4–6 | 45–60 |
| Squash: (winter) | 1–1½ | 24–36 | 72 | 6–10 | 60–90 | 45 | 4–6 | 85–120 |
| Sweet Potato: slip | 1–2 | 12–18 | 36–48 | 14–20 | 75–80 | 60 | DS | 150 |
| Swiss chard | ½ | 4–12 | 18–24 | 7–14 | 50–85 | 40 | DS | 55–65 |
| Tomato | ¼–½ | 18–36 | 36–48 | 6–14 | 70–85 | 51 | 5–6 | 55–90 |
| Tomato: Ground cherry, Husk tomato | ¼–½ | 18–24 | 36 | 6–13 | 70–85 | 51 | 6–7 | 90–100 |
| Turnip | ¼–½ | 2–3 | 12–18 | 3–10 | 40–85 | 35 | DS | 40–50 |
| Watermelon | 1–1½ | 24–36 | 48–60 | 3–12 | 60–95 | 55 | 4–6 | 80–100 |
Source: Adapted from Propagating Plants from Seed listed in the Further Reading section.
1 DS is direct seeded.
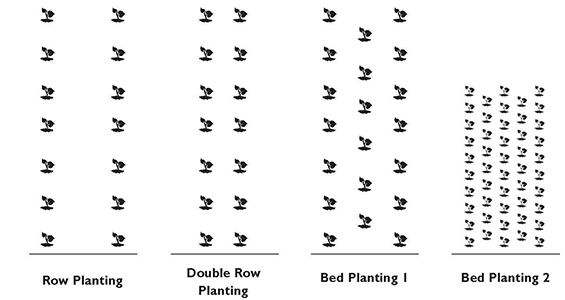
There are several planting schemes or designs for vegetable beds (Figure 7). Row planting is generally used for large crops, such as sweet corn and tomatoes, but these crops can also be planted in a double row to save space. In bed planting, offset the rows so that the maximum number of plants are fitted into the bed and the bed space is fully utilized.
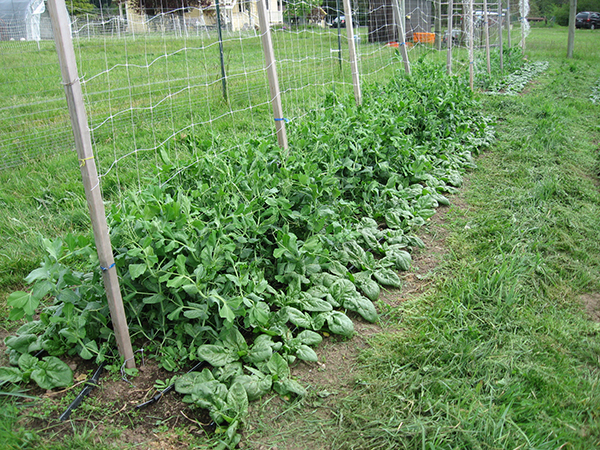
There are several other ways you can maximize your garden space usage. First, interplant a slow-growing crop such as tomatoes, broccoli, or peppers with a fast-growing crop such as radish or lettuce. After you harvest the fast-growing crop, the slow-growing crop will fill the space. Second, when you direct seed or transplant crops such as lettuce, beets, or spinach, you can plant heavily and thin plants to their final spacing over time. The thinned plants can be eaten rather than discarded. Third, use a trellis for tall or vining crops, such as tomatoes and cucumbers, and grow a shorter crop, such as lettuce or basil, at the base of the trellis (Figure 8). And fourth, you can maximize your garden space by interplanting shallow-rooted crops with deep-rooted crops (Table 8).
Table 8. General rooting depths of some common vegetable crops.| Shallow-rooting (18–36”) | Medium-rooting (36–48”) | Deep-rooting (48+”) |
|---|---|---|
| Broccoli | Bean, snap | Artichoke |
| Brussels sprouts | Beet | Asparagus |
| Cabbage | Carrot | Bean, lima |
| Cauliflower | Cucumber | Parsnip |
| Celery | Eggplant | Pumpkin |
| Chinese cabbage | Mustard | Squash, winter |
| Corn | Pea | Sweet potato |
| Endive | Pepper | Tomato |
| Garlic | Rutabaga | Not applicable |
| Leek | Squash, summer | Not applicable |
| Lettuce | Swiss chard | Not applicable |
| Onion | Turnip | Not applicable |
| Parsley | Not applicable | Not applicable |
| Potato | Not applicable | Not applicable |
| Radish | Not applicable | Not applicable |
| Spinach | Not applicable | Not applicable |
Source: Adapted from Knott’s Handbook for Vegetable Growers, listed in the Further Reading section.
Seed Quality
The most important consideration before starting any plant is the quality of the seeds. Seeds that have poor germination and vigor will produce poor quality plants no matter how much care you give them. Most gardeners purchase seeds from nurseries, garden supply stores, or catalogs. If you wish to use seed that you have saved from your own garden, only save seed from healthy, disease-free plants. Do not save seed from hybrid varieties as the seed you collect from these plants will not grow true-to-type.
Direct Seeding
Plant seeds of your vegetable crops directly into the ground when soil temperatures are within the optimum range for good germination (Table 9). Some crops such as cabbage, carrot, cauliflower, lettuce, pea, radish, and spinach will germinate when soil temperatures are quite low (40–45°F), but most crops germinate best when soil temperatures are warm (around 65–75°F). All cucurbit crops (cucumbers, melons, and squash) and solanaceous crops (tomatoes, peppers, eggplants) will not germinate well unless soil temperatures are warm (at least 65–70°F). Regardless of the crop, do not seed into cold, wet soil because the disease incidence under these conditions can be quite high. Some crops, such as carrots and turnips, do not transplant well and other crops, such as bulb fennel, grow fastest when direct seeded (Figure 9), so it is always best to direct seed them.
Table 9. Minimum, maximum, and optimum soil temperatures for vegetable seed germination.| Vegetable | Minimum (°F) | Optimum Range (°F) | Optimum (°F) | Maximum (°F) |
|---|---|---|---|---|
| Asparagus | 50 | 60–85 | 75 | 95 |
| Bean | 60 | 60–85 | 80 | 95 |
| Bean, lima | 60 | 65–85 | 85 | 85 |
| Beet | 40 | 50–85 | 85 | 95 |
| Carrot | 40 | 45–85 | 80 | 95 |
| Cauliflower | 40 | 45–85 | 80 | 100 |
| Celery | 40 | 40–70 | 70 | 85 |
| Chard | 40 | 50–85 | 85 | 95 |
| Corn | 50 | 60–95 | 95 | 105 |
| Cucumber | 60 | 60–95 | 95 | 105 |
| Eggplant | 60 | 75–90 | 85 | 95 |
| Lettuce | 35 | 40–80 | 75 | 85 |
| Muskmelon | 60 | 75–95 | 90 | 100 |
| Okra | 60 | 70–95 | 95 | 105 |
| Onion | 35 | 50–95 | 75 | 95 |
| Parsley | 40 | 50–85 | 75 | 90 |
| Parsnip | 35 | 50–70 | 65 | 85 |
| Pea | 40 | 40–75 | 75 | 85 |
| Pepper | 60 | 65–95 | 85 | 95 |
| Pumpkin | 60 | 70–90 | 90 | 100 |
| Radish | 40 | 45–90 | 85 | 95 |
| Spinach | 35 | 45–75 | 70 | 85 |
| Squash | 60 | 70–95 | 95 | 100 |
| Tomato | 50 | 60–85 | 85 | 95 |
| Turnip | 40 | 60–105 | 85 | 105 |
| Watermelon | 60 | 70–95 | 95 | 105 |
Source: Knott’s Handbook for Vegetable Growers, listed in the Further Reading section.
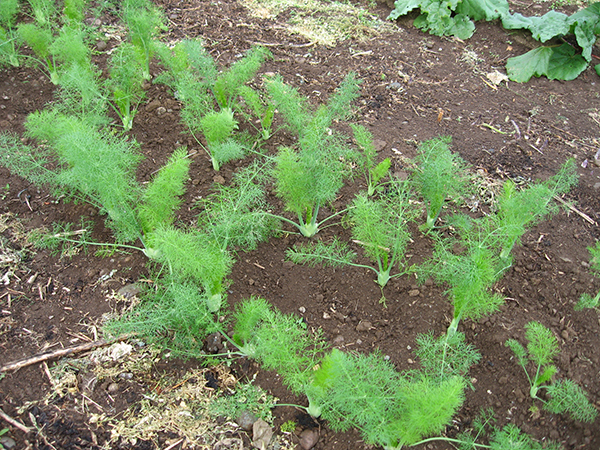
As a general rule, the planting depth for most seeds is equal to twice the size of the seed. The planting depth for most small-seeded crops is ⅛ to ½ inch, while large-seeded crops are generally planted 1–2 inches deep. Refer to Table 7 for recommended planting depths for many specific vegetable crops. Seed large crops in rows, and place two seeds per planting hole (thinning one if both emerge) to ensure that you attain the correct plant stand (number of plants in a given area). Small crops, such as radish, can be sown close together in rows or broadcast seeded. Over time you can thin the plants to their final spacing, and the thinned plants can be eaten rather than discarded.
Growing Transplants
Starting seeds indoors in mid-spring enables you to gain four to eight weeks on the growing season. In western Washington, this can enable gardeners to grow some varieties and crops that might not otherwise mature in the relatively cool summer climate of their region. Additionally, there are many varieties of vegetable crops available through seed catalogs that are not available through local garden stores. Many small-seeded crops, such as lettuce, pepper, tomato, and basil, to name some, do better as transplants than when direct seeded, because they tend to be susceptible to adverse environmental conditions and seedling diseases. Indoors you can protect them from damaging winds, heavy rains, or hail. Tiny seeds can be more carefully sown in flats than in garden beds. Some plants, like tomatoes or peppers, will not mature at all in our northern climate unless started indoors.
For best germination, use a commercial seed starting potting mix that contains vermiculite, perlite, and sphagnum moss to provide a light medium that promotes good root development. Commercial mixes also contain some amendments to provide nutrition for the seedling once it begins development. Homemade potting mixes using garden soil or compost tend to contain weed seeds, pathogens, and insects that should not be brought indoors. Most soil types will form a crust and drain poorly under transplant growing conditions.
Plant seeds for transplants four to eight weeks prior to the date when you plan to set them out in the garden. Refer to Table 7 for more specific information regarding the number of weeks needed to produce transplants of specific crops. Sow large-seeded crops directly into the final transplant pot. Sow small-seeded crops very close together in seeding trays to conserve space and “prick out” seedlings into larger transplant pots after the cotyledons have fully emerged. Do not allow transplants to become root bound, especially cucurbits (melons, cucumbers, and pumpkins), as plants can become permanently stunted.
While you can use a variety of containers for seed starting, choose items that are efficient for the space you have and that are durable so you can reuse them year after year. A 72-cell seedling flat, a bottom tray, and a clear plastic dome cover are ideal for seed starting and cost about $4.50 (Figure 10). Fill each cell with starting mix, saturate the mix thoroughly with water, allow any excess moisture to drain out, and place the seedling flat in the tray. Place one or more seeds in each cell, planting them to the recommended depth (Table 7). If you use the flat for more than one type of crop, place masking tape across the flat and use a water-resistant marker to write the crop name. However, do not plant slow- and fast-germinating plants in the same flat (see Table 7). Place the dome over the flat to contain the moisture and place the flat in a warm place; light is not needed to sprout seeds. Remove the dome once more than half the seeds have sprouted, to reduce the risk of damping off. Place the flat where it will get adequate light. In areas with good sun exposure, place the flat in a window and turn the flat each day to prevent seedlings from bending in one direction. In areas without adequate sunlight, place the flat under a grow light.
Another simple way to start seeds is to use 4-inch pots: fill pots with seedling mix, press down the mix lightly, saturate the mix thoroughly with water, and allow excess moisture to drain. Plant six to eight seeds of one variety per pot and label each pot. Place the pots on a tray, place into a clear plastic bag, and close the bag with a clothespin to conserve the moisture (Figure 10). In this way, you will not need to water the pots as long as they are in the bag. Remove each pot from the bag when more than half of the seeds in the pot have sprouted and place in adequate light.
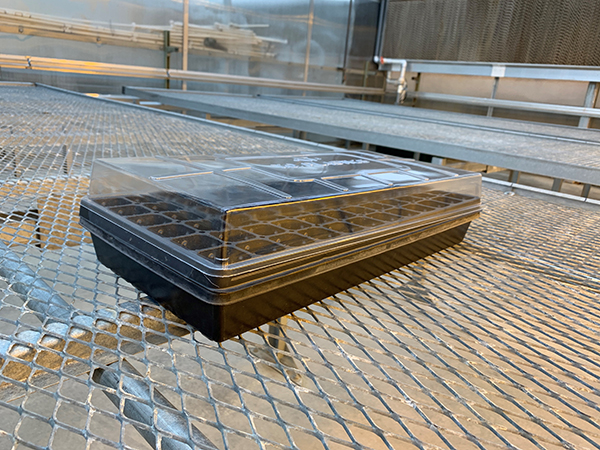
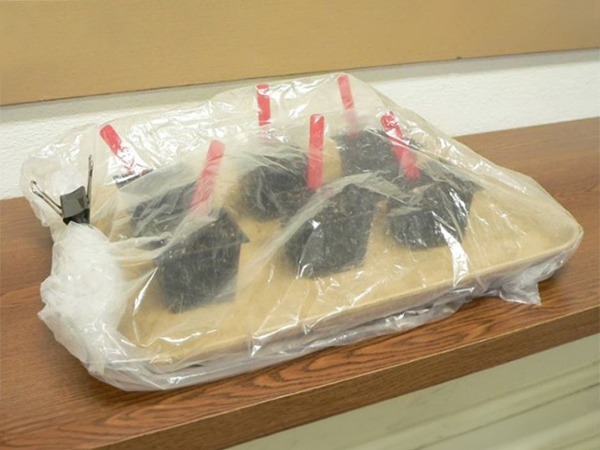
After you have placed the flats or pots in the light, water lightly once a day or as needed to maintain moist, but not saturated, soil conditions. After seedlings develop one or two sets of true leaves, transfer them into larger pots filled with transplant potting mix. Some potting mixes will have starter fertilizer included, which is sufficient for germination and early growth. After the first true leaves are present, water once a week with a weak solution of water-soluble complete fertilizer. Transplants are ready to be placed in the garden when they have a sturdy top, a robust root system, and the temperature is suitable.
If you are using recycled or previously used seedling flats or pots, first wash them in soap and water to remove all debris and then rinse. Next, soak them in a household bleach and water solution, mixed according to the bleach label directions for hard, nonporous surfaces. This will kill pathogens and prevent damping off. Finally, rinse them three times in clean water to remove bleach residue.
Hardening Transplants
A week or two prior to being planted in your garden, transplants will need a period of preparation to resist the weather challenges. The process of preparing indoor-grown seedlings for the outside garden environment is referred to as “hardening off.” Plants that are hardened off have a temporarily decreased growth rate, which enables the plant to store energy and better withstand transplant shock from exposure to outdoor growing conditions (low temperatures, increased sunlight, and drying winds), plus root injury and moisture stress that occurs during transplanting.
Gradually reduce watering, but do not allow plants to dry out suddenly or wilt. Set plants outside in a protected area during the day in the first week of hardening off, and for the entire day and night in the second week—but cover plants at night to avoid cold damage. Hardening temperatures should be just 5–10°F less than the inside growing temperatures. Do not apply fertilizer immediately before or during hardening but do water and fertilize plants well at transplanting to encourage quick plant establishment and growth.
Planting Schedule
Recommended dates for direct seeding and transplanting vary across the state and depend on minimum temperatures and type of vegetable crop. See Table 10 (Artichoke-Turnip) for suggested planting and transplanting schedules for western and eastern Washington. Specific dates will vary by location and microclimate. As always, the best way to determine what dates work best in your area is to experiment and talk with other gardeners. Refer to the following key when interpreting planting schedules by crop:
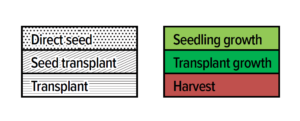
Artichoke (globe and Jerusalem)
Western Washington
For globe artichokes, planting activities begin in mid-February with direct seeding, followed by an extended seedling growth period through March and April. Transplanting begins in early May and continues into June, with transplant establishment and active growth carrying the plants into early summer. The harvest period begins in mid-July, continues through August and September, and concludes in mid-October. No planting, growth, or harvest activity is shown from November through January.
For Jerusalem artichokes, planting starts in late February through direct seeding, followed by seedling growth through March and early April. No transplanting period is indicated for this varietal. Growth continues through the summer, and the harvest period begins in late August, extending through September and ending in mid-October. There is no activity shown from November through January.
Eastern Washington
Planting begins in early March, predominantly through transplanting, with a short window of direct seeding occurring in mid-March. Seedling growth extends through March and April, followed by a concentrated transplanting period in late April and early May. Plant development continues through June and July until the crop enters its harvest period in mid-July, which lasts through August and September, ending in early October.
For Jerusalem artichokes, planting begins in mid-March with direct seeding, followed by seedling growth through March and April. No transplanting stage is shown for this varietal. Growth continues through summer, and the harvest period begins in early August, lasting through September and finishing in early October. No activity is indicated for the winter months.
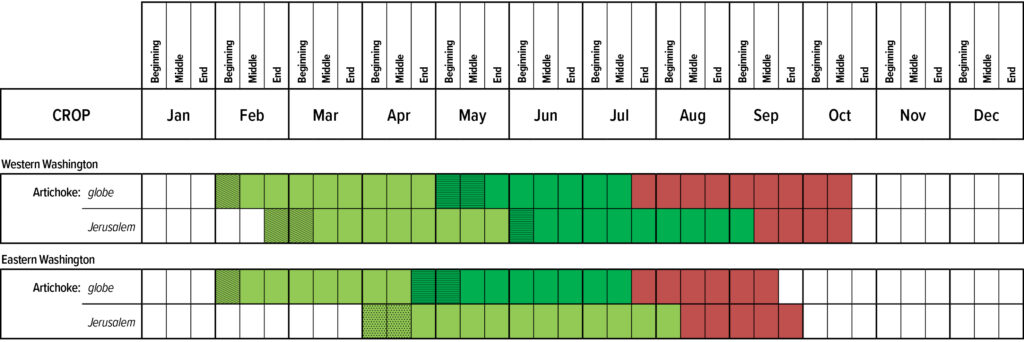
Arugula
Western Washington
Arugula planting begins in mid-March with direct seeding, which continues through April and into early May. Seedling growth follows immediately after each seeding period throughout March, April, and May, supporting successive plantings. Transplanting is not indicated for this crop in the western region. By mid-June, the crop enters its harvest period, which continues through July, August, September, and into October, concluding in early November. No additional planting or growth activity is shown from November through February.
Eastern Washington
Arugula planting starts later, beginning in early April with a short period of transplanting, followed by active direct seeding from mid-April through early May. Seedling growth continues through April and May, and transplant growth extends briefly into early June. The harvest period begins in late June, continuing consistently through July, August, September, and October, ending in early November. No planting or growth activity is shown from November through March.
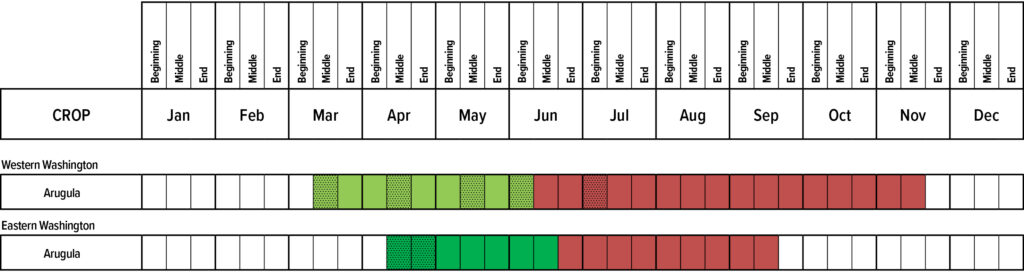
Asparagus (seed and crown)
Western Washington
Asparagus grown from seed begins with direct seeding in late February, followed by seedling growth throughout March and April. A transplanting period begins in early May and continues through late May, after which transplant growth and establishment carry forward through the summer and into the fall.
For asparagus established from crowns, planting begins slightly earlier in mid-March, followed by active growth through April. Transplanting begins alongside the seed-grown crop in early May and continues through the month, after which the crop continues its vegetative growth uninterrupted. Across both seed and crown methods, the crop remains in a continuous growth and establishment phase from June through November, with no harvest period indicated in the chart. No planting or growth activity is shown for December through January.
Eastern Washington
Asparagus grown from seed follows a similar but slightly earlier pattern. Direct seeding begins in early March, followed by seedling growth throughout March and April. Transplanting begins in early May and continues through late May, with transplant growth extending steadily through the summer and fall.
Asparagus planted from crowns begins in mid-March, followed by active early growth through April, and then transitions into transplanting in early May, continuing through the month. Just like in the western region, both seed- and crown-established asparagus remain in continuous vegetative growth from June through November, with no harvest period shown. No planting or growth is indicated in December through February.
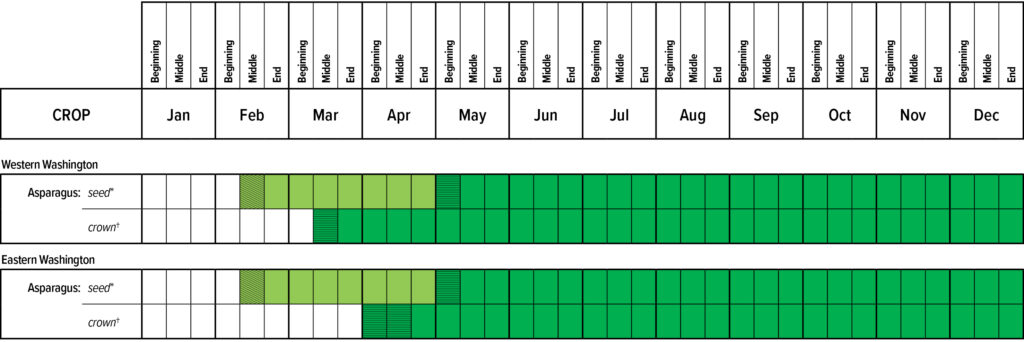
*Harvest begins in the third year.
†Harvest begins in the second year.
Beans (bush, pole, and fava)
Western Washington
Bush beans begin with direct seeding in late May, followed by seedling growth through June and into early July. Harvest begins in mid-July and continues through August, September, and ends in mid-October.
Pole beans follow the same schedule as bush beans, beginning with direct seeding in late May, progressing through seedling growth in June and early July, and entering harvest from mid-July through mid-October.
Fava beans have a distinctly different schedule, beginning with seedling growth starting in January and continuing through February, March, and into early April. Harvest for fava beans begins in mid-April, continues through May, and ends in early June. After a period with no activity through July, a second planting window appears, with direct seeding occurring in late August, followed by seedling growth from September through November. No winter activity is indicated for bush, pole, or fava beans.
Eastern Washington
Bush beans begin with direct seeding in early May, followed by seedling growth through May and June, and a short period of transplant growth in late June. Harvest begins in early July and continues through August and September, ending in early October.
Pole beans follow the same pattern, beginning with direct seeding in late May, continuing with seedling and transplant growth through June, and entering harvest from mid August through mid September.
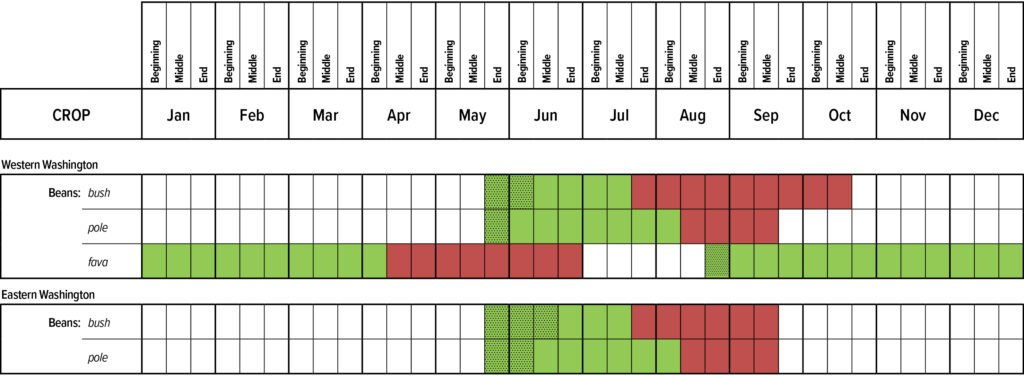
Beets
Western Washington
Beet planting begins in early April with direct seeding. Seedling growth continues through April and May, followed by a short period of transplant growth beginning in late May and continuing into early June. Harvest begins in mid-July, continues steadily through August, September, and October, and ends in early November. No planting, growth, or harvest activity is shown from November through March.
Eastern Washington
Beet planting begins slightly later, starting in early May with direct seeding. Seedling growth continues throughout May and June, followed by a brief transplant growth period in late June. Harvest begins in early July, continues through August and September, and concludes in early October. No activity is shown for the remainder of the year.
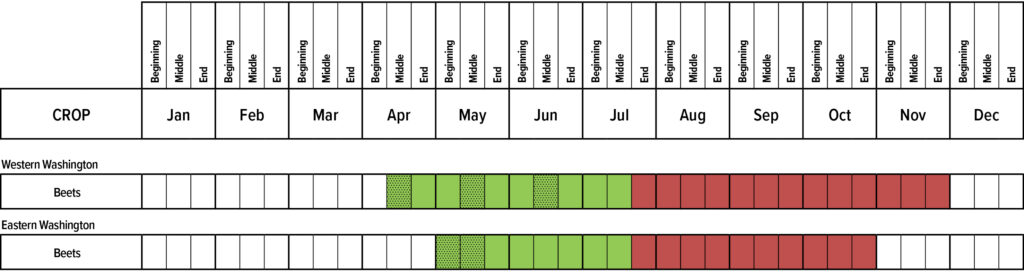
Broccoli (summer and winter)
Western Washington
For summer broccoli, planting begins in early April with transplanting. Seedling growth continues through April and May, followed by transplant growth beginning in late May and continuing into June. Harvest begins in late June, continues through July, August, September, and ends in early October.
Winter broccoli follows a different schedule, beginning with seedling growth in January, continuing through February and March, and transitioning into harvest in early April. Harvest continues through April and May, concluding in early June. A second growth period begins in late August, carries through September, October, and November, and continues into December, with no harvest shown for this late-season growth cycle.
Eastern Washington
For broccoli planting begins in late March with transplanting, followed by seedling growth through April and early May. Transplant growth begins in mid-May and continues into June. Harvest begins in mid-June, continues through July, August, and September, and ends in early October.
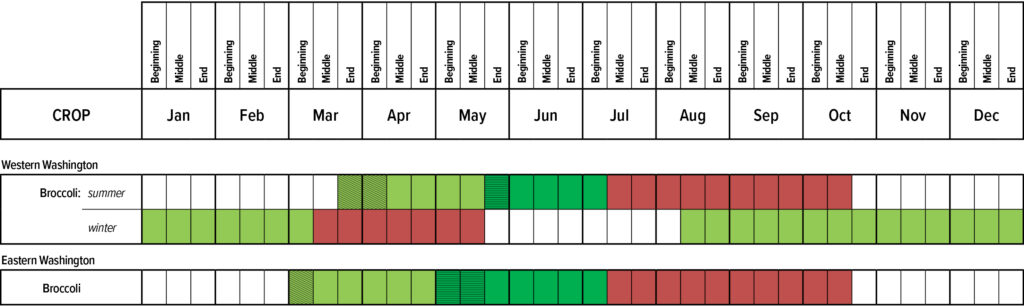
Brussels sprouts
Western Washington
Brussels sprouts begin with a long harvest period that spans January through early March from overwintered plantings. New planting activity begins in early April with transplanting, followed by seedling growth through April and May. Transplant growth continues through May and into June, supporting establishment of the summer crop. The main growth period runs from June through August, after which the crop enters harvest in early September. Harvest continues throughout September, October, November, and December, providing an extended late-season and winter harvest window.
Eastern Washington
Planting begins later, starting in late March with transplanting. Seedling growth follows through April, and transplant growth continues through May and into June. Active crop growth and development occur through June, July, and August, with the harvest period beginning in early September. Harvest continues steadily through September and into early October, after which all activity ends for the season. No planting, growth, or harvest activity is shown from October through February.
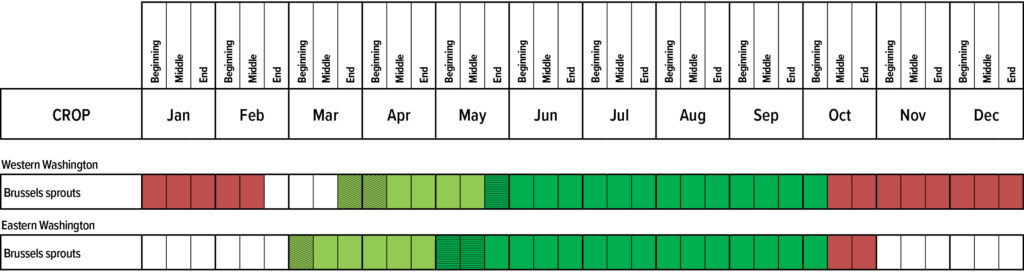
Cabbage (summer, winter, and Chinese)
Western Washington
Summer cabbage begins planting in early April with transplanting, followed by seedling growth through April and May. Transplant growth begins in late May and continues into June, after which the plants develop through June and July. Harvest begins in early August, continues through September and October, and ends in early November.
Winter cabbage begins much earlier, with seedling growth starting in January and continuing through February and March. Transplanting begins in early April, followed by transplant growth through April and May. Harvest begins in early June, continues through June, July, and August, and ends in early September. After a gap with no harvest from September through October, seedling growth resumes in early November and continues through December, supporting overwintering development.
Chinese cabbage begins with transplanting in early April, followed by seedling growth through April and May and transplant growth in June. The main plant development continues through June, followed by a harvest period that runs from mid-July through August and finishes in early September.
Eastern Washington
Summer cabbage planting begins in early April with transplanting, followed by seedling growth through April and May and transplant growth in late May and June. Harvest begins in mid-July, continues through August and September, and ends in early October.
Chinese cabbage follows a similar early-season schedule, beginning with transplanting in early April, followed by seedling growth through April and May and transplant growth through June. Harvest begins in late July, continues through August, and concludes in mid-September. No activity is shown for winter cabbage in the eastern region.
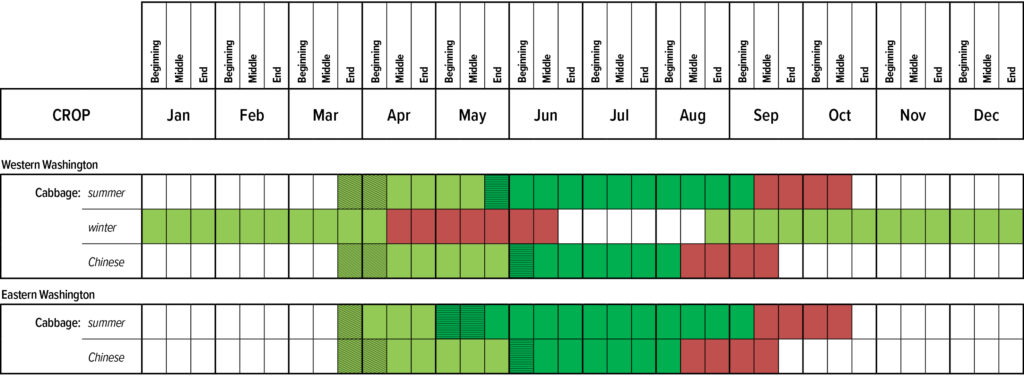
Carrots (summer and winter)
Western Washington
Summer carrots have a short overwintered harvest period in January and early February. New planting begins in early April with direct seeding, followed by seedling growth through April and May. Transplant growth is shown beginning in late May and continuing into June, after which plant development continues through June and July. Harvest begins in mid-July, continues through August, September, and October, and ends in early November.
Winter carrots follow a different schedule. Seedling growth begins in January and continues through February, March, and into early April. Harvest begins in mid-April and continues through May and June. After a break with no harvest in July, direct seeding resumes in early August, followed by seedling growth through August, September, October, November, and December, supporting a late-season and overwintering crop.
Eastern Washington
Carrots begin planting in early May with direct seeding. Seedling growth continues through May and June, and a short transplant growth period appears in late June. Plant development continues through July and August, with harvest beginning in early September. Harvest continues through September and October, ending in early November. No late-season planting or overwintering activity is shown for this crop in the eastern region.
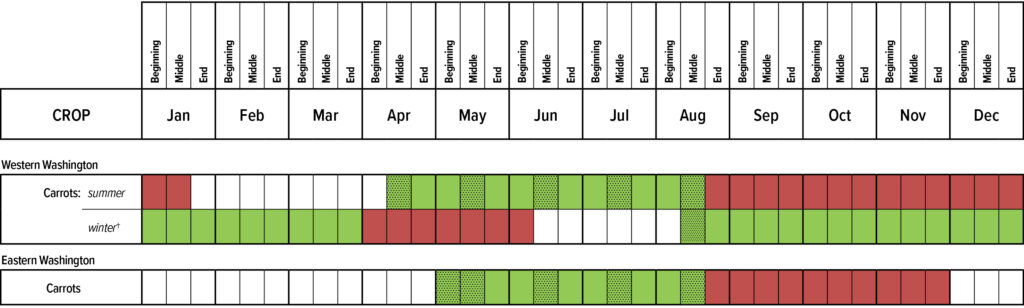
Cauliflower (summer and winter)
Western Washington
Summer cauliflower planting begins in early March with transplanting. Seedling growth continues through March and April, followed by transplant growth in late April and early May. Plant development continues through May and June, and harvest begins in early July. The harvest season continues steadily through July, August, and September, ending in early October.
Winter cauliflower begins with seedling growth in January, continuing through February and March. Transplanting begins in early April, followed by transplant growth through April and May. Harvest begins in mid-May, continues through June, and ends in early July. After a gap in July, direct seeding resumes in early August, followed by seedling growth through August, September, October, November, and December, supporting an overwintering crop with no late-season harvest shown.
Eastern Washington
Planting begins in late March with transplanting. Seedling growth continues through April and early May, followed by transplant growth from mid-May into June. Plant development continues through June and early July. Harvest begins in mid-July, continues through August and September, and ends in early October.
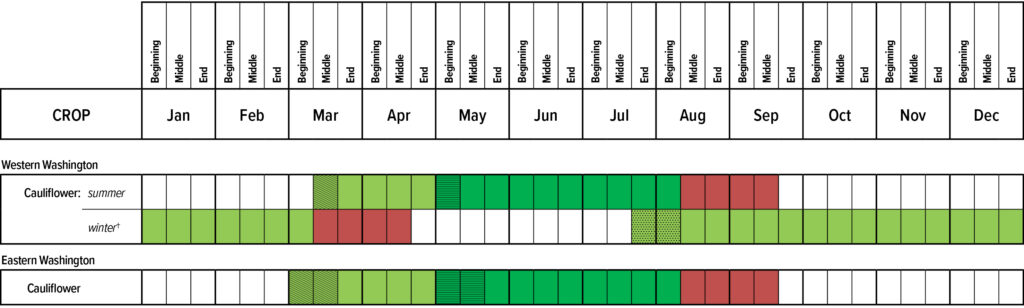
Celery
Western Washington
Celery planting begins in early March with transplanting. Seedling growth follows through March and April, transitioning to transplant growth in late April and May. Plant development continues through May, June, and July, and harvest begins in early August. The harvest period continues steadily through August, September, and October, ending in early November. No planting, growth, or harvest activity is shown from November through February.
Eastern Washington
Planting begins slightly later, starting in late March with transplanting. Seedling growth continues through April and early May, followed by transplant growth in mid-May and June. Plant development carries through June and July, and harvest begins in early August. Harvest continues through August and September, ending in early October. No activity is shown for the remainder of the year.
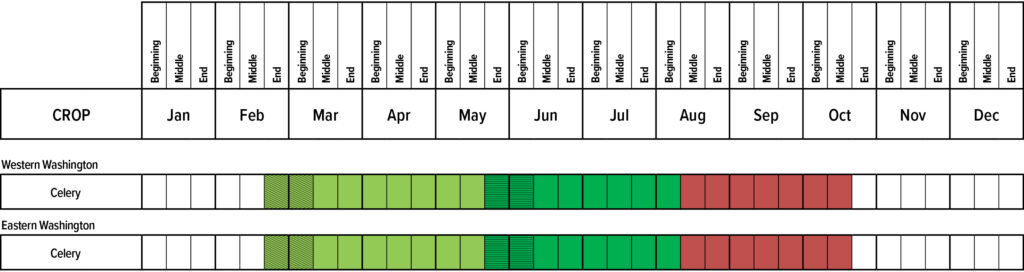
Chives
Eastern Washington
Chive planting begins in early April with direct seeding, followed by seedling growth through April and May. Plant development continues through May, June, and early July, leading into a harvest period that begins in mid-July. Harvest continues through August, after which a second direct seeding window appears in early September. Seedling growth follows through September, and plant development continues into October. A second harvest period begins in mid-October and continues through early November. No planting, growth, or harvest activity is shown from November through March.
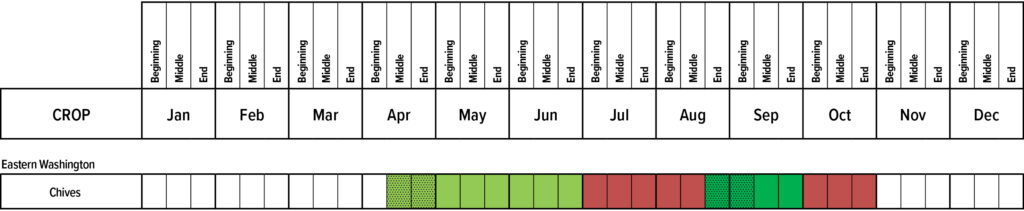
Collards
Western Washington
Collards begin with an overwintered harvest period that spans January through early March. No planting or growth activity is shown from March through June. New planting begins in early July with direct seeding, followed by seedling growth through July and early August. Plant development continues through August and early September, before the crop enters a long harvest period beginning in mid-September. Harvest continues consistently through October, November, and December, extending back into January, creating a continuous late-season and winter harvest cycle.
Eastern Washington
Collard planting begins in early April with direct seeding, followed by seedling growth through April and May. Plant development continues through May and June, after which the crop enters its harvest period in early July. Harvest continues through July, August, and September, and ends in early October. A second planting window begins in early August with direct seeding, followed by seedling growth through August and September. Plant development continues through early October, leading into a brief late-season harvest period that begins in mid-October and ends in early November. No activity is shown from November through March.
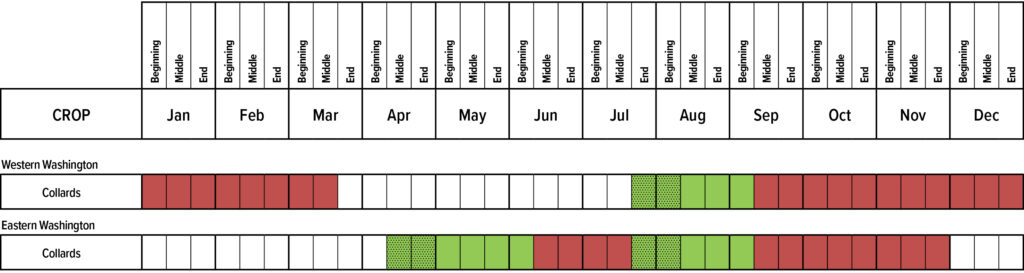
Corn, salad
Western Washington
Salad corn begins with an overwintered harvest period that spans January through early March. No planting or growth activity occurs from March through mid-August. New planting begins in mid-August with direct seeding, followed by seedling growth through late August and early September. Plant development continues through September, after which the crop enters its harvest period in early October. Harvest continues through October, November, and December, creating a late-season and early-winter harvest window with no additional activity shown outside these periods.
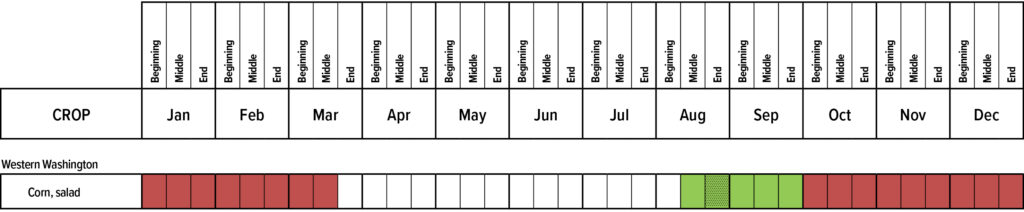
Corn, sweet
Western Washington
Sweet corn planting begins in late May with direct seeding. Seedling growth continues through June and transitions into plant development through July. The harvest period begins in early September, continues through September, and ends in early October. No planting, growth, or harvest activity is shown from October through May.
Eastern Washington
Sweet corn planting starts slightly earlier, beginning in mid-May with direct seeding. Seedling growth continues through May and June, followed by plant development in July. Harvest begins in mid-August, continues through September, and ends in early October. No additional planting or harvesting is shown for the remainder of the year.
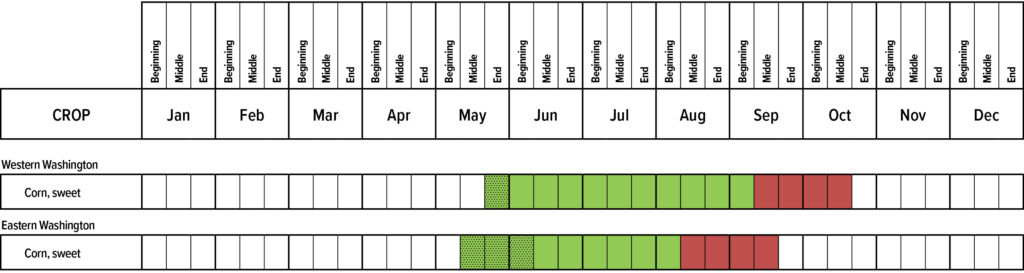
Cucumbers
Western Washington
Cucumber planting begins in early April with transplanting. Seedling growth continues through April and into May, followed by transplant growth through May and into early June. Plant development continues through June and July, after which the crop enters its harvest period in early August. Harvest continues through August and September, ending in early October. No cucumber planting, growth, or harvest activity is shown from October through March.
Eastern Washington
Planting begins slightly earlier, starting in late March with transplanting. Seedling growth continues through April and early May, followed by transplant growth through late May. Plant development continues through June and July, and harvest begins in early August. Harvest continues through August and September, ending in early October. No additional cucumber activity is shown from October through March.
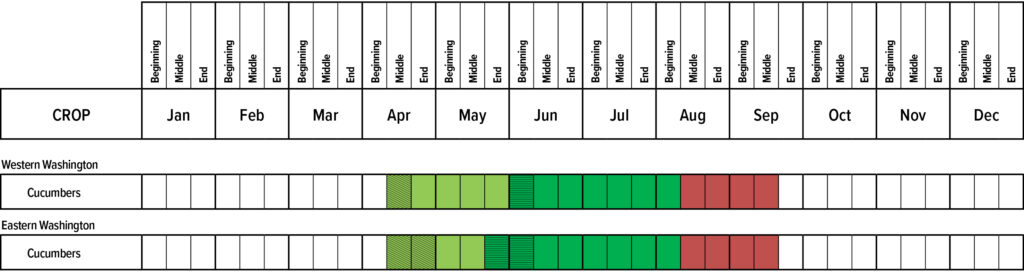
Eggplant
Western Washington
Eggplant planting begins in early April with transplanting. Seedling growth continues through April and into May, followed by a period of transplant growth extending through May and into early June. Plant development continues steadily through June and July, leading into a harvest period beginning in early August. Harvest continues through August and September, ending in early October. No planting, growth, or harvest activity is shown from October through March.
Eastern Washington
Planting begins a bit earlier, starting in late March with transplanting. Seedling growth follows through April and early May, and transplant growth continues through mid-May into early June. Plant development progresses through June and July, leading into the harvest period in early August. Harvest continues through August and September, ending in early October. No eggplant activity is shown from October through March.
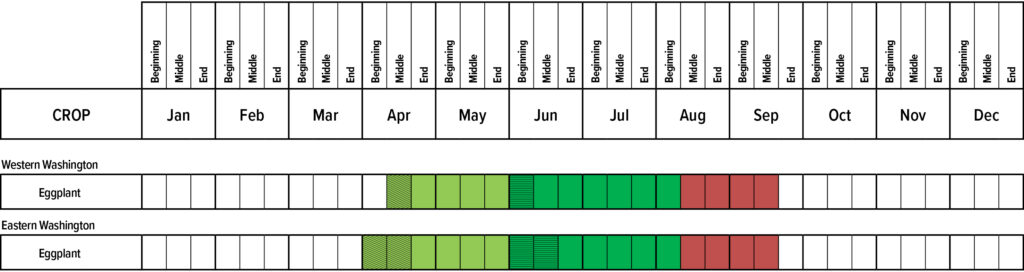
Endive (chicory)
Western Washington
Endive begins with an overwintered harvest period that spans January through early March, followed by a short period of continued harvest and plant cleanup through late March and early April. New planting begins in mid-May with direct seeding, followed by seedling growth through late May and June. Plant development continues through June and July, with a second direct seeding window appearing in mid-July, leading to additional seedling growth through late July and August. Harvest resumes in early August, continues through September, October, and November, and extends into December, creating a late-season and winter harvest period that runs nearly continuously until the following spring.
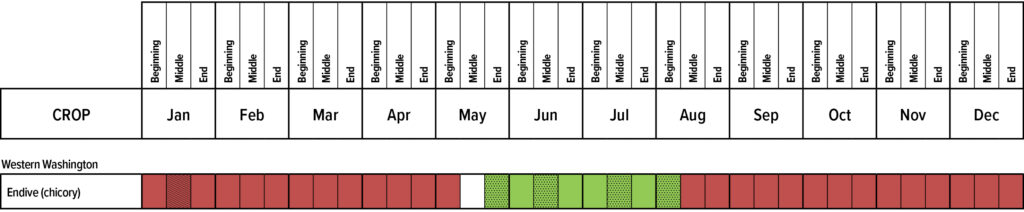
Garlic
Western Washington
Garlic grows continuously from January through July, reflecting its overwintering nature. Active plant growth spans the entire winter and spring, continuing into early summer. Harvest begins in mid-July, running through August, and ends by early September. Planting resumes in mid-October with direct seeding of cloves and continues through November and December, establishing the next year’s crop.
Eastern Washington
Garlic follows a nearly identical seasonal pattern. Growth is shown continuously from January through July, followed by the harvest period in mid-July through August, ending in early September. Fall planting begins in mid-October with direct seeding and continues through November and December, covering the full autumn planting window.
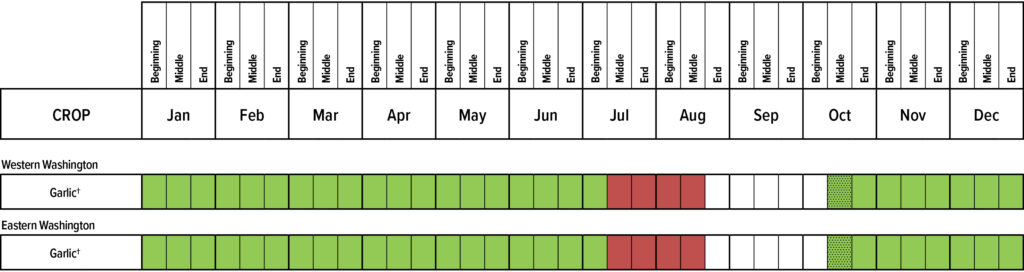
†Harvest begins in the second year.
Kale
Western Washington
Kale is harvested through the entire winter and early spring, from January through April. After a brief gap in late spring, planting begins in mid-July and continues through early August (indicated by the hatched green). Full growth and harvest occur from mid-August through October, after which winter harvest resumes in November and December.
Eastern Washington
Planting begins in mid-July, with the establishment period continuing into early August. Active growth and harvest run from mid-August through October. Harvest concludes by the end of October, with no winter harvest period shown for the eastern region.
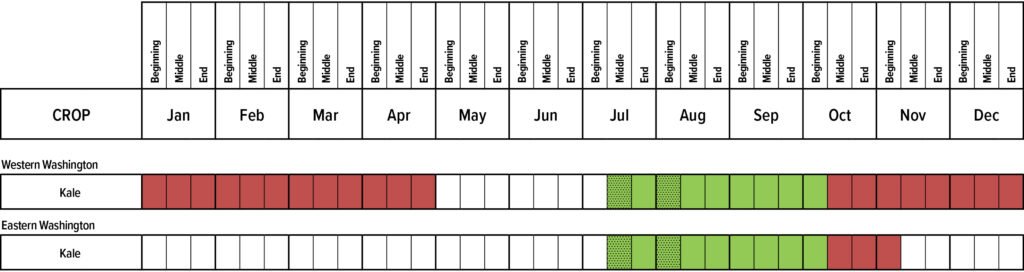
Kohlrabi
Western Washington
Planting for kohlrabi begins in mid-April, with establishment continuing into late April (shown by the hatched green). Active growth and harvest occur from May through mid-July. Harvest ends around mid-July, and harvest-only (red) continues from late July through October, wrapping up in early November.
Eastern Washington
Planting starts in mid-April, with establishment continuing through late April. Growth and harvest extend from May through July, followed by harvest-only from August through October. Harvest concludes by early November.
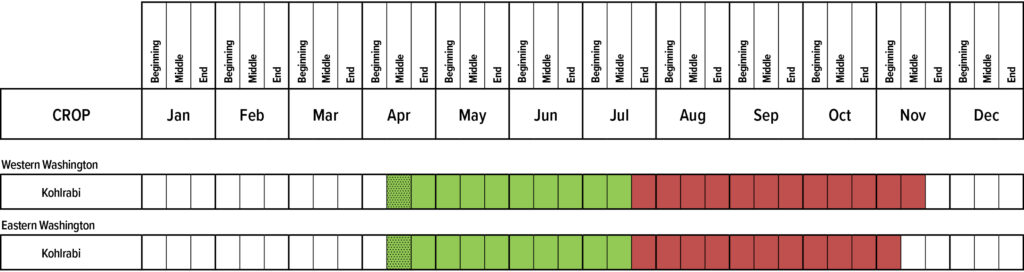
Leek (summer and winter)
Western Washington
For summer leeks, transplanting begins in mid-March, continuing through late March (diagonal hatch), followed by active growth from April through July. Harvest begins in August and continues through September (solid green), then shifts to harvest-only (red) from October through November, finishing in early December.
For winter leeks, harvesting occurs from January through late March (red). Planting for the next winter crop begins again in mid-June, continuing through late June (diagonal hatch). Growth runs from July through November, with harvest resuming in December and continuing into the following year.
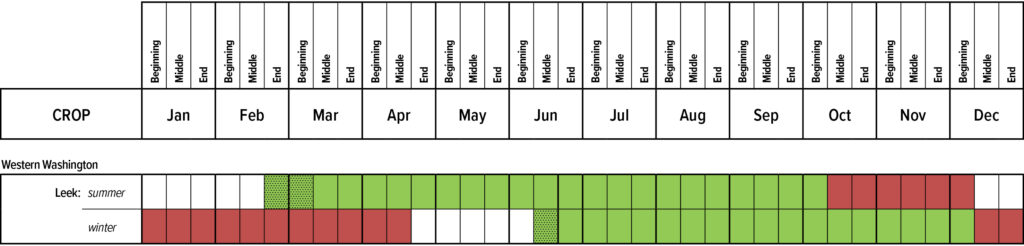
Lettuce (summer and winter)
Western Washington
For summer lettuce, planting begins in late March using seed-for-transplant, followed by active growth through April and May. Growth and harvest occur from late May through June, and harvest continues from July into early August. Planting begins again in early September, with growth continuing through October, and harvest resuming in November and December.
For winter lettuce, harvest occurs steadily from January through July, with no planting or growth indicated during this period.
Eastern Washington
Planting begins in mid-April and continues through late April, followed by growth through May and early June. Growth and harvest take place during June and July, and harvest continues from August into early September. No additional planting, growth, or harvest periods are shown for the remainder of the year.
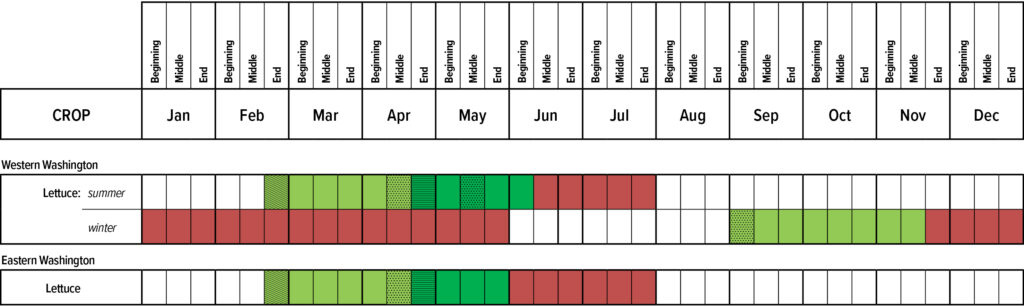
Melons
Western Washington
Melon planting begins in early April using seed-for-transplant, followed by active seedling growth through mid-April. Growth continues through May and early June, and harvest begins in late June. Harvest extends steadily through July and into early August. After early August, no further planting, growth, or harvest periods are indicated for the remainder of the year.
Eastern Washington
Planting also begins in early April with seed-for-transplant, followed by seedling growth through mid-April. Active growth continues through May and early June, and harvest begins in mid-June. Harvest continues throughout July and into August, ending in mid-August. No additional planting, growth, or harvest periods appear for the rest of the year.
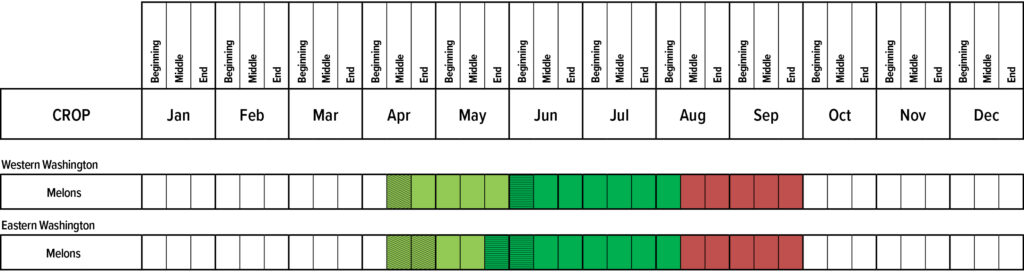
Mustard greens
Western Washington
Planting of mustard greens begins in early March using direct seeding, followed by seedling growth through mid-March. Transplant growth continues from late March through April and into early May. Harvest begins in mid-May and extends through June, with harvesting continuing into early July. No additional planting, growth, or harvest periods appear for the remainder of the year.
Eastern Washington
Planting begins slightly later, in early April, using both direct seed and seed-for-transplant. Seedling growth continues through mid-April, followed by transplant growth through late April and into early May. Harvest begins in mid-May and continues steadily through June and July, ending in late July. No further activity is shown for the rest of the year.
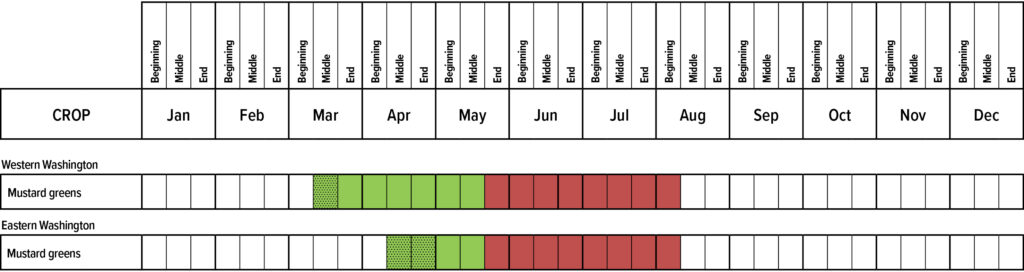
Okra
Eastern Washington
Planting for okra begins in early June using seed-for-transplant, followed by transplant growth through mid-June. Active growth continues from late June through all of July and August, extending into early September. Harvest begins in mid-September and continues into early October. No additional planting, growth, or harvest periods occur for the remainder of the year.
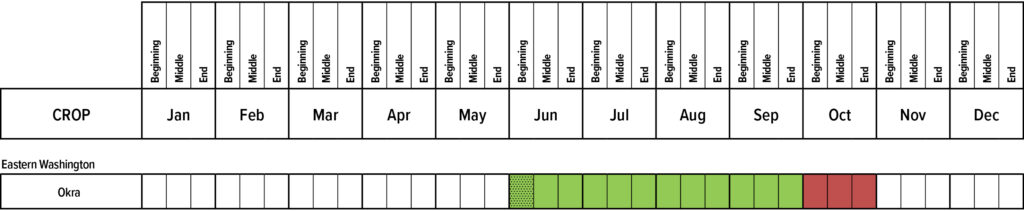
Onions (bulb, scallions, and winter)
Western Washington
Bulb onions are planted beginning in early February using seed-for-transplant, with transplant growth continuing through March, April, and into early summer. Harvest for bulb onions begins in mid-July and continues steadily through early October.
Scallions follow a similar pattern but begin slightly later, with planting in early April, growth through April and May, and harvest beginning in mid-July and ending in early October.
Winter onions are planted in early January using transplant methods, with growth continuing uninterrupted from mid-January through December; however, no harvest period is shown for winter onions within the calendar.
Eastern Washington
Bulb onions are planted beginning in early April using seed-for-transplant. Growth continues throughout April, May, and June. Harvest begins in early July and continues through September.
Scallions also begin with seed-for-transplant in early April, growing steadily through May and June, with harvest overlapping from early July through September. No additional planting, growth, or harvest activity is shown for either type after September.
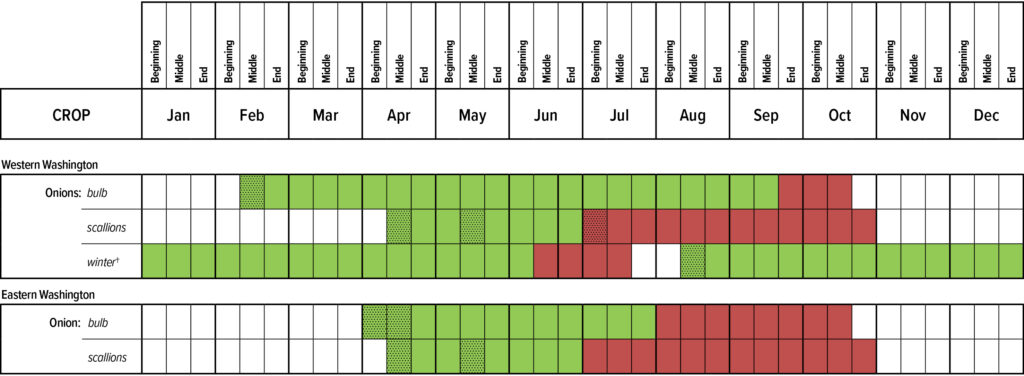
†Harvest begins in the second year.
Parsley
Western Washington
Parsley is started from seed indoors beginning in early January and continues through late April. Growth begins in mid-May, with harvest starting in late May and continuing steadily through the end of June. After a brief pause, growth resumes in early July and harvest follows again from mid-July through late October. No planting, growth, or harvest activity is shown for November and December.
Eastern Washington
Parsley planting begins in early April using seed, with growth following through April and May. Harvest begins in mid-May and continues into late June. Another planting begins in early July, with growth through late July and harvest extending from early August through late October. No planting or harvest is shown from November through March.
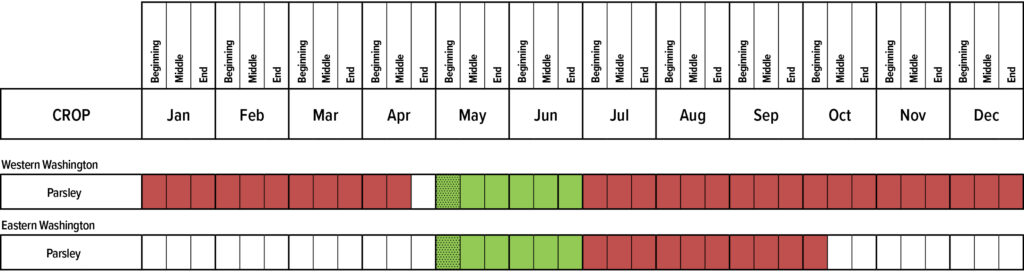
Parsnips
Western Washington
Parsnips are planted from seed beginning in early April and continuing through mid-May. Growth fills in steadily from April through June, with harvest beginning in early August and continuing consistently through late November. No planting or harvest activity is shown for December through March.
Eastern Washington
Planting begins a bit later, starting in early April and continuing into early May. Growth progresses from April through mid-June, and harvest begins in late June, extending strongly through July and August before continuing into late September. Afterward, activity stops for the remainder of the year until planting resumes the following spring.
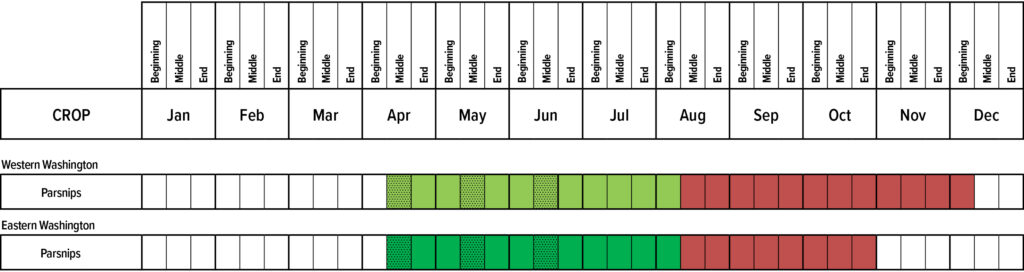
Peas
Western Washington
Peas are planted beginning in early March, with seeding continuing through early April. Plants grow steadily from March into early June, and harvest begins in mid-June, running through mid-July. After that, no additional planting or harvest activity appears for the remainder of the season.
Eastern Washington
Planting begins slightly later, starting in early April and continuing through mid-April. Growth progresses from April into early June, and harvest starts around early June, continuing through mid-July. No planting or harvesting is shown after July in this region.
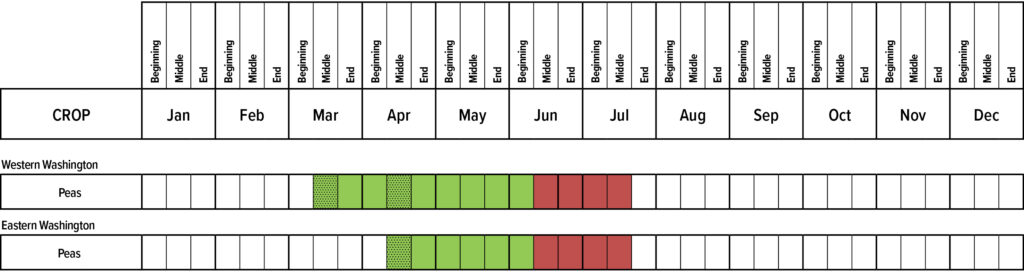
Peppers
Western Washington
Peppers are planted beginning in early April and continuing through April. Growth progresses from late April into early June, with a transition to harvest beginning in mid-June. Harvest runs from mid-June through August, ending in early September.
Eastern Washington
Planting starts earlier, beginning in late March and continuing through April. Plants grow steadily from April into June, and harvest begins in early June, continuing through August and ending in early September.
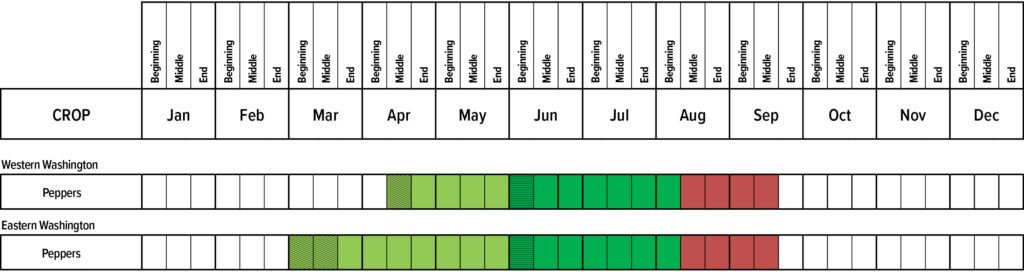
Potatoes
Western Washington
Planting for potatoes begins in early April and continues through late April. Growth extends from late April through July, with harvest beginning in early August and running steadily through October.
Eastern Washington
Planting starts slightly later, beginning in late April and continuing into early May. Plants grow from May through July, and harvest begins in early August, continuing through October.
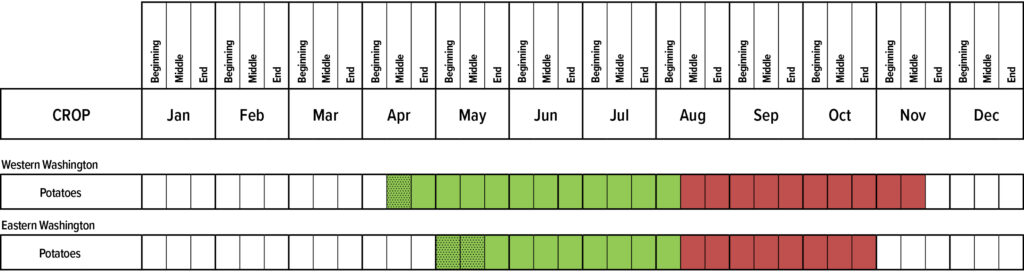
Radish
Western Washington
Direct seeding for radishes begins in early March and continues through mid-April. Growth extends from March into May, with harvest running from early May through mid-July.
Eastern Washington
Direct seeding begins slightly later, starting in early April and continuing through early May. Growth lasts through May and into June, and harvest runs from early June through mid-July.
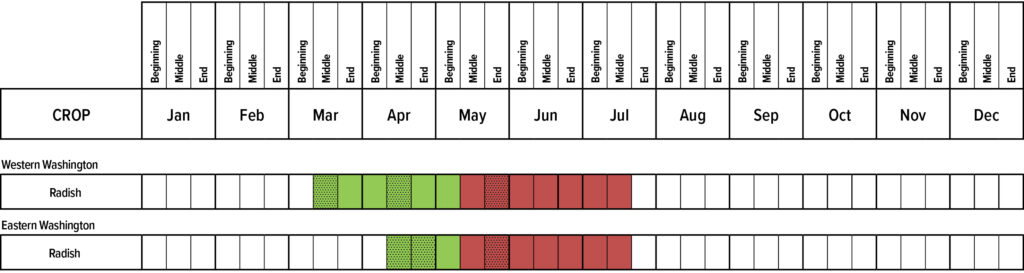
Rhubarb
In both western and eastern Washington, rhubarb is grown exclusively from transplants or established crowns rather than direct seeding. Transplant growth begins in early April and continues steadily through the entire growing season. Harvest starts in early May and runs continuously through the end of October.
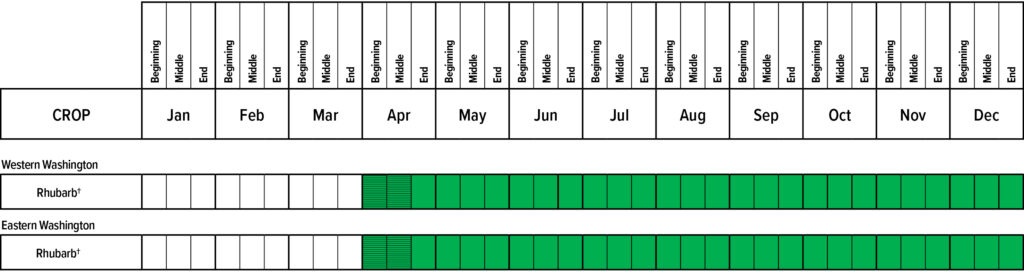
†Harvest begins in the second year.
Rutabaga
Western Washington
Rutabaga harvest extends from early January through mid-March. Direct seeding begins in early May and continues into early June, followed by steady seedling growth from May through August. Harvest resumes in early September and continues through the end of December.
Eastern Washington
Direct seeding starts later, beginning in early May and continuing through mid-June. Growth runs from May through August, and harvest extends from early September through the end of October.
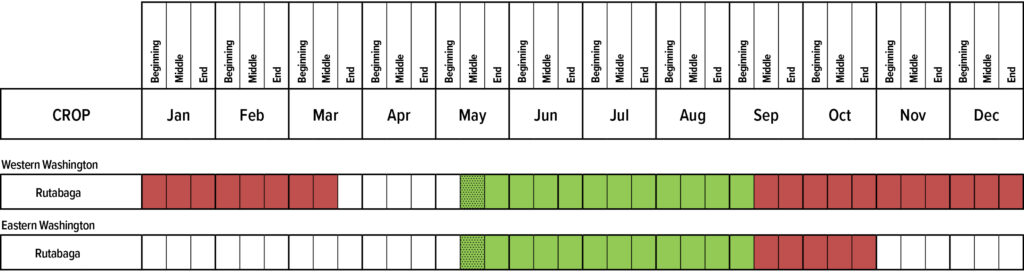
Spinach
Western Washington
Spinach harvest continues from early January through early April. Direct seeding begins in mid-March and continues into April, with steady growth through April and May. Harvest resumes in early June and continues through mid-July. Another seeding window opens in early August, followed by growth through late August and early September, with harvest running from early September through the end of December.
Eastern Washington
Direct seeding runs from early April through early May, followed by growth from April into June. Harvest extends from early June through mid-July. A second seeding period begins in early August, with growth continuing through September and harvest occurring from mid-September through late October.
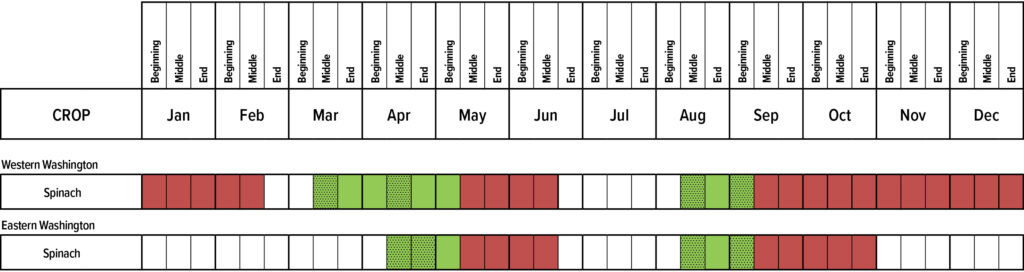
Swiss chard
Western Washington
Swiss chard is seeded beginning in early April, with planting continuing into late April. Growth starts quickly in May and continues strongly through June. Harvest begins in early July, carries through the end of that month, and remains steady from August into September. Production tapers off through October and November before stopping in early December.
Eastern Washington
Seeding also begins in early April and continues through April’s end. Growth is robust from May through June, followed by harvest beginning in early July and extending through August and September. The harvest window closes gradually during October and wraps up by early November.
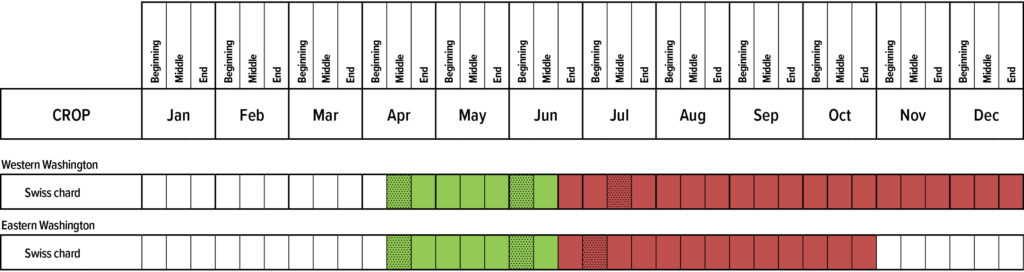
Tomatoes
Western Washington
Tomatoes are seeded in early April, with planting continuing through mid-April. Transplants go into the ground from late April through mid-May, and plants grow steadily through June. Harvest begins in early July, peaks through late July and August, and continues into early September before tapering off later in the month. By early October, the harvest window has closed.
Eastern Washington
Seeding starts in early April and runs through mid-April, with transplanting taking place from late April through mid-May. Strong growth follows from late May into June, and harvest begins in early July. Production remains heavy through July and August, continuing into early September before tapering later in the month and concluding by early October.
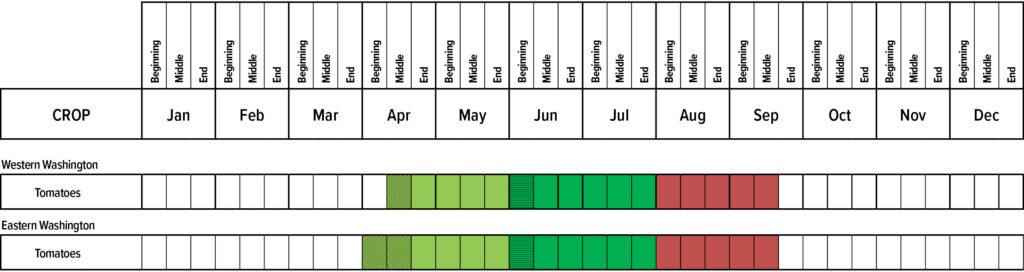
Turnip
Western Washington
Turnips are sown beginning in mid-May and continuing through June, with steady growth following through July. Harvest starts in early July, peaks through late July and August, and continues steadily through September before tapering off in early October. After early October, the harvest period ends for the season.
Eastern Washington
Planting begins in early May and continues through mid-May, followed by strong growth through June. Harvest begins in early July, peaks through late July and August, and continues into September before concluding in early October.
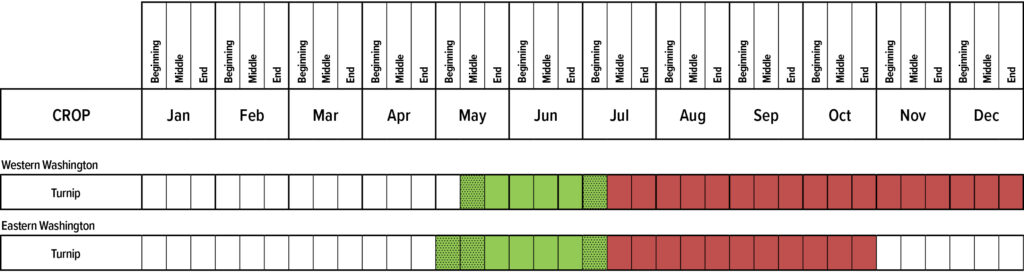
Maintenance
Plant Nutrition
Plants require macro- and micronutrients to grow well and be productive. For fertilizer information and application methods, refer to Chapter 4: Plant Mineral Nutrition and Fertilizers.
If you are adding compost to your garden each year, you may be adding sufficient levels of most macro- and micronutrients for adequate crop growth. To determine if your soil has appropriate nutrient levels to meet the needs of your vegetable crops, have your soil tested every two to five years. If your soil is low in one or more nutrients, add the appropriate fertilizer at the recommended rate to meet your crop needs. If the level of any nutrient in your soil is above the recommended level, reassess your practices so that you do not continue to add that nutrient. For example, compost made from dairy manure tends to be high in phosphorus (P) while compost made from poultry manure tends to be high in potassium (K). Fertilizers made from organic materials may also provide micronutrients, which are beneficial for vegetable crops.
Remember that soil pH affects nutrient availability. In acid soils (low soil pH), nutrients are not readily available for uptake by most vegetable crops. To increase nutrient availability, maintain a soil pH between 6.0 and 7.0. If you are adding compost to your garden each year, the organic matter will slowly increase soil pH. If your soil pH is still too low, add agricultural lime at the rate of about 6 pounds (12 cups) per 100 square feet for most soils. For clay soils, add 8 pounds of lime, and for sandy soils add 4 pounds. Lime does not react quickly in the soil and it takes at least 6 months to be effective. In addition, water is needed to activate the lime; therefore, it is best to apply lime in the fall. Lime is rarely needed in eastern Washington as soils tend to have a high pH.
Watering
Summers are quite dry throughout Washington, and you need to be prepared to water your vegetable garden from May through September. The amount of water and method of irrigation you use will often determine the success of your vegetable garden. The following is a guide to help you determine how best and how frequently to water.
Timing
If you are using an overhead sprinkler, irrigate in the early mornings so that foliage can dry off before cool evening temperatures occur. Disease potential is increased when foliage remains wet during the night. If you use soaker hoses or drip irrigation, irrigate in the late afternoon or evening. By watering at the end of the day, more water will be absorbed into the soil and less water will be lost due to evaporation and transpiration, thereby increasing irrigation efficiency. Regardless of your irrigation method, do not irrigate in the heat of the day (11 a.m. to 2 p.m.), as excessive evaporation loss and foliage burn will occur. Windy weather is also a poor time to water due to increased evaporation rates.
Sprinkler Irrigation
Sprinkler irrigation is generally the least expensive and the simplest irrigation method for home vegetable gardens, but unfortunately it is also the least efficient. With a sprinkler, the entire garden area is watered and thus the total amount of water used to irrigate is much greater. Evaporation loss is also larger when the water is broadcast into the air. Weeds and weed seeds in the soil are also being watered, which leads to greater weed growth. In addition, diseases are encouraged by wet foliage and can be transferred to neighboring plants by splashes of water.
Soaker Hoses
Soaker hoses are much more efficient than sprinkler systems and can reduce water use by up to 50%. Soaker hoses can be flat or round, and they have tiny holes through which water leaks or seeps out. Evaporation, runoff, and weed growth are reduced by nearly a half, while water application to the vegetable crop is optimized. The occurrence of foliar plant diseases is also substantially reduced with the use of soaker hoses.
Drip Irrigation
The water efficiency and plant health benefits of drip irrigation (Figure 11) are quite similar to those of soaker hoses, but drip lines tend to be more complex and expensive to install and operate. Depending on the size of the irrigation system, gauges and water pressure reducers may be required. When selecting drip lines for your garden, it is important to choose ones with the appropriate emitter spacing. The emitter is the hole in the tape or hose where the water comes out. Use an emitter spacing of 6–9 inches for a continuous row (as with radishes, beans, peas), with 6 inch spacing for sandy soils and 9 inch spacing for loam or clay soils. Choose a wider emitter spacing to match the plant spacing for those crops that are spaced far apart; for instance, 18 inches for tomatoes, peppers, and broccoli, and 36 inches for squashes, cucumbers, and melons. Place plants about 2–4 inches away from the emitter.
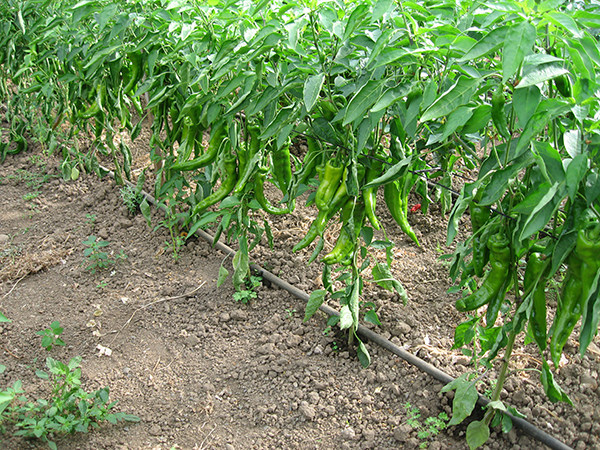
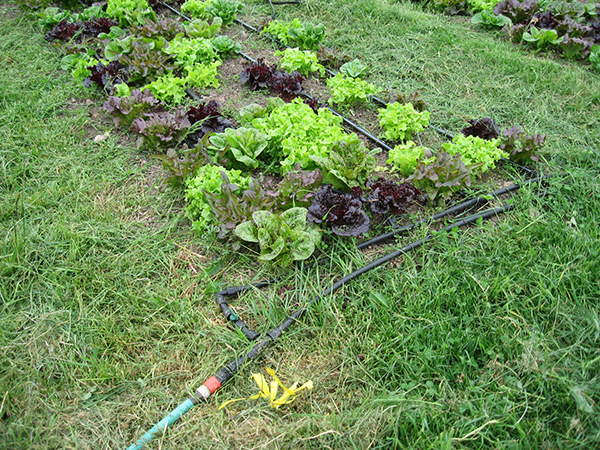
Frequency
Water seedlings and transplants in the garden gently and frequently (every two to three days, depending on rainfall) for the first week or two. Apply approximately ¼ inch of water in each application. Thereafter, irrigate once a week or as needed and apply 1 inch of water at each application. Shallow watering encourages shallow root growth, resulting in plants that are inefficient in water uptake and are less drought tolerant. To determine the amount of water applied, see the Calculating Amount to Irrigate section below.
Rate
Irrigation is most effective when applied at approximately ½ inch or less of water per hour. A faster rate will cause runoff. If you begin to see runoff or puddling, turn off the irrigation and resume watering in about an hour.
Rain Gauges
Observe and note any rainfall that your garden receives. Adjust irrigation accordingly so that rainfall plus irrigation equals 1 inch per week.
Calculating Amount to Irrigate
The amount of water that vegetable crops need is usually given in inches. For example, most vegetable crops require 1 inch of water (per square foot) every week. You can use indicators such as depth of soil moisture to determine if you have applied the right amount of water or you can measure and calculate the actual amount of water you apply.
The easiest method for determining how long to irrigate is to simply use a shovel to check the depth of moisture in the soil and adjust your watering schedule accordingly. For most clay and loam soils, 1 inch of water will penetrate about 6 inches deep. Measure the amount of time it takes for your first irrigation to wet the soil to a depth of 6 inches, and this is the amount of time it takes to apply 1 inch of water. Irrigate again for this same amount of time when the top 1–2 inches of soil are dry. After several weeks of irrigation, the soil should be moist throughout the root zone.
It is helpful to know that 1 inch of water per square foot equals 0.62 gallons. If you are watering by hand, apply 0.62 gallons per plant per week for those plants that are spaced more than a foot apart, or apply this same amount of water per linear foot of row for those crops that are spaced close together.
To measure the amount of water you are applying with a sprinkler, place a bucket of about 1 foot diameter near one of the vegetable plants. Measure the depth of the water in the bucket after one hour; this will be the amount in inches that the plant received in that hour. You can also measure the volume of water in the bucket, and this will be the amount in gallons that the plant received. Use this measurement to determine how long to keep your sprinkler system on so that plants receive 1 inch, or 0.62 gallons, of water.
If you are using a sprinkler, measure the area (in square feet) of the garden that will be reached by the sprinkler. Multiply this number by the number of inches of water needed (1 inch in most cases) and then multiply by 0.62 (1 inch of water per square foot = 0.62 gal). This will give you the total number of gallons you need to apply. Divide the total number of gallons that you need to apply by the gallons-per-hour rate of your irrigation system to determine the irrigation time.
Soaker hoses vary slightly in the amount of water they deliver, but in general they emit approximately 0.1 gallon per linear foot per hour. Soaker hoses generally wet an area of 6 inches on either side of the hose, or a 1-foot total width. You would need to irrigate six hours in order to apply the amount of water that is needed (0.62 gallon per square foot). You can measure the amount of water delivered by your soaker hose or drip tape by placing a container under the hose or tape. The volume of water in the container at the end of an hour tells you the number of gallons of water the plant is receiving. Or you can place the entire hose or tape in a small wading pool to measure the total amount of water applied.
GARDENING TIP
1 inch of water per square foot equals 0.62 gallons.
Winter Gardening
Some vegetables are suitable for winter gardening in Washington. In central and eastern Washington, low temperatures limit the number of crops that can be grown with protection. In western Washington, crops listed as hardy (see Table 2) can be grown without cold protection and crops listed as half-hardy do best with protection. Hardy vegetables can withstand air temperatures below 28°F. Semi-hardy vegetables can withstand air temperatures in the range of 28 to 32°F.
The US Department of Agriculture (USDA) has divided the country into 13 “hardiness zones” based on annual minimum winter temperature. Lower numbered zones have colder winters while higher numbered zones are warmer. Hardiness zones in Washington State range from Zone 4 to Zone 9, with warmer zones on the western side and cooler zones on the eastern side of the Cascade Mountains. Okanogan, Ferry, Stevens, and Pend Oreille Counties have the coldest winter temperatures, which can be as low as -15°F. On the west side, winter temperatures are considerably milder, with expected low temperatures of 15 to 20°F along the Pacific Coast. To see your area, go to the interactive Washington USDA Hardiness Zone Map (opens in new window). Do not confuse the USDA hardiness zones with Sunset’s Western Garden Book’s “Climate Zones.” The Sunset climate zones use a different numbering system and take a wider range of factors into account, which include growing season, time and amount of rainfall, winter low temperatures, summer high temperatures, and humidity.
In western Washington, September 15 is generally the latest seeding date for winter vegetable production. As day length shortens to less than 10 hours from about November 1 through February 10 in Washington, plant growth essentially stops. Plants can still be harvested during this period but they are not actively growing.
In most areas, crop covers are needed for winter production to protect plants from heavy snow or rain and low temperature. The two most common materials used for crop covers are fabric row covers and clear plastic. Fabric row covers come in different weights and can increase day temperatures by 4–8°F. Lighter fabric row covers (0.45–0.55 oz/sq yd) are generally promoted as insect barriers and are not recommended for winter use. Heavier fabric row covers (0.9–1.5 oz/sq yd) are used for frost protection. Daytime temperatures under greenhouse-grade clear plastic (6 mil) can be 10–20°F greater than outside temperatures on a clear, sunny day. Nighttime temperatures under row covers and plastic tend to be equal to outside temperatures. Do not place row cover or plastic in direct contact with the plants as frost damage can occur where the material comes into contact with the plant.
Covers can be placed over hoops made of metal, PVC, or polyflex tubing to create a low tunnel over a single bed (Figure 12). Construct the hoop structure so that it is sturdy enough for the winter climate in your area, as heavy snow can cause plastic hoops to collapse (Figure 13). Building a simple and inexpensive high tunnel provides added protection for your winter crops (see Portable Field Hoophouse EM015) but be aware that nighttime temperatures in the tunnel can still reach the same low as they do outside. Low and high tunnels need to be sturdy enough to withstand heavy snow, wind, and ice. Cold frames can be purchased or made at home and consist of a wooden frame with a plastic lid. In areas where the sun shines brightly during the winter, plastic low tunnels and cold frames will need to be vented to avoid overheating the crop. Note that glass covers are not generally recommended as they require intensive management to prevent the crop from being damaged by sunlight.
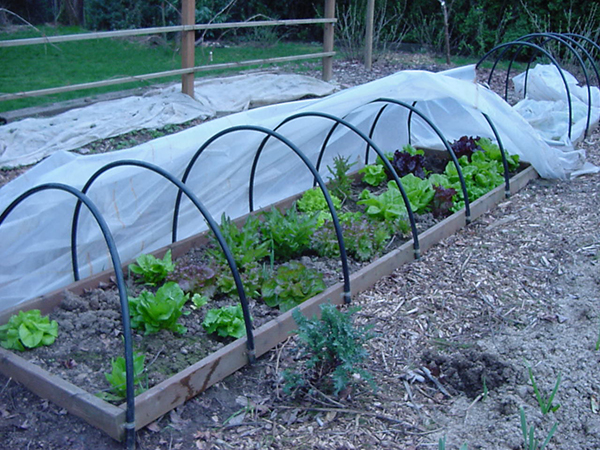
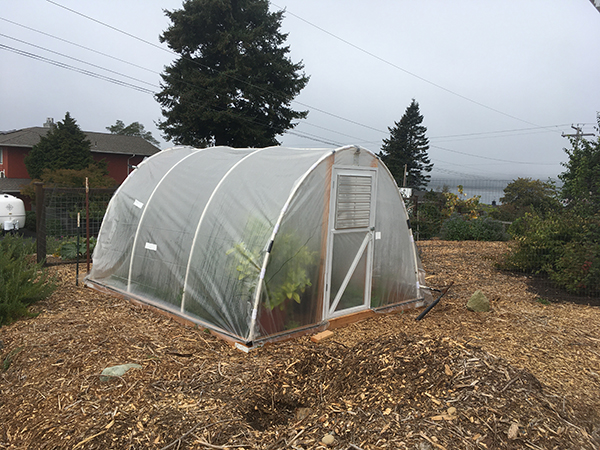
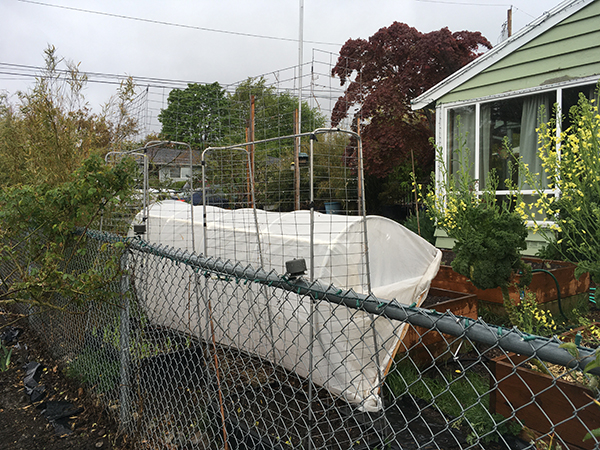
Saving and Storing Vegetable Seeds
When saving seeds from your own garden, choose seeds from healthy plants that are either self-pollinated or open-pollinated. Hybrid varieties are sold as F1 seed, and this will be marked on the seed packet, in the seed catalog, or on the plant stake if you purchase transplants. Seeds from hybrid cultivars do not produce plants with the same traits as the parent plants. Seeds from self-pollinating crops will provide the most success. While you can also save seed from open-pollinated plants, if cross-pollination has occurred, the seeds you collect will produce hybridized plants. Self- and open-pollinated varieties are called heirlooms when the variety is at least 50 years old. The flower of self-pollinating crops has both male and female parts. Crops that are easy to save seed from include beans, peas, lettuce, tomatoes, eggplant, and peppers. For cross-pollinated crops, such as sweet corn, carrots, and all Brassica crops, an isolation distance from other plants of the same species is needed to keep seed true to type.
Seed harvesting methods can be divided into dry or wet processing. The dry method is used for seeds born in pods or husks, such as beans or lettuce, and is very easy. The wet method is used for seeds that are embedded in the damp flesh of fruits, such as tomatoes and peppers, and requires a bit more work.
For beans or peas, let the pods dry on the plant and pick them individually before the pod becomes too dry and opens. If freezing weather is expected before pods are dry, pick pods that are fully mature and turning yellow, and lay out in a single layer to dry, turning each day to prevent mold. Place the dry pods in a paper bag or pillowcase and then gently walk on the bag or pillowcase to thresh the seed. Pour the threshed seed onto a series of screens (Figure 14) to separate the seed from plant debris. For lettuce seed, cut the seed stalk from the plant and place the stalk upside down in a paper bag. Place the bag with the seed stalk in a warm, dry place for several weeks, until the seed can be easily separated from its feather-like chaff, first by rubbing the seed off the stalk with your hands and then by rubbing the seed through a screen of the correct size.
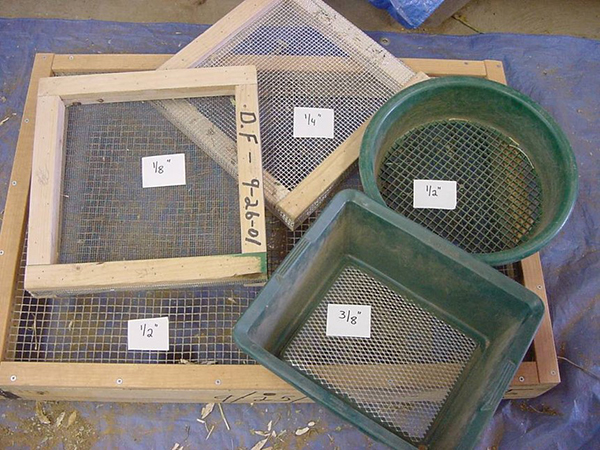
Wet processing is a three-step method that involves removal of seeds from the fruit, washing the seeds to clean them, and drying. In addition, some species need to go through a fermentation process to improve germination and reduce seedborne diseases. One common example is tomatoes. First, cut open the tomato and remove the seeds and surrounding gel, which prevents the seeds from germinating. Put the seeds and gel in a watertight container, add two tablespoons of water, place plastic wrap over the opening and secure with a rubber band, then poke a couple of holes in the plastic. Place the container on the kitchen counter (or other warm area) for three to four days, until the surface of the seed-gel mix becomes covered with mold. Pour the contents into a mesh kitchen strainer and rinse gently with clean water until only the seeds are left. Dry seeds on a paper plate in a warm, dry place out of direct sun.
Seeds must be well dried for storage. A food dryer or dehydrator is suitable for seed drying when set at a very low temperature, about 90°F. The fan blows air away from the seed to prevent heat from building up around the seed. For small seeds, drying time may be one hour while large seeds may require three hours. Drying time will depend on the starting seed moisture content, the thickness of seed being dried, and whether or not the seed is still in the pod. The seed moisture for storage should be around 5–8%.
Once the seed is dried, seed moisture will eventually reach equilibrium with the surrounding atmosphere: about three weeks for small seeds and up to six weeks for large seeds. Store vegetable seeds in a dry area at a moderate temperature of about 50°F. High moisture and temperature cause rapid seed deterioration and loss of seed viability. The longer seeds are stored, the more important moisture and temperature conditions become. Under good storage conditions, seed of most vegetable crops can be stored for four to five years (Table 11). For storage, wrap dry seeds in paper or place in a small paper envelope and label with the crop type, variety, and date. Place seed in an airtight container with a desiccant, such as calcium chloride, silica gel, or rice, and redry the desiccant as needed. Store the container in a cool, dry place or in the refrigerator.
For more information on seed saving, refer to the book Seed to Seed (listed in the Further Reading section at the end of this chapter). You can find detailed information on the science of seed saving, plus instructions for saving seeds of over 100 vegetable varieties.
Table 11. Approximate life expectancy of vegetable seeds stored under favorable moisture and temperature conditions.| Vegetable | Years |
|---|---|
| Asparagus | 3 |
| Bean | 3 |
| Beet | 4 |
| Broccoli | 3 |
| Brussels sprouts | 4 |
| Cabbage | 4 |
| Cardoon | 5 |
| Carrot | 3 |
| Cauliflower | 4 |
| Celeriac | 3 |
| Celery | 3 |
| Chard, Swiss | 4 |
| Chervil | 3 |
| Chicory | 4 |
| Chinese cabbage | 3 |
| Collards | 5 |
| Corn, sweet | 2 |
| Corn salad | 5 |
| Cress, garden | 5 |
| Cress, water | 5 |
| Cucumber | 5 |
| Dandelion | 2 |
| Eggplant | 4 |
| Endive | 5 |
| Fennel | 4 |
| Kale | 4 |
| Kohlrabi | 3 |
| Leek | 2 |
| Lettuce | 6 |
| Muskmelon | 5 |
| Mustard | 4 |
| New Zealand spinach | 3 |
| Okra | 2 |
| Onion | 1 |
| Parsley | 1 |
| Parsnip | 1 |
| Pea | 3 |
| Pepper | 2 |
| Pumpkin | 4 |
| Radish | 5 |
| Rutabaga | 4 |
| Salsify | 1 |
| Sea kale | 1 |
| Sorrel | 4 |
| Southern pea | 3 |
| Spinach | 3 |
| Squash | 4 |
| Tomato | 4 |
| Turnip | 4 |
| Watermelon | 4 |
Further Reading
Angima, S.D., M. Noack, and S. Noack. 2019. Composting with Worms (opens in new window). Oregon State University Extension Publication EM 9034. Oregon State University.
Ashworth, S. 2002. Seed to Seed: Seed Saving and Growing Techniques for Vegetable Gardeners (opens in new window), second edition. Seed Savers Exchange.
Bary, A., C. Cogger, and D. Sullivan. 2016. Fertilizing with Manure and Other Organic Amendments. Pacific Northwest Extension Publication PNW533. Washington State University.
Benedict, D., C. Cogger, and N. Andrews. 2014. Methods for Successful Cover Crop Management in Your Home Garden (opens in new window). Washington State University Extension Publication FS119E. Washington State University.
Bubel, N., and J. Nick. 2018. The New Seed-Starters Handbook. Rodale Books.
Cogger, C. 2020. A Home Gardener’s Guide to Soils and Fertilizers (opens in new window). Washington State University Extension Publication EM063E. Washington State University.
Cogger, C., N. Andrews, and S. Fransen. 2014. Cover Crops for Home Gardens East of the Cascades (opens in new window). Washington State University Extension Publication FS117E.
Fitzgerald, T. 2005. Gardening for Life—A Guide to Garden Adaptations for Gardeners of All Ages and Abilities (links to PDF document). Washington State University Extension Publication MISC545E. Washington State University.
Fitzgerald, T.J. 2010. Gardening in the Inland Northwest (opens in new window). Washington State University Extension Publication MISC0304. Washington State University.
Flint, M.L. 2018. Pests of the Garden and Small Farm: A Grower’s Guide to Using Less Pesticide (opens in new window), third edition. Publication 3332. University of California.
Hanley, D., and G. Kuhn. 2003. Trees Against the Wind (opens in new window). Pacific Northwest Extension Publication PNW0005. Washington State University.
Hochmuth, G.J., and R.G. Sideman. 2022. Knott’s Handbook for Vegetable Growers, sixth edition. John Wiley and Sons.
Howard, R.J., J.A. Garland, and W.L. Seaman. 1994. Diseases and Pests of Vegetable Crops in Canada (links to PDF document). Canadian Phytopathological Society and Entomological Society of Canada.
Kumar, G.N.M., F.E. Larsen, and K.A. Schekel. 2009. Propagating Plants from Seed (opens in new window). Pacific Northwest Extension Publication PNW0170. Washington State University.
Miles, C., G. Sterrett, L. Hesnault, C. Benedict, and C. Daniels. 2013. Home Vegetable Gardening in Washington (links to PDF document). Washington State University Extension Publication EM057E. Washington State University.
Miles, C., G. Sterrett, M. Taylor, and D. Young. 2010. Market Vegetable Gardens: Planning for Success (links to PDF document). Washington State University Extension Publication EM032E. Washington State University.
Myers, R. 2013. Vermicomposting: The Basics (links to PDF document). National Sustainable Agriculture Information Service.
Nonnecke, I.L. 1989. Vegetable Production. New York: Van Nostrand Reinhold.
Pscheidt, J.W., and C.M. Ocamb, eds. 2000. Pacific Northwest Plant Disease Management Handbook (opens in new window) [online]. Oregon State University.
Rangarajan, A., E. Bihn, R. Gravani, D. Scott, and M. Pritts. 2000. Food Safety Begins on the Farm: A Grower’s Guide (opens in new window). Cornell Department of Food Science.
Western Regional Climate Center (opens in new window). Washington summary.