
Home Orchards
Bernardita Sallato, Extension Specialist, Agriculture and Natural Resources Unit, College of Agricultural, Human, and Natural Resource Sciences, Washington State University
Tianna DuPont, Extension Specialist, Agriculture and Natural Resources Unit, College of Agricultural, Human, and Natural Resource Sciences, Washington State University
Growing an Orchard at Home
Growing fruit trees or nut trees in your backyard provides fresh produce for your family and a beautiful landscape. Along with the pleasure and satisfaction of growing your own tree fruits and nuts comes responsibility. In Washington State, home orchardists have a legal responsibility to control the insect and disease pests that may plague their fruit and nut trees in order to help maintain the health of all orchards in the community.
This responsibility is a year-round commitment that extends throughout the lifetime of the crops. Pest problems that arise one year can impact fruit production for several seasons and sometimes threaten the life of the tree. Some pests can spread from your fruit trees to other fruit trees in the neighborhood, including commercial orchards, negatively impacting the economy of your region. Thus, for most fruit and nut trees this will inevitably require the use of pesticides and various integrated pest management (IPM) practices. The Pacific Northwest has a global reputation for producing quality tree fruits and nuts. Please help us maintain this reputation by properly managing the insect and disease pests in your home orchard.
Fruit and Nut Trees for the Pacific Northwest
The wide range of climatic conditions in the Pacific Northwest provides ideal conditions to grow several tree fruit species. The most common include pome fruit: apples and pears (European and Asian), stone fruit: sweet and sour cherries, peaches, nectarines, plums, prunes, pluots and other interspecies hybrids and apricots, as well as nut trees: walnuts, hazelnuts, and chestnuts. The best source of information on what you can and cannot grow in your area will be your local Extension office.
The environmental conditions of your area will determine the species that are best suited and most importantly, those that are not recommended. Washington has exceptional growing conditions for most tree fruit species. The most important resources are water, suitable soil, long and warm summer days during the growing season, cool nights, and sufficient chilling during winter. The most limiting factor in eastern Washington is the frost risk that can affect early blooming species.
The length of the growing season (measured in average number of frost-free days) is quite variable throughout Washington, ranging from 90 days north of Spokane to 180 days along the Pacific Coast. Most fruit trees require at least 150 frost-free days, but fruit varieties exist that do better at either end of the statewide range of growing seasons.
Trees can be susceptible to and damaged by extreme temperatures. The ability of a plant to withstand cold temperatures during dormancy is referred to as plant hardiness. There are ten hardiness zones defined by their minimum temperatures during winter. Apples, tart cherries, and American plums are some of the most hardy of the more common deciduous fruits and can withstand winter temperatures as low as −30°F. Pears and European plums can usually tolerate winter temperatures down to −20°F. Sweet cherries, Japanese plums, and apricots are hardy enough to survive −10°F to −15°F. Peaches and nectarines are more sensitive fruit trees and can be injured at temperatures of −8°F to −12°F. Planting peaches and nectarines in a hardiness zone of 5 (where the average minimum winter temperature can reach −20°F to −10°F) would result in winter injury to that tree most of the time—making it difficult to maintain that tree in good health.
Tree fruit buds tend to be the most sensitive tissues to extremely cold temperatures—especially early in the spring as the buds start to swell. Late spring frosts or temperatures below 28°F (a “killing frost”) can kill the fruiting bud, thus limiting the productivity of a fruit or nut tree. Within each tree fruit species, there are different varieties with different susceptibility to cold temperatures in the winter and during spring. In general, early blooming varieties are more susceptible to spring frost, so if you live in an area that is prone to late spring frosts, you should consider selecting fruit and nut trees that are late-blooming varieties.
Planning Your Home Orchard
Growing a productive tree with good quality fruit has two main steps and challenges. The first step is to understand your backyard conditions, especially those that can be limiting for tree growth. Second, the selection of the tree. Most home and garden shops near your home will have a selection adequate to your area with detailed information on the growing requirements. Either way, it is better if you know what you want and can select according to your preferences. There are three major considerations within each tree fruit species: variety, rootstock, and pollinizer (if needed). The more information you can gather on the fruit or nut tree you select, the better the chances you have of successfully growing a fully productive backyard tree.
Variety Selection
For most commercial tree fruit species, there are many varieties, which could differ in many aspects, including the tree shape, productivity, flowering time, pollinator requirements, productivity, harvest season, and fruit characteristics. For some tree fruits like apples, there are literally hundreds of varieties to choose from. Start your orchard simple and with common varieties that have more information available for adequate management.
Generally, the more varieties of fruit you grow, the more complex it will be to manage them. As you gain experience and meet with success, you may choose to diversify and meet the challenge of managing more varieties. Important considerations in variety selection will be susceptibility to cold temperatures, pollination requirements, harvest time, disease tolerance, fruit quality, and how the crop is consumed and stored (i.e., eaten fresh off the tree, canned, frozen, or dried).
The following lists show some of the more common fruit varieties grown in Washington State; however, new varieties are frequently being developed or discovered that are well suited for growing regions found in Washington. Check with your local ag Extension office, with local nurseries, or with fruit growing organizations or individuals who can provide information of fruit varieties that are reliably productive and suitable for your growing area.
Apples
There are hundreds of varieties of apples available to the home gardener. One important criterion in selecting a variety for your backyard is tree vigor (opens in new window) (see list below). In general, more vigorous apple varieties are larger trees and less productive. The more vigorous trees produce large and heavily branched canopies. These trees will require more precise and intensive tree training and pruning to control vegetative growth, control shading, and encourage fruit production (opens in new window).
List 1. Vigor category of common apple cultivars.
High vigor:
- Earligold
- Gravenstein
- Mutsu
- Northern Spy
- Winter Banana
Low vigor:
- Honeycrisp
- Spur Delicious
- Spur Golden
- Spur Granny Smith
Very low vigor:
- Spur Delicious
- Spur Rome
- Super Spur
Moderate vigor:
- Braeburn
- Cosmic Crisp
- Delicious
- Empire
- Fuji
- Gala
- Idared
- Granny Smith
- Jonagold
- Jonathan
- Liberty
- Melrose
- Golden
Delicious
List 2. Apple cultivars grouped by relative timing of fruit harvest
Harvesting Time: Early
- Akane
- Gravenstein
- Jersey Mac
- Lodi
- Pristine
- Red Melba
- Sansa
- Tydeman’s Red
- William’s Pride
Harvesting Time: Midseason
- Empire
- Gala
- Jonathan
- Liberty
- McIntosh
- Wealthy
- Honeycrisp
Harvesting Time: Late
- Braeburn
- Cortland
- Cosmic Crisp
- Delicious
- Fuji
- Granny Smith
- Jonagold
- King Macoun
- Melrose
- Mutsu
- Newtown
- Rome Beauty
- Pink Lady
If you are considering planting more than one variety of apple in the backyard, consider selecting varieties that have different harvest timing so you can have fresh fruit over a longer period of time. List 2 lists apple varieties by anticipated harvesting time.
Typically, the early harvested apple varieties mature around mid- to late August. Midseason apples are harvested September to early October, and late season apples in mid-October to November. For the late harvest varieties, it is important to consider the risk of late fall frost events that could occur before harvest and damage the crop.
In areas like the west side of the Cascades in the Pacific Northwest, where frequent precipitation and high humidity are the norm, home orchardists should select disease-resistant apple varieties. These varieties can reduce the number of fungicides needed to protect your trees and fruit from plant diseases such as apple scab and apple mildew (see list below). In the low-humidity and low-rainfall parts of the Pacific Northwest, disease incidence is not a major concern and harvest times can be the chief selection criteria.
List 3a. Apple cultivars by scab resistance category recommended for western Washington
Scab-resistant only:
- Chehalis
- Enterprise
- Freedom
- Goldrush
- Liberty
- Pristine
- Raritan
- Red Baron
- Sansa
- Sir Prize
- Tompkins King
- William’s Pride
Scab- and mildew-resistant:
- Bramley’s Seedling
- Brown Russet
- Buckley Giant
- Hudson’s Golden Gem
- Mother
- Prima
- Priscilla
- Stirling
- Tydeman’s Early
- Wolf River
List 3b. Apple cultivars recommended for eastern Washington
Timing: Early
- Akane
- Earligold
- Gingergold
- Gravenstein
- Lodi Paulared
- Redfree*
- Sansa*
- Summerred
- Tydeman’s Early*
Timing: Midseason
- Chehalis*
- Elstar (not heat-tolerant)
- Empire
- Enterprise*
- Honeycrisp
- Liberty*
- McIntosh
- Prima*
- Priscilla*
- Royal Gala
- Spartan
Timing: Late
- Braeburn
- Cortland
- Cosmic Crisp
- Fuji
- Golden Delicious
- Goldrush
- Granny Smith
- Idared Jonafree
- Jonagold
- Jonamac
- Melrose
- Newtown Pippin
- Pink Lady
- Red Delicious
- Sundowner
Cherries
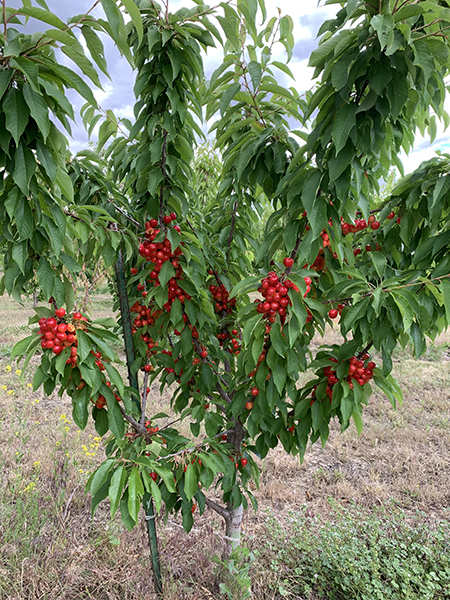
Important criteria in selecting cherry varieties are fruit flavor, appearance, and harvest time. Sweet cherries are best eaten as fresh fruit off the tree while sour cherries (such as Montmorency and Balaton), also known as pie cherries, have an intense cherry flavor and are better for baking and cooking. Sweet cherry varieties may have dark red skin, red skin, or yellow skin with a red blush. Bing is the most popular of the sweet cherry varieties and matures between the last week of June and first week of July, depending on the weather conditions. Chelan, Royal Ann, Coral Champagne, Early Robin, and Tieton are early varieties that ripen about one week before Bing. Lapins, Skeena, Regina, and Sweetheart may ripen two to three weeks after Bing. One main criterion used to select east-side versus west-side varieties is cherry susceptibility to rain cracking (see lists below). Precipitation just prior to harvest can cause the fruit of many cherry varieties to swell and split. Disease tolerance is a desirable trait in cherry varieties selected for home orchards in eastern Washington.
List 4a. Cherry cultivars by color type recommended for western Washington
Color Type: Sweet (dark)
- Bing
- Benton
- Black Pearl
- Burgundy Pearl
- Kordia (Attika)
- Lambert
- Lapins
- Regina
- Sandra Rose
- Santinas
- Skeena
- Sweetheart
- Tieton
- Van
Color Type: Sweet (yellow-blush)
- Bada
- Corum
- Rainier
- Royal Ann (Napoleon)
Color Type: Sour
- Balaton
- Danube
- Montmorency
- Surfire
List 4b. Cherry cultivars by color type recommended for eastern Washington
Color Type: Sweet
- Bing
- Benton
- Black Pearl
- Burgundy Pearl
- Chelan
- Coral Champagne
- Kordia (Attika)
- Rainier (light-skinned)
- Regina
- Royal Ann (Napoleon)
- Santinas
- Sandra Rose
- Skeena
- Sweetheart
- Tieton
- Van
Color Type: Sour
- Balaton
- Montmorency
Pear
There are two types of pears that can be grown in the Pacific Northwest—European and Asian pears. Most of us are familiar with the shape and texture of European pears including the Bartlett and Winter Nellis pears. European pear varieties can sport yellow or red skin color. Asian pears, sometimes called apple pears, are shaped more like apples and have a crisper and juicer texture than European pears. Most pears in Washington are grown on the east side of the state (see list below). The wetter climate on the west side tends to be more conducive to disease problems; however, disease-resistant pear varieties like Blake’s Pride, Orcas, and Rescue may be ideal for home orchards in western Washington.
List 5. Pear varieties for the Pacific Northwest
European (green):
- D’Anjou*
- Bartlett
- Bosc*
- Comice*
- Conference*
- Seckel*
- Tosca
European (red):
- Red Anjou*
- Red Bartlett
- Reimer
- Starkrimson
Asian (yellow skinned):
- Kikusui
- Kosui
- Nijisseiki
- Shinseiki
Asian (russet):
- Chojuro
- Hosui
- Shinko
*Requires several weeks of cold storage after harvest for best eating quality.
Stone Fruits
There are dozens of stone fruit cultivars that do exceedingly well in the Pacific Northwest. Fruit productivity and disease susceptibility are two limiting factors in cultivar selection for peaches, nectarines, and apricots in western Washington, but there are some cultivars that show some tolerance to stone fruit diseases (see list below).
List 6a. Stone fruit cultivars by harvest time for western Washington
July maturity: Peaches
- Early Redhaven
- Gemfree
- Golden Gem
- Harbelle
- Harrow 719
- Springcrest
August maturity: Peaches
- Earlihale
- Fairhaven Glohaven
- Harken
- Harmony
- July Elberta
- Loring
- Redglobe
- Redhaven
- Redtop
- Rochester
- Slappy
- Suncrest
- Sunhaven
- Veteran
September maturity: Peaches
- Bisco
- Early Elberta
- Flamecrest
- J.H. Hale
September maturity: Peaches
- Karko
- Redgold
- Fantasia
- Juneglo
September maturity: Apricots
- Puget Gold
List 6b. Stone fruit cultivars for western Washington
- Early Elberta
- Early Hale
- Elberta
- Golden Jubilee
- Halehaven
- July Elberta
- Newhaven
- Redhaven
- Rosa
- Fantasia
- Flavortop
- Juneglo
- Nectared
- Red Gold
- Sunglo
- Goldbar
- Goldcot
- Goldrich
- Moorpark
- Perfection Wenatchee
- Rival
- Tilton
- Tomcot
Peaches
Nectarines
Apricots
Nut Trees
A number of hazelnut, walnut, and chestnut trees can be productive here in the Pacific Northwest (list below). Frequently, the limiting factor to sustainable production on the east side of the state is winter injury due to early spring frosts and severe winter temperatures. In western Washington the most limiting factor is the cool, wet growing seasons.
List 7. Nut tree cultivars by species for the Pacific Northwest
Hazelnuts (filberts)
- Barcelona
- Lewis
- Clark
- Willamette
- Hall’s Giant
Walnuts
- Carpathian
- Franquette (can freeze out)
- Hartley
- Manregian
- Spurgeon
Chestnuts
- Colossal
- Layeroka
- Skioka
- Skookum
Rootstock Selection
Nearly all commercially available fruit and nut trees are actually two plants grafted together. The aboveground portion of the fruit tree is called the scion (opens in new window) and presents the variety characteristics discussed above. The bottom portion of the fruit tree is called the rootstock (opens in new window) and makes up the root and collar system of the tree.
While home orchardists can select the variety of fruit tree they want, they generally do not have a choice about the rootstock it is grafted on. However, it is important to know the purpose of rootstocks and, whenever possible, choose dwarfing rootstocks that limit the ultimate size of a tree, providing precocity and productivity.
The main purpose of fruit tree rootstocks is to control overall tree size. A tree that is sprouted from seed (that is, grown on seedling rootstock (opens in new window)) tends to grow vigorously and can easily grow to 30 feet or taller. Dwarfing rootstocks can reduce the need for ladder work, which includes activities like pruning, harvest, insect and disease management in the upper canopy (opens in new window) of the tree, among others. The ultimate height of any tree can be greatly influenced by pruning and training.
Apples
Apple trees present a great variety of rootstocks for home orchardists to choose from. Horticultural researchers in different breeding programs have developed a series of rootstocks with diverse vigor and disease resistance. For example, researchers in England developed the Malling and the Malling Merton series of apple rootstocks. These rootstocks provide trees with diverse vigor. Each rootstock is identified by the letter “M” (for Malling) or “MM” (for Malling Merton) and a series number. The height may be anywhere from dwarf (4 to 8 feet) to semistandard (16 to 18 feet). Cornell University’s apple breeding program has also developed a series of popular rootstocks distinguished by their tolerance to diseases. These rootstocks correspond to the Geneva series identified by the letter “G” (for Geneva) followed by a series number. The Budagorsky (“Bud”) series was introduced from central Russia and is also popular in eastern Washington for its vigor control. There are other commercially available apple rootstocks, and nurseries should be able to provide information regarding vigor, disease resistance, and winterhardiness.
Home orchardists should select dwarf rootstocks such as M.9, Bud 9, G.11, G.41, or M.26. Apple trees on these rootstocks are workable tree heights (6 to 8 feet tall) that should minimize ladder work. In some cases, if too dwarfing or the soil is shallow, trees might need additional support by stakes, poles, or wires to keep in an upright position.
The M.27 is the most dwarfing apple rootstock and can be used to grow apples in containers. For container plantings, you should also use spur-type (opens in new window) varieties (List 1). Spur-type varieties are the least vigorous growing varieties, yet they still set good apple crops. New varieties will continue to be developed, thus it is important to understand the concept of vigor, precocity, and diseases resistance. They will be the most important factors that will influence your tree selection.
Pears
Asian pears sometimes use these rootstocks, but they also are grown on two species of Pyrus rootstocks. Partially dwarfing rootstocks include the OH×F 87, OH×F 333, and OH×F 97 rootstocks.
Cherries
Most cherry trees in Oregon and Washington are grown on Mazzard rootstocks, a fibrous, vigorous rootstock that does well in poor soils. The most common dwarfing cherry rootstock available correspond to the Gisela series developed in Germany. The most dwarfing from the Gisela series is Gisela 3 (Figure 1), followed by Gisela 5, Gisela 6, and Gisela 12. These rootstocks will produce trees that are approximately 40, 50, and 60 percent, respectively, of the size of a cherry tree grafted onto Mazzard rootstock. Other rootstocks include Maxma 2, Maxma 60, and Maxma 14. The latter is the most popular of this series with size about 75–85% of a seedling. The Krymsk series includes Krymsk 5 and Krymsk 6, which are the most popular rootstocks. Krymsk 5 is more vigorous than Krymsk 6, with a tree size approximately 70% of Mazzard. Cherry trees on dwarfing rootstocks will bear fruit earlier (more precocious) and promote higher yields. The combination of a highly productive variety (e.g., Sweetheart) and a dwarf rootstock (e.g., Gisela series) can increase fruit yield, affect fruit size, and might require fruit thinning.
Other Fruit and Nut Trees
Dwarfing rootstocks are not as common among the other fruit and nut trees. Plums are produced on a wide variety of Prunus rootstocks, such as peach, plum, apricot, and almond. Peaches usually are grown on their own seedling rootstocks. There are some dwarfing rootstocks for peaches, such as Citation, St. Julian, and Controller 5. Peach tree size can be best controlled through pruning, so dwarfing rootstocks may not be as necessary as with apple trees.
Pollination Requirements
Although fruit may sometimes develop without pollination (parthenocarpic fruit set) the process of fruit development most commonly requires pollination. This is the transfer of pollen (male gametophyte) to the stigma (female floral structure). Then the pollen needs to germinate, grow through the style, and fertilize the ovules. Many tree fruit species require cross-pollination—the need of pollen from a different variety to successfully fertilize the ovules of the main cultivars. Some tree fruit varieties can self-pollinate; these are referred to as self-compatible (opens in new window) or self-fertile. Varieties that cannot pollinate themselves are called self-incompatible (opens in new window) or self-sterile. Thus, for self-incompatible varieties, it is critical to select a pollinizer (pollen donor) that (1) flowers at the same time (so that pollen is available when needed) and (2) provides compatible pollen.
Clearly, it is critical to know the pollination requirements of any tree fruit variety. Self-fertile varieties will set a crop in isolation whereas self-sterile varieties will not set a crop without a different source of pollen. Often, the pollination requirements for a given variety are described on a sales label. For further information on pollination processes and requirements, visit WSU Tree Fruit Extension (opens in new window).
Some sweet cherries and most varieties of apples and pears grown in Oregon and Washington do not set fruit unless they are pollinized by another pollen-compatible variety.
Lapins, Benton, Skeena, Sweetheart, and Sandra Rose are self-fruitful sweet cherry varieties. Other examples of self-fruitful crops are tart (pie) cherries and most peaches, nectarines, and European plums.
Bartlett pears may set a few seedless pears without cross-pollination, but they set more if pollinated by d’Anjou. Bosc and Comice trees pollinate each other.
Home orchardists should plant pollen-compatible trees within 100 feet of each other to ensure adequate pollination. The bloom periods of the main and pollinizer varieties must overlap enough to provide at least several days for cross-pollination to take place. Climatic conditions such as mild winters, hot springs, and changes in temperature can modify the bloom time of some varieties, preventing bloom overlap. In these cases, fruit production will be affected. Orchards with many pollinizers tend to be more fruitful than those with just one pollinizer.
If no pollinizing varieties are growing nearby, or the pollinizer bloom time is not overlapping with the variety, cut a bouquet of blooms from another compatible variety and place it in a pail of water beside your tree during bloom. Another alternative is to graft a branch of a compatible variety onto the main variety.
Site Selection and Tree Planting
Location
The most important requirement for healthy and productive tree fruit is light interception. Thus, the location should receive full sun for most of the day. The second most important factor is water. Excessive or deficient water supply will affect tree growth and fruit quality. Plant the trees in well-drained soils with no limiting factors for root growth. Most trees grow better in at least four feet of well-drained soil. Dwarfing rootstocks can grow well in shallower soils. Poor soils conditions (slow infiltration, excessively drained soils, shallow or with hard layers that impede water flow) will limit root growth. In some of these conditions, raised beds can be helpful.
Spacing
Once you identify the variety and rootstock you want to grow and what is available, define the spacing according to the nursery advice and vigor of the rootstock. The spacing between trees will depend on the training system and rootstock. As a general guideline, spacing on freestanding trees on larger rootstocks typically ranges from 12 to 24 feet. Freestanding trees on semi-dwarfing and dwarfing rootstocks can be planted between 8 to 12 feet apart. Dwarf and semi-dwarf trees can be planted as close together as 1 to 5 feet apart when specialized trellising or training systems are used, but high-density systems require more precise pruning and management. Pear trees on standard rootstocks are generally vigorous, and spacing is usually between 15 to 20 feet. Partially dwarfing rootstocks include the OH×F 87 and OH×F 97 rootstocks where trees can be spaced on a 5 foot by 12 foot pattern. If trees are planted too close together there will be less space for root growth and the trees will be smaller than expected. The tree’s canopy density may reduce the development of fruit wood, increase pests and diseases, and affect fruit quality; therefore, trees will require more precise pruning. Too much spacing between trees can promote growth and vigor, and trees might take longer to produce fruit.
Soil
Before planting, make sure you know your soil and the limiting factors of your site. The best strategy is to dig a couple of soil pits at least 3 feet deep and observe possible limitations, such as physical barriers, abrupt changes in color, bad drainage, presence of impermeable layers, etc. Soil chemical analyses can also help correct deficiencies prior to or at planting, to help initial tree growth. Samples should be taken between 8 to 12 inches deep from the planting site. To collect a good representative sample, collect subsamples from different points, mix well, place in a plastic bag, and label well to track back the results to the corresponding area. If the planting area is large (greater than two acres) or too variable, it is better to collect separate samples from each distinct area. Labelled samples should be sent to a testing laboratory. For information on where to send a soil sample, the North American Proficiency Testing Program (opens in new window) (NAPT) provides a list of certified laboratories for each state, and each laboratory can provide more information on sampling guidelines.
Planting
Fruit trees are sold bare-root or in plastic pots with a nursery potting soil or planter mix. Dig a hole two to three times wider than the root ball or existing root system, large enough to comfortably accommodate the new tree’s root system without bending roots, and only as deep as necessary so that the tree is planted with the soil level at the same level as the top of the container soil or where the bare-root tree was originally planted in the ground. If the soil is compacted or if it is a heavy (clay-like) textured soil, roughen the sides of the planting hole to help favor root growth and water movement into the surrounding soil and prevent the tree from becoming “pot bound” in the planting hole. If a chemical test indicates low levels of phosphorous (P), placing fertilizer in the planting hole is highly recommended, due to its low mobility. Make sure the fertilizer is mixed in the soil in the planting hole a few inches below the roots of the tree and there is a layer of soil between the roots and the fertilizer to prevent burning of roots. Do not add organic planting mixes, soil amendments, or planting mixes into the planting hole, and use only the native soil to refill the hole when planting the tree. When the mix in the planting hole and the potting soil are physically different, the tree’s roots may have difficulty growing into the surrounding soil and the tree could rapidly decline three to four years after planting.
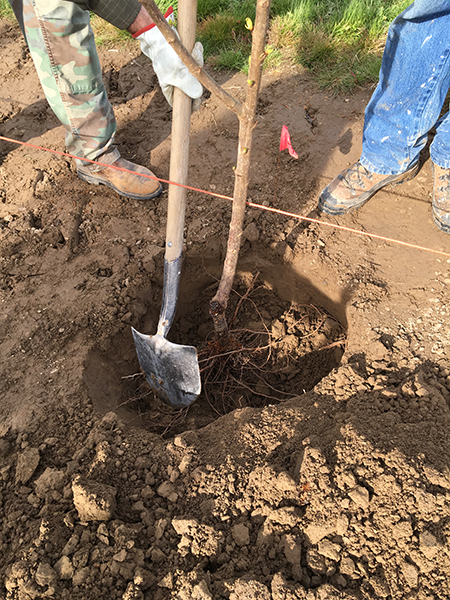
For bare-root trees, trim off any broken roots and place the trees over a low mound of soil in the hole (Figure 2). Make sure the graft union between the rootstock and the cultivar wood remains above the ground surface. If the cultivar wood is below the ground surface it will produce its own root system and the dwarfing impact or other benefits of the rootstock will be lost. Conversely, any shoots that grow from the rootstock, called root suckers, should be removed as they produce inferior quality fruit, may outcompete the cultivar, and may be more susceptible to insects and diseases. For trees in plastic pots which are planted in a nursery “soil,” make sure to roughen up the soil on the sides of the root ball and cut any circling or heavily matted roots before placing the tree in the ground. To ensure a good contact between the roots and the soil, irrigate immediately after planting to soak the planting area and ensure adequate filling of air spaces.
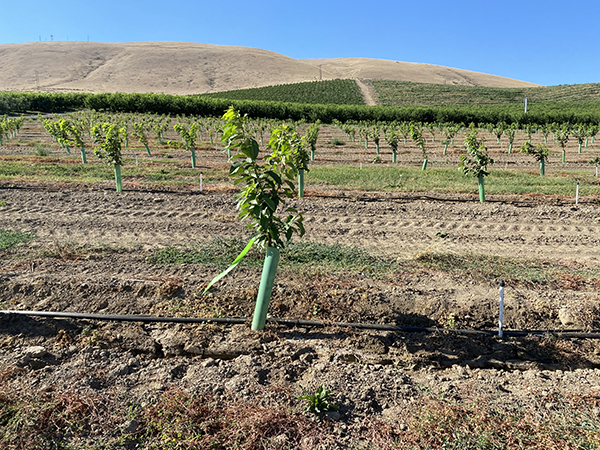
Protect the trunk of the newly planted tree with either white, water-based latex paint, tree trunk wraps, or protective covers (Figure 3). White paint helps protect the bark of the tree from sunburn or sunscald and winter injury. Other protective covers and wraps can also prevent animal injury.
Proper Irrigation
Water is the most important resource needed for tree growth and should be well planned with the help of an orchardist. Without irrigation there will be no tree fruit in eastern Washington, where the precipitation during the growing season is not sufficient. The demand for water by the tree depends on the amount of transpiration in the leaves, and therefore the environmental conditions. The timing or frequency of the irrigation will depend on the soil type and its water-holding capacity. The best way to determine if your irrigation set is adequate is to manually dig down into the soil in the region occupied by the tree roots, usually under the canopy near the drip line or edge of the tree’s canopy, 24 hours after an irrigation set. Observe and feel by hand the depth of soil that is moist. If the soil is moist beyond the feeder root zone (generally two to three feet deep on an established tree), the irrigation set was too long. If the moisture did not reach the full depth of the root bulb, then the irrigation set was too short and needs to be increased. An easy way to determine how often the trees need to be irrigated is to collect a soil sample from the root zone and squeeze it into a ball. If this soil ball crumbles when released, the soil is too dry and you need to provide more frequent water. If the ball drips water when squeezed or is muddy and leaves some water on your hands, then there is more than enough water in the soil and no irrigation is needed at this time. Oversaturated soil or a soil that is kept too wet can kill roots and can promote harmful diseases that may cause trees to die. There are several economic moisture sensors that can also be utilized to help determine irrigation frequency and sets, but most of them need calibration.
The amount of water needed by a fruit tree will vary over the year. In general, fruit trees will take up water when leaves start opening and transpiring in the early spring until the first leaves start to yellow and drop in the fall. Water needs will be greatest during hot or windy days when transpiration rates are the highest. During the summer months, even in western Washington, home orchardists should monitor tree stress such as leaf curling, wilting, or premature leaf drop over the entire tree canopy. These signs of tree stress can indicate either too little or too much irrigation.
Remember that young, newly planted trees typically have an underdeveloped root system and therefore a reduced ability to take up water. Thus, watering young trees regularly and frequently in warm weather, usually 1–3 times per week, will help them get off to a better start. Light watering that does not moisten the complete soil profile, or at least to the desired root depth of three feet, will encourage the tree to develop a shallow and weak root system. So as the fruit trees mature, less frequent and deeper watering is preferable. In general, mature fruit trees can use a deep soaking from irrigation or rainfall every 7 to 15 days, depending on the season and soil type.
Under-tree or drip irrigation is the preferred means to apply water to fruit trees. However, if the soil is too coarse or sandy, where the water does not spread well laterally from the emitters, sprinklers or micro-sprinklers that cover a greater area would be better. Try to keep or minimize water from contacting the tree foliage, trunk, flowers at bloom, and fruit. This will reduce the incidence of many tree fruit disease problems. At the same time, avoid overwatering or excessive moisture near the base of the tree trunk as this can lead to crown and root rots.
Tree Pruning and Training
Tree pruning is a necessary part of home orchard care. Pruning promotes adequate light interception, health, and strength, while also controlling tree height and maximizing fruit-bearing potential, ensuring sustainable production.
Your pruning strategy should consider the fruiting habit of each tree. The type and age of wood that bears fruit varies with the tree species and between varieties. For example:
- Walnuts and quince produce fruit on the current season’s shoots.
- Hazelnuts, nectarines, peaches, quince, and Japanese plums produce fruit only on one-year-old shoots.
- Some sour and sweet cherries, some apples, and some pears can produce fruit on one-year-old shoots.
- Apples, apricots, sour cherries, sweet cherries, pears, and plums (European and Japanese) produce fruit mostly on fruiting spurs which occur on shoots and branches that are two years old or older.
Good light penetration is necessary for fruit spur formation and productivity. Trees that fruit on spurs should be maintained in an open form. Those that produce their crop on one-year-old wood (such as peaches and hazelnuts) demand more intense pruning to renew fruiting wood.
Pruning and Training Guidelines
- Pruning newly planted trees should be kept to a minimum for the first year. Prune broken, damaged, or diseased branches or roots with natural target pruning cuts that promote rapid wound closure and compartmentalization of the wound.
- If necessary, prune or train branches that have narrow crotch angles (less than 30 degrees) to prevent the development of included bark which results in structurally weak branch attachment.
- Winter pruning promotes vigor and vegetative growth, while summer pruning reduces vigor by reducing photosynthetic capacity in the current season.
- Prune young trees very lightly. Heavy pruning will delay tree fruiting.
- Prune mature trees more heavily during the winter to remove weak branches, promote light distribution and encourage regrowth, especially if trees are weak.
- Thinning cuts or “clean cuts” close to the base of the leader are recommended on vigorous or upright shoots with less than a 30-degree crotch angle to open spaces for light penetration and when regrowth is not needed.
- Heading cuts are cuts of a portion of the branch that will promote regrowth right below the cut. Utilize heading cuts to regulate crop load in long branches and to promote branching and vigor. Heading cuts often cause an excessive amount of branches to occur below the cut which blocks light penetration, restricts air circulation, and often leads to weak branch attachment and increased pest and disease problems. Follow-up pruning after regrowth occurs is usually necessary to promote better light penetration, improve air circulation, and develop stronger branch attachment and structure.
- To keep trees small, prune during the summer and do not apply excess fertilizer, manure, or compost.
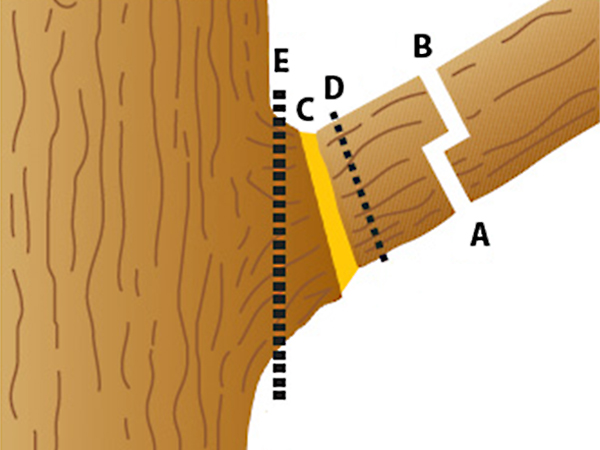
- When removing large limbs, first cut partway through from the underside, about six inches out from the trunk, then make a second cut from the top a little farther out, cutting all the way through, until the branch falls away. Finally, cut the stub back to the branch collar. Do not remove the branch collar (Figure 4).
Fertilizing Fruit Trees
Fruit trees need nutrients for growth and development. The need to apply fertilizer will depend on the demand of the trees and the available nutrients in the soil and water. The availability of nutrients in the soils will vary depending on the soil type and history of the site. Consult local Extension educators for specific recommendations in your area.
Nitrogen (N) and potassium (K) are the most important macronutrients in tree fruit, as they are required in greater amounts. Nitrogen is very mobile in the soil and can be lost under many different conditions, especially in sandy soils; thus, fertilization with N is usually necessary every year. The movement of K is more limited, except for very sandy, coarse soils, and might not be needed every year. The amount needed varies depending on tree size, crop load, and availability. As a general recommendation, N should be applied during spring (or active growth), up to one pound of actual N per tree each spring. The best way to gauge nitrogen needs is to watch the vigor of the tree and apply fertilizer in small doses several times during the growing season. Low vigor is associated with lack of growth and yellowing of leaves, while high vigor is associated with excessive shoot growth (more than 20 inches), lack of fruiting wood, and shading. Be careful to assess lack of vigor adequately, as it can also be related to lack or excess of water, shade, insects, and diseases. Overapplication of nitrogen can cause many problems, such as bad fruit quality, soft fruit, lack of color, and increased susceptibility to insects, diseases, and disorders.
Tree fruits do not have a large demand for phosphorous (P), but it is essential for many energetic processes and required for adequate growth and development. In most soils, P can be low, and because it has very low mobility in the soil, the best time to apply P is during planting, in the planting hole. Consider the equivalent of one ounce of actual P per tree and make sure the fertilizer is not in direct contact with the roots.
Nutrients with low mobility in the soil, such as P and K, might build up in excess if applied every year without checking soil levels. While none of them are toxic to plant growth, excessive levels in the soil might induce nutrient imbalance and prevent the uptake of other essential elements such as calcium and magnesium.
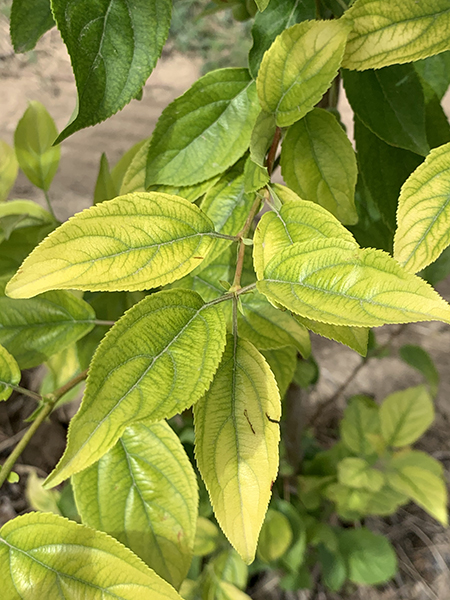
In eastern Washington where the soils have high pH (above 7.5) or high calcium carbonate, phosphorous, boron, and metallic micronutrients can be unavailable for plant uptake. A common symptom of micronutrient deficiency is iron (Fe) chlorosis (Figure 5). In general, when Fe-chlorosis is observed, manganese (Mn), zinc (Zn), copper (Cu), and boron (B) can also be deficient. Micronutrients can effectively be corrected with small doses via foliar sprays with multi-mineral formulations.
Under alkaline conditions, products such as iron sulfate or elemental sulfur can help reduce soil pH and help with nutrient availability.
Most home orchardists do not apply adequate boron to their fruit trees. Although boron is needed only in small amounts, it is essential, especially for flower development and fruit set. Trees that are low in boron have poor fruit set, deformed fruit, and lack of shoot growth. An easy source of boron for home orchardists is Borax. If you need to apply boron to a fruit tree, add a tablespoon of Borax to two gallons or more of water and apply it to the soil within the tree’s dripline during active growth. It is best to have the soil analyzed for boron deficiency before adding more.
Fruit Thinning
Fruit thinning of apples, Asian and European pears, peaches, and sometimes cherries is a very important part of orchard management and improves size and quality of fruit. For pome fruits such as apples and pears, thinning also helps ensure adequate crops year after year. The earlier it gets done, the greater the effect on fruit size and return bloom.
Early thinning of blossoms and young fruit helps stimulate flower initiation for next year’s crop, especially on cultivars that tend toward biennial bearing. The seeds from the current season’s flowers release a plant growth regulator that inhibits the formation of flower buds for the following year. By removing blooms or newly formed fruit, there is less inhibition, and more flower buds can develop.
Timing is critical. In apples, thinning should be done within 40 days of bloom, and in pears within 60 days of bloom. In sweet cherries, biennial bearing has not been reported, so thinning is more important for fruit size than for the following year’s crop. Attaining adequate return bloom on peaches seldom is a problem, but early thinning generally helps to improve fruit size and quality as well as reduce the risk of limbs breaking due to the weight load of the fruit.
Excessive fruit can lead to small fruit due to competition for carbohydrates and nutrients. The most important period for sizing is prior to cell division. This period for apples lasts four to five weeks after petal fall. For peaches and cherries, it lasts four weeks after petal fall, while pears continue cell division for seven to nine weeks after petal fall. After cell division starts cell enlargement, which continues throughout the growing season until harvest. Note that if you have a smaller crop, fruit can be excessively big, which can also be undesirable. Determine the size of fruit you want and thin accordingly.
There are a couple ways for a home gardener (i.e., noncommercial grower) to thin fruit. The most efficient way to ensure adequate size and return bloom is to thin during the dormant season with pruning. Leaving an adequate amount of fruiting buds per linear wood could be sufficient and will help to manage the crop. If your trees are still producing too much fruit or the fruit is too small, hand fruit thinning will help increase fruit size. Mechanical thinning has also been utilized in cherries and apples, using different strategies to knock either blooms or fruit by physical force. These methods, while efficient, are not as effective and can damage the tree. More information about fruit thinning can be found on the WSU Tree Fruit Extension (opens in new window) web page.
Apples
It is best to leave one fruit per spur, removing the smallest fruit. The relative sizes of the fruit do not change throughout the season. The king bloom (first bloom in a cluster) generally produces the largest fruit.
Decide how much fruit to leave on the tree based on the vigor and general condition of the tree. In cultivars that tend toward biennial bearing, leaving every other spur without fruit helps ensure adequate return bloom. Leaving more than one fruit per spur is possible except on short-stemmed cultivars, such as Gravenstein, and red cultivars that color poorly. Fruits of short-stemmed varieties tend to push each other off the spur if there are two fruits per spur.
Asian Pears
Asian pears generally need thinning. Each blossom cluster contains several flowers in a row. Save the fruit in the middle and remove the rest. By counting the flowers as they appear, starting from the base of the cluster, you can determine which fruit to remove. For example, if there are seven flowers, save the fourth fruit from the base of the cluster. Thin early to get large fruit.
Depending on the tree’s vigor, you might experiment by leaving two fruits per spur and checking the fruit size response.
Peaches
Thin peaches to one every four to six inches. This spacing gives them adequate room to mature to full size.
Weed Management
Proper weed management is important to newly planted and young fruit and nut trees, especially in eastern Washington where water can be a limiting resource. Weeds will compete with your trees for water and nutrients. As your trees mature, they will gain the competitive edge and shade out and outcompete many of the weeds. Allowing weeds to grow at the base of the tree can provide ideal habitat for several insect pests as well as for pestiferous rodents like voles. Throughout the lifetime of your trees, it is a good strategy and aesthetically pleasing to manage those weeds that grow beneath each tree.
For home orchardists, frequent scouting and hand removal of perennial weeds is the easiest means of managing them. Shallow cultivation under the tree to cut annual weeds just below the soil surface is important for newly planted and young fruit and nut trees. Take care not to damage the trunk of the tree and to minimize the scarring of any shallow roots. Plastic mulches, woven mats, and bark mulches are excellent materials that prevent weed infestations under young trees. As your fruit or nut tree becomes productive, a dwarf turf grass or other ground cover under the tree can be encouraged and managed as a living mulch. There are many groundcovers that can encourage beneficial insects, fix nitrogen into the soil, or have other benefits for the orchard. Check with your local agricultural Extension or Master Gardener office for recommendations on options for your area.
Herbicides may be used to manage weeds under your tree as well. Before using any herbicide product, be sure to verify that the herbicide label allows for use under your fruit or nut tree. Avoid spraying herbicides in windy conditions, and avoid applying any herbicide directly to the green tissues of your tree. Always follow the label directions for appropriate application.
Insect Management
There are many arthropods, including both insects and mites, that negatively affect tree health and fruit quality. Most are considered indirect pests that may feed on tree leaves, branches, or roots, but do not directly damage the fruit. These pests can be managed through numerous IPM tactics like cultural, behavioral, mechanical, biological, and, occasionally, through chemical applications. The most serious pests directly damage the fruit itself. In apples, the most serious pests include apple maggot and codling moth; in pears, the pest of concern is codling moth; and for cherries—western cherry fruit fly. For these fruits, home orchardists will have to practice IPM to prevent these serious pests from infesting a sizeable percentage of their harvested fruit. By necessity, these programs will utilize insecticide applications, but other IPM strategies can be used to reduce home orchardist reliance on insecticides.
Two strategies of IPM that home orchardists should consider are pest scouting and pest monitoring. Pest scouting involves periodic visual inspection of the fruit tree for the presence (or absence) and density of insect pests, as well as the damage they cause, and to gauge the overall health of the tree. Pest monitoring involves the use of traps and phenological models to monitor and predict pest development, pest density, and the potential for pest damage.
While scouting and monitoring pest populations, home orchardists should also learn to identify and manage the beneficial arthropods as well as the pests. The proper management of beneficials like lady beetles, predatory mites, spiders, lacewings, and others can help home orchardists control populations of indirect pests such as spider mites, aphids, caterpillars, and scale insects. While home orchardists may not want to tolerate direct pest populations, they are encouraged to tolerate populations of indirect pests. Indirect pests can be maintained at levels that do not cause fruit damage or impact tree health, but do provide a food source for those beneficial insects that can keep these and other indirect pests in check throughout the growing season.
Please note that in Washington State, home orchardists have a legal responsibility (RCW 15.08.010) to control the horticultural pests and diseases that can plague their fruit trees. The basis of this responsibility is to prevent the buildup of pests in backyard fruit trees that can then spread to adjacent backyard trees as well as to commercial orchard operations. In many counties, especially those whose economies are dependent on agriculture, this responsibility is enforced by County Horticultural Pest & Disease Boards. As a result, home orchardists are often discouraged from planting fruit trees on their property unless they are willing and able to protect these fruit trees from insect pests each and every year. The insect pests of chief concern to most county horticultural boards are codling moth, apple maggot, western cherry fruit fly, pear psylla, and San Jose scale.
Pesticides are discussed generally and specifically in the following pest sections. Because labels change, you must always read a currently registered label to determine whether that product is registered for use on your specific crop.
Codling Moth
If you grow apples, codling moth will eventually find them and infest the fruit. The larva of this moth is known as “the worm in the apple.” It is whitish to pinkish in color with a brown head capsule and is ½- to ¾-inch long when mature. Codling moth larvae will also infest crabapples, pears, hawthorns, quince, and sometimes prunes and walnuts. Codling moth is very difficult for home orchardists to control. Satisfactory control is often achieved through the use of several strategies and often necessitates insecticides.
Codling Moth Life Cycle
- There are at least two generations of codling moth each season in Washington. In warmer regions, there can be a third generation and an occasional, partial fourth generation.
- Codling moth overwinters as mature larvae (pupa) in cocoons hidden under tree bark or among leaf litter and debris at the base of host trees.
- Adult moths emerge from the cocoon in late April to June, and the initial moth flight often coincides with full bloom of Red Delicious apples and lasts six to seven weeks. Moths mate almost immediately, and egg-laying can start within a day of emerging. Eggs are laid singly on leaves adjacent to fruit or on the fruit itself.
- Eggs usually take one to two weeks to hatch into larvae. These larvae immediately enter through the skin to feed on the flesh and then bore to the core of the fruit.
- Larvae can take three to four weeks to complete their development within the fruit.
- Mature larvae exit fruit. They will seek debris on the orchard floor or crevices in tree bark to pupate.
- A second generation of moths will begin emerging generally in early July with peak activity mid-July to early August and activity into September.
- Second generation larvae can be found infesting fruit from mid-July to late-September.
- It has become more common to have a third generation and in exceptionally warm years a partial fourth generation.
IPM Strategies for Codling Moth
- Properly train and prune apple trees to keep the canopy open for pesticide penetration, and maintain tree height at 12- to 15-feet tall or as tall as your sprayer can reach.
- Properly thin the fruit on your trees to one fruit per cluster.
- Throughout the growing season, routinely scout your tree for, and remove, any “wormy” fruit. Look for fruit with entry holes that may have a granular, brownish frass (opens in new window) mound extruding from the hole. Do not just drop wormy fruit on the ground—remove fruit from yard or destroy fruit to prevent larvae from completing their development.
- In early to mid-August, encircle or band the base of the fruit tree with a four-inch-wide strip of corrugated cardboard. Tightly secure the strip to the tree. Mature codling moth larvae migrating up and down the trunk will cocoon and pupate in these strips. After fruit harvest, remove and destroy these strips. Cardboard strips can also be placed around the base by mid-June, but be sure to remove strips by mid-July.
- “Bag” fruit when fruit are between ½- to 1-inch in diameter. Use standard paper bags or special apple bags available from orchard supply stores to enclose fruit. Cut a small slit in the bottom of bag and slide over fruit. Tightly close both ends of the bag. This strategy can prevent moths from laying eggs on, and prevent any newly hatched larvae from reaching, fruit. Remove those bags about two weeks before anticipated harvest to allow desired color development.
- Use horticultural oils to reduce codling moth populations by suffocating the moth eggs. Oil applications must be timed to coincide with the presence of codling moth eggs and are most effective early in the season against the first generation of codling moth. It may require three to five applications spaced seven to ten days apart to smother most of the eggs laid each moth generation. Second generation sprays will start in mid-July. Note: prolonged use of the horticultural oils over several seasons can adversely affect fruit quality and tree health.
- Apply kaolin clay (such as Surround at Home, a unique clay product that may deter codling moth egg-laying behavior by acting like a repellant). A thin film of clay must cover the surface of leaves and fruit by the time the moth egg-laying starts. Applications must begin within a week of petal fall and continue every 10 to 14 days. It may take two to four applications per generation to adequately protect your fruit. Kaolin clay will wash from the fruit, so reapplication after each rain episode may be necessary.
- Well-timed horticultural oils used alone on the first generation can be effective. A limited number of insecticides are also available to home orchardists, such as acetamiprid (e.g., 8033-21-239 Ortho Flower, Fruit and Vegetable Insect Killer Ready-to-Use) and spinosad (e.g., Monterey Garden Insect Spray). These insecticides must be directed toward the newly hatched larvae before they bore into the fruit. For the first generation, apply the first cover spray about 14–18 days after full bloom. Depending on the insecticide selected (refer to pesticide label), a second cover spray will be required 10 to 14 days later. For the second generation, begin cover sprays in mid-July and repeat every 10 to 14 days (depending on label) until fruit harvest. Be sure to mind the preharvest interval stated on the pesticide label. It may require two to four applications per generation to control codling moth.
- Pheromone traps and degree day models can be used to monitor adult activity. In most traps a sticky insert is included to capture the moths. Traps should be placed in the upper third of the canopy before first apple bloom. Check traps once per week. Count and remove moths counted. Commercial orchards use a threshold of 4–5 moths for the first and 1–2 for the second generation to signal sprays are needed. In home gardens with fewer traps, capturing one or more moths signals you have a population. If you have a history of codling moth it is best to treat the first generation regardless of trap counts because cold or windy weather can limit flight to traps.
Apple Maggot
Apple maggot is a serious pest of apples, crabapples, and hawthorns on the west side of Washington State and is present in Okanogan and Yakima Counties on the east side of the state. The apple maggot larvae are white, cylindrical, headless, legless, and ¼- to 3/8 -inches long when mature. It is important to distinguish apple maggot damage from codling moth damage. Apple maggots will tunnel in the flesh of the apple often just below the surface while codling moth larvae tunnel to the core of the apple. Often apple maggot damage is associated with a soft rot while codling moth damage is associated with granular frass that lines the tunnels and extrudes from entrance holes. The adult apple maggot is a ¼-inch fly with a distinctive wing pattern. Apple maggot is a quarantine pest. It is critical to control apple maggot in home orchards so as to not impact the ability of neighboring commercial orchards to market fruit.
Apple Maggot Life Cycle
- There is generally one generation of apple maggot per season throughout the Pacific Northwest.
- Apple maggot overwinters as pupae in the soil beneath host trees. Some pupae may remain in the soil for two consecutive winters.
- Adult flies emerge from the soil in late June to early July and may be active in the tree canopy as late as September. Adult flies must feed for one to two weeks before they mate and lay eggs on host fruits.
- Eggs are laid just underneath the surface of the apple. Some dimpling of the fruit may be visible. Typically larvae complete development in 30 days.
- Apples infested with maggots drop from the tree, or the mature maggots can bore out of the apple and drop to the ground where they enter the soil to pupate.
IPM Strategies for Apple Maggot
- Properly train and prune apple trees to keep the canopy open for pesticide penetration, and maintain tree height between 12- and 15-feet tall (use dwarfing rootstocks) or as tall as your sprayer can reach.
- From mid-July to harvest, routinely scout your tree for, and remove, any fruit infested with apple maggot. Pay close attention to the earlier maturing apple varieties, as this fruit seems to be particularly attractive to apple maggot. Do not just drop infested fruit on the ground as maggots will complete their development and pupate in the soil. This fruit must be removed from the orchard or destroyed. Place infested fruit in a black or transparent plastic bag, close the bag, and leave it in the direct sunlight for a couple days to kill maggots.
- Use insect traps to monitor. These traps may come in the form of yellow, sticky, rectangular cards or as red apple-shaped spheres coated with a sticky insect glue. The traps come with an ammonium lure that makes it even more attractive to female and male apple maggots. Traps should be in place by mid-June. Check the traps frequently and spray if adults are found.
- Apply kaolin clay (Surround at Home). This clay product has been shown to be very effective in preventing egg-laying behavior by apple maggot. Applications should begin early to mid-July and continue on a 10- to 14-day interval until harvest. It may take three to four applications to adequately protect your fruit. Kaolin clay will wash from the fruit, so reapplication after each rain episode may be necessary.
- Use insecticide cover sprays. Apple maggot is susceptible to several insecticides available to homeowners, including spinosad (e.g., Success, Entrust), acetamiprid (e.g., Ortho Bug-B-Gon Systemic), and lamba-cyhalothrin (e.g., Bonide Lambda 0.5% Concentrate). These insecticides must be directed toward the adult fly but are useless against the immature insect stages in the apple. Begin cover sprays seven days after apple maggot is predicted to emerge from the soil (generally July), and repeat based on label recommendations. Be sure to mind the preharvest interval stated on the pesticide label. It may require two to four applications to control apple maggot as allowed per label.
- There are a number of molasses-like baits that can be used to enhance fly uptake of insecticides. There is at least one fly bait formulated with spinosad as an active ingredient available for use by certified pesticide applicators (opens in new window) on backyard fruit and nut trees. These baits are particularly useful in backyard trees that exceed 20 feet in height, as good spray coverage is not critical (the bait attracts flies to the insecticide).
Western Cherry Fruit Fly
Cherry fruit flies are serious pests of sweet and tart cherries throughout North America. The adult fly is about 1/5-inch long with distinctive wing patterns. The fly’s larvae are creamy-white, legless maggots lacking a distinct head capsule and found tunneling in the flesh of the cherry. Since cherry fruit fly is such a poor flier, unsprayed trees may remain uninfested for many years.
But once cherry fruit fly finds your backyard tree, management necessitates multiple applications of pesticides, according to label directions, throughout the cherry season from the point when cherries start to turn from green to yellow in color until the preharvest interval stated on the product label. If left uncontrolled, cherry fruit fly will eventually infest all the fruit on a tree.
Cherry Fruit Fly Life Cycle
- Cherry fruit fly has only one generation per season here in the Pacific Northwest.
- This insect overwinters as a pupa in the soil under the host tree.
- Adult flies start to emerge from the soil in May and are active three to four weeks after harvest. Peak emergence of adult flies often coincides with harvest of Bing cherries.
- Adults can live from two weeks to one month. Approximately one week after emerging adult flies will start mating and then lay eggs. Each female can lay 50–200 eggs in a three week period.
- Eggs are laid in the cherry fruit just below the skin. Some dimpling of the fruit may be visible.
- Eggs will hatch in about one week and the maggots will bore toward the pit. At this stage, feeding damage can be difficult to detect without cutting open individual fruits. Maggots can complete their development in 10 to 21 days. When fully developed, maggots will bore their way out of the cherry, drop to the ground, and burrow into the soil to pupate.
IPM Strategies for Cherry Fruit Flies
- Insect traps. A yellow sticky card with an ammonium carbonate lure can be used to monitor. However, western cherry fruit fly is not strongly attracted to traps and so you cannot assume a tree is safe if no fliers are caught. A degree day model (opens in new window) can be used to predict when flies will emerge. Emergence can vary by four weeks year to year.
- Complete harvest. At cherry harvest, be sure all cherries are removed from the tree. Try not to leave any stray cherries on the tree that serve as hosts for next year’s cherry fruit flies.
- Insecticide cover sprays. Cherry fruit flies are susceptible to spinosad, acetamiprid, imidacloprid, and carbaryl insecticides that are available to home orchardists. These insecticides must be directed toward the adult fly but are useless against the immature insect stages shielded inside the cherry. Begin cover sprays in mid-May or when cherry fruit begins to show a little yellow or straw color. Repeat according to label directions until fruit is no longer left on the tree. Be sure to mind the preharvest interval stated on the pesticide label. It may require several applications to protect your fruit from cherry fruit fly.
- Baits. There are a number of molasses-like baits that can be used to enhance fly uptake of insecticides. There is at least one fly bait formulated with spinosad as an active ingredient available for use by certified pesticide applicators on backyard fruit and nut trees. These baits are particularly useful in backyard trees that exceed 20 feet in height, as good spray coverage is not critical (the bait attracts flies to the insecticide).
Pear Psylla
Pear psylla is considered a secondary pest in pears since it does not feed directly on the fruit. However, psylla nymphs feed on the phloem of the pear tree and produce copious amounts of honeydew. This sticky, wet honeydew can be a nuisance to home orchardists and can cause russet or surface marking of the pear fruit. When they first hatch from tiny, rice-shaped, yellowish eggs, the nymphs are cylindrical and creamy white. As they mature they grow larger, more oval, and flatter with dark green to brown color. Nymph size varies from 0.02 to 0.09 inches. All nymph stages have distinctive red eyes and are associated with pools or globs of honeydew. Pear psylla can be best managed early in the season with “soft” insecticides that can conserve biocontrol agents later in the season.
Pear Psylla Life Cycle
- Pear psylla has three to four generations per season in the Pacific Northwest.
- This insect has a winter-form winged adult that is dark gray and about 0.1 inches long. The overwintering adults begin to lay eggs when temperatures warm in the spring.
- In the early spring, eggs are laid at the base of buds and in crevices on small twigs. Later in the spring and summer, eggs are often laid along the midrib on the underside of pear leaves.
- Nymphs can complete their development in about a month and a half. As the season progresses, there will be overlap in the generations and all stages can be found at once by mid-June.
- Summer-form winged adults tend to be light brown to yellowish in color and often jump and fly away when approached.
IPM Strategies for Pear Psylla
- Prune trees moderately each year to avoid excessive vegetative growth. By the end of June, pull all water sprouts at the base of the tree by hand and prune out any upright shoots from center of pear trees.
- Encourage biological control of pear psylla using predacious insects, including lady beetles, lacewings, and several predacious bugs, by not spraying broad-spectrum insecticides.
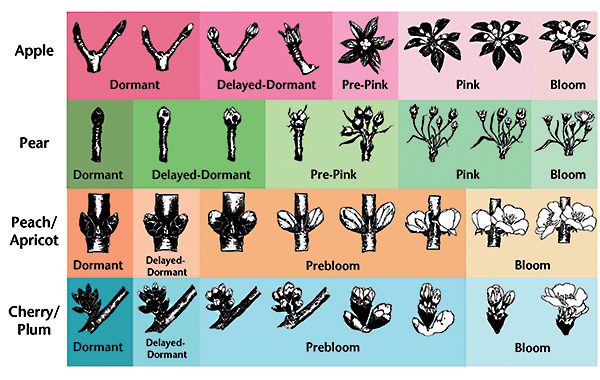
- Horticultural oil applications early in the season will discourage adult psylla from laying eggs. The best timing is in the dormant and the delayed-dormant period before tree buds start showing pink (Figure 6). Apply to the entire tree, especially small limbs and shoots.
- Apply kaolin clay (Surround at Home) two to three times starting at dormant or delayed dormant. This clay product has been shown to be very effective in preventing egg-laying behavior by pear psylla early in the season. Kaolin application can be continued throughout the season to cover new growth.
- Azadiractin and neem oil products as well as oil are also effective on psylla nymphs.
San Jose Scale
San Jose scale is a secondary pest of most fruit and nut trees as well as many ornamental trees and shrubs. It can be most destructive on apples and cherries, especially on large, older trees, but young, unsprayed backyard trees can be vulnerable. Adults and older nymphs are immobile and protected under oval, brittle wax scales that are white to gray with a nipple-like bulge. These “barnacle-like” organisms attach themselves to first-year wood and fruit and feed on plant juices. Red spots may form on wood and on fruit. San Jose scale feeding can kill twigs and limbs, as well as cause cosmetic damage to the fruit. The best means of controlling San Jose scale is to manage it early in the season, preferably during the dormant and delayed-dormant periods (Figure 6). There are other scale insects that may plague fruit and nut trees, and their management options are similar.
San Jose Scale Life Cycle
- San Jose scale has two generations each year in the Pacific Northwest.
- This pest overwinters as nymphs underneath blackened scales. During the relatively cold winter seasons, only the mature nymphs will survive to spring.
- Nymphs mature in the early spring and emerge as adults from mid-April to May. Adult females remain hidden beneath their scale while adult males develop wings and fly in search of adult females to mate.
- Mated females will give birth to several hundred live nymphs from mid-June through July. These nymphs, also known as “crawlers,” will move until they find a suitable feeding site, insert their stylet (opens in new window), and immediately produce a waxy scale. The second generation of crawlers will continue to be produced until October or November.
IPM Strategies for San Jose Scale
- Avoid planting fruit and nut trees next to older trees or shrubs already infested with San Jose scale.
- There is a fair amount of biological control of scale insects by parasitic wasps, but this control is not enough to keep scale in check. Conserve these parasites by avoiding summer sprays of insecticides directed toward scales—these sprays are rarely effective on scale anyway.
- Horticultural oil applications early in the season will smother and kill the immobile scale stages. Apply at delayed-dormant periods before tree buds start showing pink. Good spray coverage of the first-year wood in the small limbs and twigs is critical.
- Broad-spectrum insecticide use can cause flare-ups of scale because they kill the tiny wasps that parasitize the scale.
- Home orchardists can improve the timing of the in-season cover sprays by monitoring the activity of crawlers with dark colored, double-sided sticky tape. The nearly microscopic crawlers are lemon yellow in color and are visible against a dark background. Time in-season spray applications to coincide with crawler activity. There is also a degree day model (opens in new window) which is useful for timing crawler sprays in June.
Leafrollers
Most fruit and nut trees have several species of leafroller caterpillars that can become secondary pests. Typically, leafrollers roll and web leaves together for shelter. The caterpillars usually feed on leaf surfaces, but they will sometimes web leaves onto the surface of a fruit and feed directly on the fruit. This damage usually causes superficial fruit scarring; but if the damage is early in the season, scarring can be deep and cause the fruit to be deformed. Leafrollers can be distinguished from other foliar-feeding caterpillars by their behavior when disturbed in their shelter. They will thrash violently, move backward, and often drop from the leaf suspended on a silken thread.
Leafroller Life Cycle
- Some leafroller species have one generation per season, like the fruit tree leafroller, while other leafroller species have two generations per season, like the obliquebanded leafroller.
- The fruit tree leafroller overwinters as egg masses on twigs and branches of the fruit tree. In spring, these eggs will hatch as the leaf and fruit buds begin to open up, through petal fall. These larvae feed for about four to six weeks. They pupate in their webbed leaf shelters from late May to early June. Adult moths emerge mid-June and are active until late July. Peak flight period is in late June. Egg-laying activity occurs primarily in July.
- The obliquebanded leafroller overwinters as late instar (opens in new window) larvae in silken chambers hidden along cracks and crevices of woody limbs and bark. As a result, these larvae are active in the spring as fruit buds begin to open. They will bore into opening buds and web together young leaf and fruit clusters, feeding on these tissues. Larvae mature in mid- to late May and pupate in webbed leaf shelters. First adult moths begin to fly in late May to early June. Peak flight activity is around mid-June. Throughout June, eggs are laid in light green, fish scale-like masses on leaves of the host plant and are difficult to find.
- The first generation larvae are active, feeding on leaves and fruit throughout July and early August. They pupate in silken leaf shelters, and adult moths will start emerging early July through September and even into October. Most egg masses will be laid during the month of August, and larval feeding activity will continue through September and October until cold temperatures and leaf drop forces larvae to find overwintering areas.
IPM Strategies for Leafrollers
- Horticultural oil applications early in the season will smother and kill egg masses and young larvae of some leafroller species. The best timing is in the dormant and the delayed-dormant period before tree buds start showing pink. Good spray coverage of the small limbs and twigs is critical.
- Early season thinning of fruit clusters to a single fruit can discourage leafroller feeding on fruit surfaces.
- There are a number of wasp species that will parasitize leafrollers. Using insecticides sparingly during the growing season can conserve these wasps. Researchers have found that growing wild roses or strawberries in the vicinity of backyard fruit trees can encourage overwintering populations of these wasps.
- Scouting the canopy for, and removing, the rolled leaves that contain leafroller larvae and pupae can reduce populations, especially in young, non-bearing fruit trees.
Insecticide sprays should be timed as two to three applications from tight cluster to petal fall. Summer sprays can also be applied to target young larvae before then enter fruit in early summer. Bacillus thuringiensis (“Bt”) can provide control of leafrollers. Products containing Bt are very selective and will only disrupt populations of leafrollers and other leaf-feeding caterpillar larvae in the trees. Spinosads are another type of material that can be used.
Spider Mites
Mature spider mites are very small (1⁄50-inch), eight-legged creatures that are just visible with the naked eye. They spin fine webs, often along the midrib of leaves, on a wide range of host plants, including fruit and nut trees, vegetable crops, houseplants, and ornamental plants. Mites can become secondary pests at high populations because they feed on and suck out the cell contents (including the green pigment chlorophyll) of plant cells, causing a yellow stippling or bronzing of leaf surfaces. In pears, this damage can lead to transpiration burn where the leaves may develop necrotic areas and drop from the tree. Excessive feeding on other trees can cause leaf yellowing and premature leaf drop.
Spider Mite Life Cycle
There are several species of spider mites in the Pacific Northwest, and most of them can complete multiple generations each growing season. During the warmer periods of summer, these mites can complete a life cycle in as little as ten days.
Some mite species, such as the two-spotted spider mite, overwinter as mature female adults in the duff and weeds at the base of host trees. Other mite species, such as the European red mite, overwinter as eggs laid in the cracks and crevices of tree bark, small branches, and twigs.
Spider mites go through egg, larvae, and adult life stages. Due to a short life cycle, all stages can be present in the backyard tree during the growing season.
IPM Strategies for Spider Mites
- Encourage the natural predators of spider mites, such as predatory mites, lacewings, ladybeetles, and many other insect predators. Normally, these predators keep spider mites in check and no further control by the home orchardist is necessary. Often, spider mite outbreaks are triggered by in-season applications of certain insecticides that kill off spider mite predators.
- Maintain a tree in proper health, and avoid water stress, especially during the drier periods in the summer. Excess nitrogen applications can spark spider mite outbreaks. Dust accumulation on trees along dirt roads can also spark spider mite outbreaks.
- Proper control of broadleaf weeds such as mallow, bindweed, knotweed, and white clover in the area around a backyard tree can reduce spider mite populations by reducing alternate host plants and limiting mite shelters and movement.
- Periodically check your trees for an abundance of spider mites, their associated webs, and feeding damage. Remember their short life cycle and that populations can flare within a week during hot summer weather.
- In-season applications of horticultural oils and insecticidal soaps can reduce spider mite populations. Multiple applications may be necessary.
- Spider mites can be washed from the tree with a strong stream of water.
- Horticultural oil applications during dormant and delayed-dormant seasons can smother and kill those mites that overwinter as eggs in the fruit tree canopy.
- Horticultural oil applications during the late spring and summer can reduce the survival rates of mite eggs and immature mites, but good spray coverage of the tree canopy becomes more difficult to achieve. Avoid applying horticultural oil to trees that show signs of water stress or during excessively hot weather.
Aphids
A number of aphid species can become pests in nut and fruit trees. In apples, there is the rosy apple aphid and the green apple aphid. In cherries, there is the black cherry aphid. In peaches and nectarines, the green peach aphid, and in walnuts, the walnut aphid. All aphids, both as immature forms and adults, suck plant juices from their host trees and deposit copious amounts of sticky honeydew. Aphids often live in colonies in leaves that curl tightly about them. In addition to honeydew and curled leaves, high populations of aphids can cause fruit deformation, branch death, and premature leaf drop.
Aphid Life Cycle
- In general, most aphids found in fruit trees overwinter as eggs in bud axils and bark crevices of twigs. Some species can overwinter as adults on weed hosts, especially during mild winters.
- Most aphid species alternate host species and will leave their overwintering tree host for a summer host in late spring or early summer.
- In the spring, female aphids reproduce asexually, giving live birth to immature clones of themselves; therefore, aphid populations can build up very quickly in the spring.
- Most fruit aphids will develop winged forms in the late spring and early summer that will leave the tree host in search of a summer host of a different plant species.
- In the autumn, male and female aphids will return to their tree host, undergo sexual reproduction, and the female aphids will lay eggs that overwinter in these trees.
IPM Strategies for Aphids
- Encourage the many natural enemies of aphids, including wasp parasites, lacewings, ladybeetles, and many other insect predators. Normally, these parasites and predators keep aphids in check and no further control by the home orchardist is necessary. Occasionally, aphid populations can reach damaging levels early in the spring before their natural enemies can attack them on their overwintering hosts.
- Maintain your fruit tree in proper health, and avoid practices that can lead to excessive vegetative growth, like overpruning, overfertilizing, or overwatering.
- Horticultural oil applications during dormant and delayed-dormant seasons can smother and kill aphid eggs and newly emerged immature forms in the fruit tree canopy.
- In-season applications of insecticides can also reduce aphid populations. The best time to apply products (azadirachtin [neem oil], insecticidal soaps) is just before tree bloom and before aphid damage causes leaves to become severely curled, enclosing and protecting the aphid colonies from contact with pesticides.
- Aphids can even be washed from the tree with a strong stream of water.
Disease Management
Eastern Washington may be considered America’s fruitbasket since it leads the country in the production of apples, pears, and sweet cherries. One key factor that makes this status possible is the dry climate and abundance of sunshine that hampers the spread of plant diseases. It is necessary for residents in western Washington to be much more vigilant and proactive in disease management of fruit trees. Nevertheless, the disease management on both sides of the state is fundamentally the same.
The key to disease prevention is reducing the duration and amount of leaf moisture in the canopy of your home orchard.
Fruit trees should be located in areas of the home landscape that receive plenty of sun and adequate air circulation. Avoid planting fruit trees next to homes, hedgerows, and fences that not only restrict air movement but also provide excess shade and inhibit quick leaf-drying conditions. Proper pruning and training reduces the density of the tree canopy allowing for better air circulation, spray, and sunlight penetration into your tree. Proper weed management under your tree will also enhance canopy-drying conditions. Avoid irrigation systems that direct water into or over the fruit tree canopy.
Home orchardists need to scout their fruit trees throughout the growing season for signs and symptoms of diseased tree tissues. Most diseases in home orchards can be controlled through orchard sanitation, like promptly pruning and then destroying infected tree tissues to prevent the spread of the pathogen throughout the tree. Signs and symptoms of diseased tissues include branches with wilting, dying, or dead leaves; tree limbs with visible cankers; and rotting fruit in the tree or on the ground beneath the tree.
Keep in mind that a healthy tree is better able to resist plant diseases than a stressed tree. Excessive or inadequate watering practices can stress a tree and leave it susceptible to soilborne and airborne pathogens. Insect damage, wind, hail, or mechanical damage to the trunk or branches, or even pruning in the growing season during wet conditions, can provide pathogens an opportunity to circumvent the natural bark barrier and infect the tree.
Powdery Mildews
Different species of fungi cause powdery mildew in apples, cherries, and soft fruits. Often the fungus overwinters in infected buds and vigorous new shoots of various hosts. Early in the season, the fungus spreads and infects new tissues, especially leaves and young, vigorous shoots. Initially, leaves or shoots are covered with a white, dusty, or powdery coating of fungal mycelium and spores. These affected tissues will become curled, distorted, and brittle, and may die. Later in the season, secondary spread of powdery mildew can infect more leaves, twigs, and fruit. Infected fruit will often develop a netlike russet on the surface of the fruit.
- Choose less susceptible varieties. Granny Smith, Cripps Pink, Honeycrisp, and Golden Delicious are susceptible cultivars for apple powdery mildew. Moderately resistant varieties include Gala, Fuji, Autumn Glory, Red Delicious, Ambrosia, and Nittany.
- Prune out and destroy these infected tissues early in the spring or as soon as you see them.
- Sulfur fungicides are effective on both apple and cherry powdery mildew. These fungicides can be applied prior to bloom and every seven to ten days until trees are fully leafed out.
- Potassium bicarbonate, neem oil, and mineral oil products also have activity on powdery mildews.
Apple and Pear Scab
Apple and pear scab are caused by different fungi, but their symptoms and management are similar. Apple scab is considered one of the most serious diseases of fruit on the west side of the state. It is less common on the east side. The fungus overwinters on dead apple leaves and fruit on the ground. Raking up fallen leaves and fruit in the autumn can be helpful in managing scab. Early in the spring, rainfall initiates spore formation, and air currents can carry these spores to young, developing tissues. Apple and pear scab is worse during wet springs. Black, sooty lesions form on infected leaves and flowers in the early spring. After petal fall, fruit can become infected, resulting in superficial pinpoint scars, scabby lesions, and fruit distortion.
- In scab-prone areas choose resistant varieties (e.g., Crimson Crisp, Enterprise, Freedom, Goldrush, Jonafree, Liberty, Pristine, Redfree, Scarlet O’Hara, Sundance, Williams Pride).
- Rake up leaves and destroy fallen leaves or chop with a mower to encourage quick break down of the leaves which host the pathogen over the winter.
Avoid irrigation that wets the tree canopy, especially when warm spring temperatures exceed 60°F.
- Space trees well and prune to encourage air flow.
- It is critical to control scab early in the season, from bud emergence through the second spray after blossom petals fall (second cover period). If scab infection can be prevented during the time all the ascospores are discharged from the fruiting bodies in the fallen leaves, the disease cycle is broken and no further source of infection remains for the rest of the season. If the cycle is not controlled, however, and leaf and fruit infection do occur, then conidia are produced on these lesions and scab will remain a constant threat all season whenever wet weather occurs. Some fungicides available to home orchardists for scab control include wettable sulfurs and Captan (in mixtures). In dryer climates, a scab control program is not generally needed.
Fire Blight
Fire blight is a serious bacterial disease of apples and pears. The bacterium overwinters in tree cankers caused by infections during the previous year. Scouting for, and removing, all tree cankers during the dormant season is the best means to keep this disease from spreading. Early in the spring, fire blight bacteria will ooze from these cankers and can be carried by blowing rain or insects to adjacent trees or new tissues on the same tree. Environmental conditions like warm, wet weather during the bloom period promotes fire blight, and so this disease is much more prominent on the west side of the state.
To infect a new tree, the bacteria must enter the tree through fruit blossoms or fresh wounds that can be caused by wind damage to young shoots. Infected apple tissues will develop a “water-soaked” appearance, then wilt, turn brown, and die. Infected pear tissues will appear to melt, and tissues will turn black as if scorched by fire.
If weather conditions are wet and warm during flower bloom, home orchardists should routinely inspect their trees for symptoms of tree infection. If an infection occurs in your apple or pear trees, the best thing to do is to cut out the infected tissue as soon as possible—at least a foot back from the visible signs of infection. Apple varieties and apple rootstocks vary considerably in their resistance to fire blight. Fire blight bacteria can quickly circulate through the tissues of young, vigorous, non-bearing apple trees, killing the apple rootstock far in advance of symptoms.
- Remove any overwintering cankers which will be the source of new infections.
- During warm, wet weather, protect blooms. Copper octanoate (e.g., Captain Jack’s Copper Fungicide; Soap Shield Flowable Liquid Copper Fungicide) has good efficacy at reducing fire blight infections. Application during periods with slow drying times can create speckled marks on the skin of fruit.
- Inspect trees daily one to two weeks after a warm, wet period during bloom. If an infection occurs, cut back 12–18 inches from the visible signs of infection as quickly as possible. Dispose of infected tissue in the garbage or by burning.
Coryneum Blight or “Shot Hole”
This fungus affects peaches, nectarines, apricots, and sometimes cherries. Coryneum blight overwinters in infected tree buds and twig lesions and can be spread by splashing water during warm weather in the early spring months. Bud and twig infections appear as small, purplish spots that rupture, releasing gum and fungal spores. Infected leaves develop small, round, tan-to-purplish spots that will drop from the leaf when tree conditions dry out (hence the name “shot hole”). Infected fruit can develop small, red spots and exude gummy material.
Fruit buds can be killed off, while large cankers can form and girdle older fruiting wood.
- Remove infected twigs and branches by pruning and destroying wood.
- To control Coryneum blight, copper sprays should be applied in the fall at 50% leaf drop, and again at shuck (opens in new window) fall in the spring. (The shuck is the papery sheath surrounding the newly developing fruit. As the new fruit expands, the shuck first splits, then falls.)
Peach Leaf Curl
This is a fungal disease that affects peaches and nectarines during wet springs and is prevalent on the west side of the state. Fungal spores overwinter on tree bark and twigs, and infection occurs just as the leaf buds begin to swell in the early spring. Later in the spring, infected leaves turn yellow and reddish, leathery, puckered, and tightly curled. Entire shoots can become affected and fruit can develop reddish wartlike growths.
- Two applications of copper-based fungicide sprays are recommended for peach leaf curl control; one application at 50% leaf fall in October, and another application at the delayed-dormant stage.
Bacterial Canker
While bacterial canker affects all stone fruits, it is most serious on sweet cherries. The most frequently encountered symptoms are branch and trunk cankers and excessive gum exudates. In the early spring, infected buds will fail to open, then turn brown and exude gum. Bacterial cankers can grow and girdle entire limbs and young trees. Bacterial canker is spread by wind and water, and in the late fall may infect trees through leaf scars. During hot summer weather, the bacteria dies back and the cankers do not resume growth until cool weather returns. Home orchardists should prune out infected and visibly affected branches in August when the bacteria are less likely to be spread through pruning tools and wounds.
To control bacterial canker, copper fungicide sprays are recommended in October at 50% leaf fall, and again in January.
Vertebrate Pests
Birds
A number of bird species like starlings, robins, and several songbirds can become pestiferous when they feed directly on ripe, or nearly ripe, tree fruit. Visual and audio scare tactics (like mylar tape, shiny pie tins, ceramic predatory birds, distressed bird calls) or bird netting draped over fruit trees and anchored to the ground or tied closed to the trunk or limbs to prevent birds from getting under or inside the net are the only methods available to home orchardists to suppress bird damage. None of these methods alone will work for extended periods of time. It is best to alternate two or more methods.
Rodents
Voles (field or meadow mice) and rabbits will feed on the bark at the base of fruit and nut trees during the winter months and can sometimes girdle and kill young trees. Gophers can gnaw and feed on the root systems of fruit and nut trees to the point of removing the entire root system. The best management is to remove as much of the vertebrate’s habitat as possible. Weed management at the base of the tree and throughout the yard can reduce vole populations. Remove mulches or grass thatches from the base of fruit trees particularly in late fall and during the winter. Home orchardists can disrupt rodent habitat by tilling the soil around the tree periodically to destroy their tunnels. Home orchardists can also place a cardboard or plastic mesh tree collar around the trunk to protect the young trees from the feeding damage and girdling caused by voles and rabbits. Be sure to bury the collar a couple inches below the ground surface to discourage voles from tunneling under the collar. In Washington, the use of all body-gripping traps is illegal, although mousetraps are exempted.
When baited with fruit or peanut butter, mousetraps set in underground tunnels can trap voles. See Chapter 20: Vertebrate Pest Management for more information on control methods for rodents.
Deer
Deer are herbivores and naturally feed on the succulent vegetative growth on fruit and nut trees. They can completely defoliate young trees in the winter and early spring. Thus, protection is important for trees that are adjacent to wooded lots that harbor deer. In these situations, approved deer fencing eight feet in height is the best method to exclude deer from your trees. Erecting a wire cage around individual trees also works to prevent deer damage. Hanging soap, human hair, animal scents, or other deer repellents can help prevent damage for a short time. It is best to utilize several methods at the same time.
Harvest and Handling
Nursery catalogs, Extension publications, and other sources give a general idea about when particular varieties ripen. However, ripening times may vary from year to year depending on the weather. Apples with codling moth damage drop about 1 to 1½ weeks before the crop is ripe.
The best and most time-tested method of judging when to pick fruit is the taste method. When enough starch has been converted to sugar and the flavor is developed, the fruit is ready to eat. Remember, fruit continues to ripen in cold storage, so pick fruit before it is ripe if you intend to store it.
Fruit changes color as it ripens. The base color, or ground color, is the color underneath the red striping or blush of peaches, apples, pears, and cherries. In most fruits, the fruit is ripening when the ground color turns from greenish to yellowish. The surface color may develop before the fruit actually is mature.
If storing fruit, cool it as soon as possible after picking. The sooner heat is removed from freshly picked fruit, the longer the fruit will keep in decent condition. Handle fruit intended for storage very gently. Bruises and wounds allow pathogens to infect the fruit.
Further Reading
WSU Extension Publications (opens in new window).
Antonelli, A.L., and E.H. Beers. 2000. Insect and Mite Control in Home Orchard Tree Fruits and Nuts (opens in new window). Washington State University Extension Publication EB0932. Washington State University.
Bush, M.R., M. Klaus, A. Antonelli, and C. Daniels. 2005. Protecting Backyard Apple Trees from Apple Maggots (opens in new window). Washington State University Extension Publication EB1928E. Washington State University.
Grove, G., and C.-L. Xiao. 2005. Apple Scab (opens in new window). Pacific Northwest Extension Publication PNW582. Washington State University.
Kaur, N. 2022. Pacific Northwest (PNW) Insect Management Handbook (opens in new window). Oregon State University Extension Publication MISC0047. Oregon State University.
Moulton, G.A., and J. King. 2008. Fruit Handbook for Western Washington: Varieties and Culture (opens in new window). Washington State University Extension Publication EB0937. Washington State University.
Olsen, J. 2011. Training and Pruning Your Home Orchard (opens in new window). Pacific Northwest Extension Publication PNW400. Washington State University.
Peachy, E. 2022. Pacific Northwest (PNW) Weed Management Handbook (opens in new window). Oregon State University Extension Publication MISC0049. Oregon State University.
Probst, C., and G. Grove. n.d. Cherry Powdery Mildew (opens in new window). Washington State University Tree Fruit Research and Extension. Washington State University.
Pscheidt, J.W., and C.M. Ocamb. 2021. Pacific Northwest (PNW) Plant Disease Management Handbook (opens in new window). Oregon State University Extension Publication MISC0048. Oregon State University.
Sallato, B., T. DuPont, and D. Granatstein. 2019. Tree Fruit Soil Fertility and Plant Nutrition in Cropping Orchards in Central Washington (opens in new window). Washington State University Extension Publications EM119E. Washington State University.
Sallato, B., G. Grove, and A. Johnson. 2021. Bacterial Canker in Washington Sweet Cherries (opens in new window). Washington State University Extension Publication FS366E. Washington State University.